1 Shiny and the Web
shiny (Chang et al. 2021) allows the development of web applications with R in minutes. Let’s face it: this is quite mind blowing. While this may not be a production-ready app, it will still be a fully functional, working prototype. Believe me, doing a web application with pure HTML, CSS and JavaScript is more difficult, especially for someone with a non-web developer background.
We first load shiny:
1.1 Shiny generates HTML code from R
I propose to warm up with a little exercise:
- Copy and paste this code to the R console and click enter.
h1("Hello World")- What do you observe?
The output is HTML code. For an R developer, being able to generate HTML code from R allows the developer to remain focused on the main task instead of the web development burdens.
Most of the time, a production Shiny app requires custom elements that are not contained or hidden in Shiny’s core.
Is a Shiny app less customizable than a classic web app? Not at all! Under the hood, Shiny has its own engine to build HTML tags, through R, meaning that all HTML elements are available. You may also include any custom JavaScript code and styles with CSS. In Chapter 2, we will shed the light on the underlying mechanisms that allow you to create HTML from R code.
Huumm … I feel you don’t believe me … OK, fine … let me show you something!
1.2 Be a DJ
What you see below in Figure 1.1 is a Shiny app. Yes, I swear!

FIGURE 1.1: Shiny app with the Pioneer CDJ 2000 NXS2 professional gear look.
If you are still not convinced, have a look at the below demonstration.
### RUN ###
# OSUICode::run_example(
#  "intro/dj-system",
#   package = "OSUICode"
# )
Wait until the blue waveform appears on the player’s screen. Then click on the green play button to stop and start the music (the space key is also supported). Besides, the waveform is interactive, thereby allowing you to browse through the current track. The rotating part (central part of the jog wheel) indicates the read position and other useful information.
What is this magic? Under the hood, this Shiny app only consists of:
- 111 lines of CSS.
- 29 lines of JavaScript code.
- 2 png images (dj gear + rotating wheel).
- 36 lines of R code, including the wavesurfer htmlWidget package to display the waveform.
- Few custom HTML tags.
- And is inspired by this article.
We must acknowledge it is still far from offering the same features as the original professional DJ gear, but it is a fairly good start!
As you noticed, you will have to acquire a bit of HTML, CSS and JS knowledge to reach the same level of result. Guess what? This is exactly the purpose of this book!
Are you ready to become a Shiny wizard?
1.3 HTML 101
This chapter provides a short introduction to the three main web languages, namely HTML, CSS and JavaScript. The following content is crucial to understand Chapter 2 about HTML generation from R.
1.3.1 HTML basics
HTML stands for (Hypertext Markup Language). An HTML file contains tags that may be divided into two types:
- Paired tags, where the text is inserted between the opening and the closing tag.
- Self-closing tags.
<!-- paired-tags -->
<p></p>
<div></div>

<!-- self-closing tags -->
<iframe/>
<img/>
<input/>
<br/>
Tags may be divided into three categories, based on their role:
-
Structure tags: they constitute the skeleton of the HTML page (
<title></title>,<head></head>,<body></body>). - Control tags: script, inputs and buttons (and more). Their role is to include external resources, provide interactivity with the user.
- Formatting tags: to control some of the wrapped text properties like its size and font.
Inside an HTML document, tag elements obey the box model, which briefly defines the element internal margins (padding), margins (space between multiple elements), the width and height. Elements are displayed according to the flow layout model (Figure 1.2). We distinguish block and inline elements:
-
Block elements may contain other tags and take the full width (block or inline).
<div></div>is the most commonly used block element. All elements of a block are printed on top of each other. -
Inline elements (
<span></span>,<a></a>) are printed on the same line. They cannot contain block tags; for instance<span><div><p>Hello World</p></div></span>is not valid, but may contain other nested inline tags like<a><img/></a>(creates a clickable image pointing to a specific location). - Inline-block elements allow one to insert a block element in an inline.
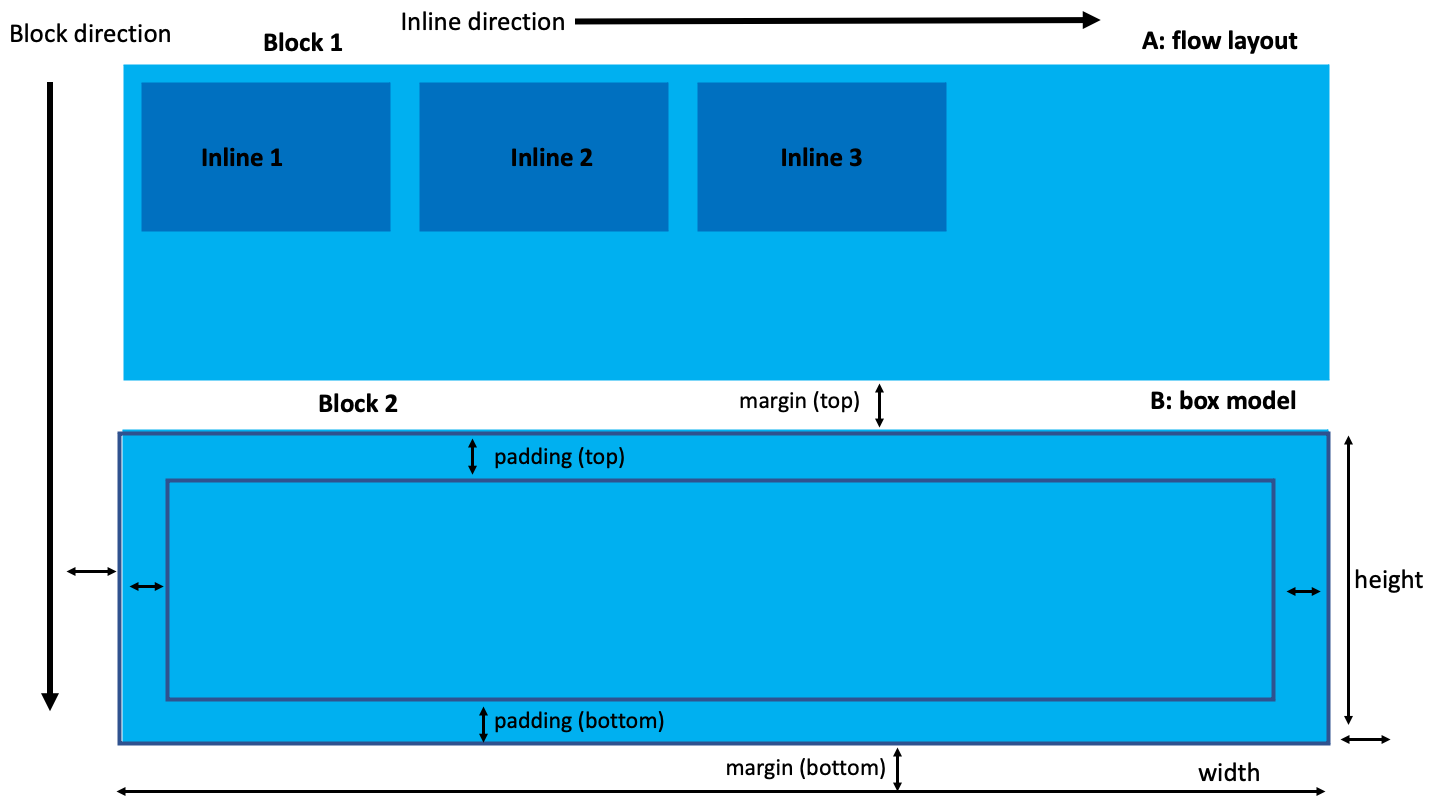
FIGURE 1.2: Flow layout and box model in an HTML document.
Importantly, <div> and <span> are generic tags and don’t have any semantic meaning, contrary to <header> and <footer>, which allow developers to structure the HTML page, as depicted by Figure 1.3. If you happen to insert a structural tag like <aside></aside> in a basic HTML document, it will not automatically create a sidebar. Instead, it helps to maintain a readable and meaningful code. If you wish to give a proper structure to the page, let’s meet below in section 1.3.5.1 and later in Chapter 6. <div> and <span> are used whenever no semantic block and inline container may be applied, respectively.
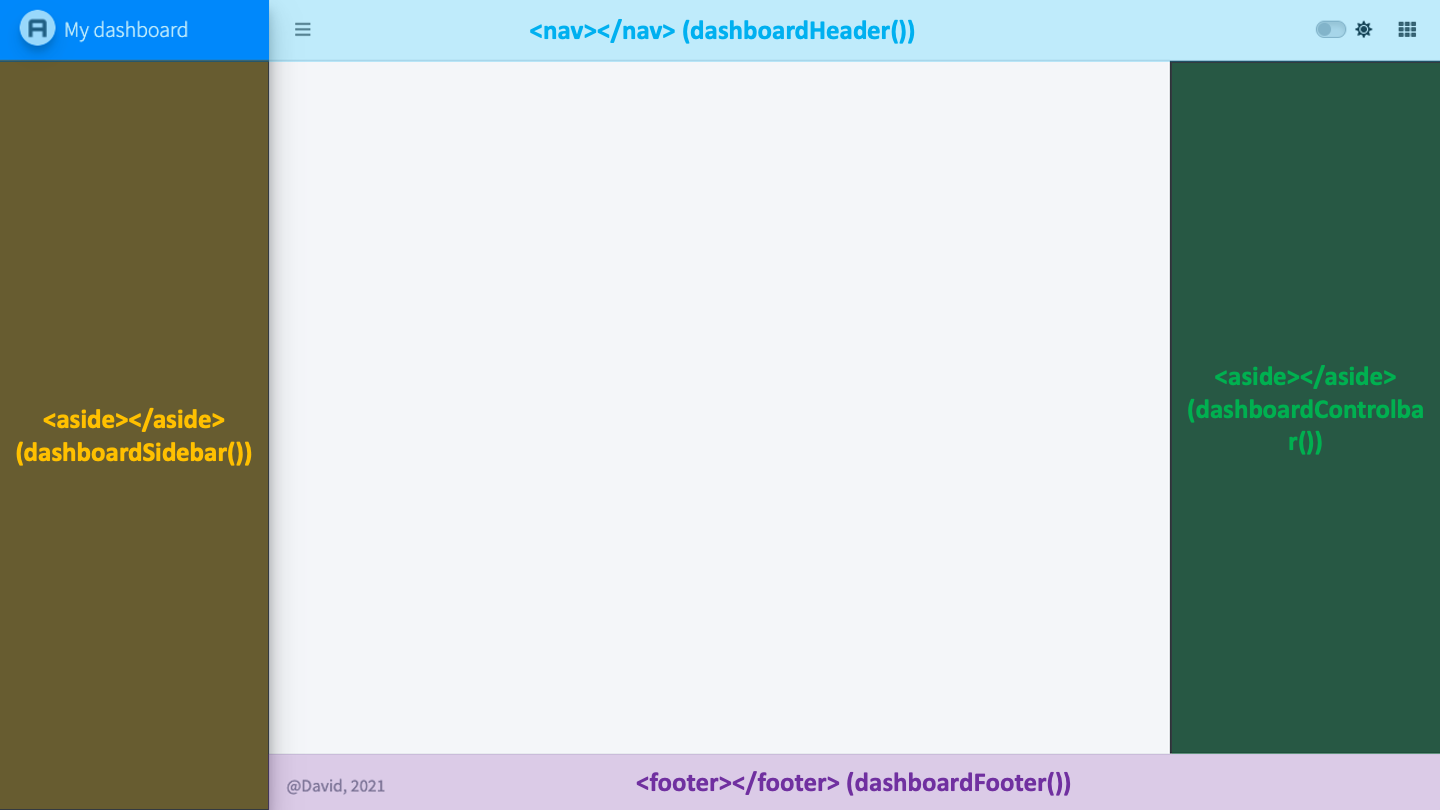
FIGURE 1.3: Example of semantic tags in the {bs4Dash} Shiny Bootstrap 4 dashboard template.
1.3.2 Tag attributes
Attributes are text elements allowing developers to specify some tag properties. For instance for a link tag (<a></a>), we actually expect more than just the tag itself, such as a target url and how to open the new page. In all previous examples, tags don’t have any attributes. Yet, there exists a large range of attributes, and we will only see two of them for now (the reason is that these are the most commonly used in CSS and JavaScript):
- class that may be shared between multiple tags.
- id that must be unique.
<div class="awesome-item" id="myitem"></div>
<!-- the class awesome-item may be applied to multiple tags -->
<span class="awesome-item"></span>
Both attributes are widely used by CSS and JavaScript to apply a custom style to a web page (see Chapter 10). Class attributes apply to multiple elements, however the id attribute is restricted to only one item.
Interestingly, there is another attribute category, know as non-standard attributes like data-toggle. We see them later in the book in Chapter 17.
1.3.3 The simplest HTML skeleton
An HTML page is a collection of tags which are interpreted by the web browser step by step. The simplest HTML skeleton may be defined as follows:
<!DOCTYPE HTML>
<html lang="en">
  <head>
  <!-- head content here -->
    <title>A title</title>
  </head>
  <body>
  <!-- body content here -->
  </body>
</html>-
<html>is the main wrapper. -
<head>and<body>are the two main children.-
<head>contains dependencies like styles and JavaScript files (but not only). -
<body>contains the page content and it is displayed on the screen. JavaScript files are often added just before the end of the<body>.
-
Only the body content is displayed on the screen. W3C validation (https://validator.w3.org/#validate_by_input) imposes at least a title tag in the head section and a lang attribute to the html tag.
Let’s write the famous Hello World in HTML:
<!DOCTYPE HTML>
<html lang="en">
  <head>
    <!-- head content here -->
    <title>A title</title>
  </head>
  <body>
    <p>Hello World</p>
  </body>
</html>
In order to preview this page in a web browser, you have to save the above snippet to a script hello-world.html and double-click on it. It will open with your default web browser.
Below is how we would do it with a Shiny app:
ui <- fluidPage(p("Hello World"))

server <- function(input, output, session) {}

shinyApp(ui, server)
From outside, it looks identical! Are you sure about this? Let’s meet in Chapter 3 to have a deeper look.
1.3.4 About the Document Object Model (DOM)
The DOM stands for “Document Object Model” and is a convenient representation of the HTML document. If we consider the last Hello World example, the associated DOM tree may be inspected in Figure 1.4.
1.3.4.1 Visualizing the DOM with the developer tools
The developer tools are a crucial way to work with websites, and particularly customize Shiny apps. As shown in Figure 1.4, here are example of actions you will be able to perform: inspect the HTML structure of the page, debug JavaScript code as demonstrated in 10.6, inspect served files (static assets like CSS, JS, images), run performances audit 24, inspect websocket activity (section 11) and many more.
In this section, we restrict the description to the first panel (Elements) of the developer tools. This feature is available in all web browsers; however, for demonstration purposes, we will only focus on the Chrome DevTools. It may be opened:
- After a right click and selecting inspect.
- After clicking on ctrl + shift (Maj) + I for Windows, option + command + I on Mac.
In the following:
- Open the hello-world.html example with Chrome.
- Right-click to open the HTML inspector (developer tools must be enabled if it is not the case).
The HTML inspector is a convenient tool to explore the structure of the current HTML page. On the left-hand side, the DOM tree is displayed where we clearly see that <html> is the parent of <head> and <body>. <body> has also one child, that is <p>. We may preview any style (CSS) associated with the selected element on the right panel as well as Event Listeners (JavaScript), which will be discussed later in the book.
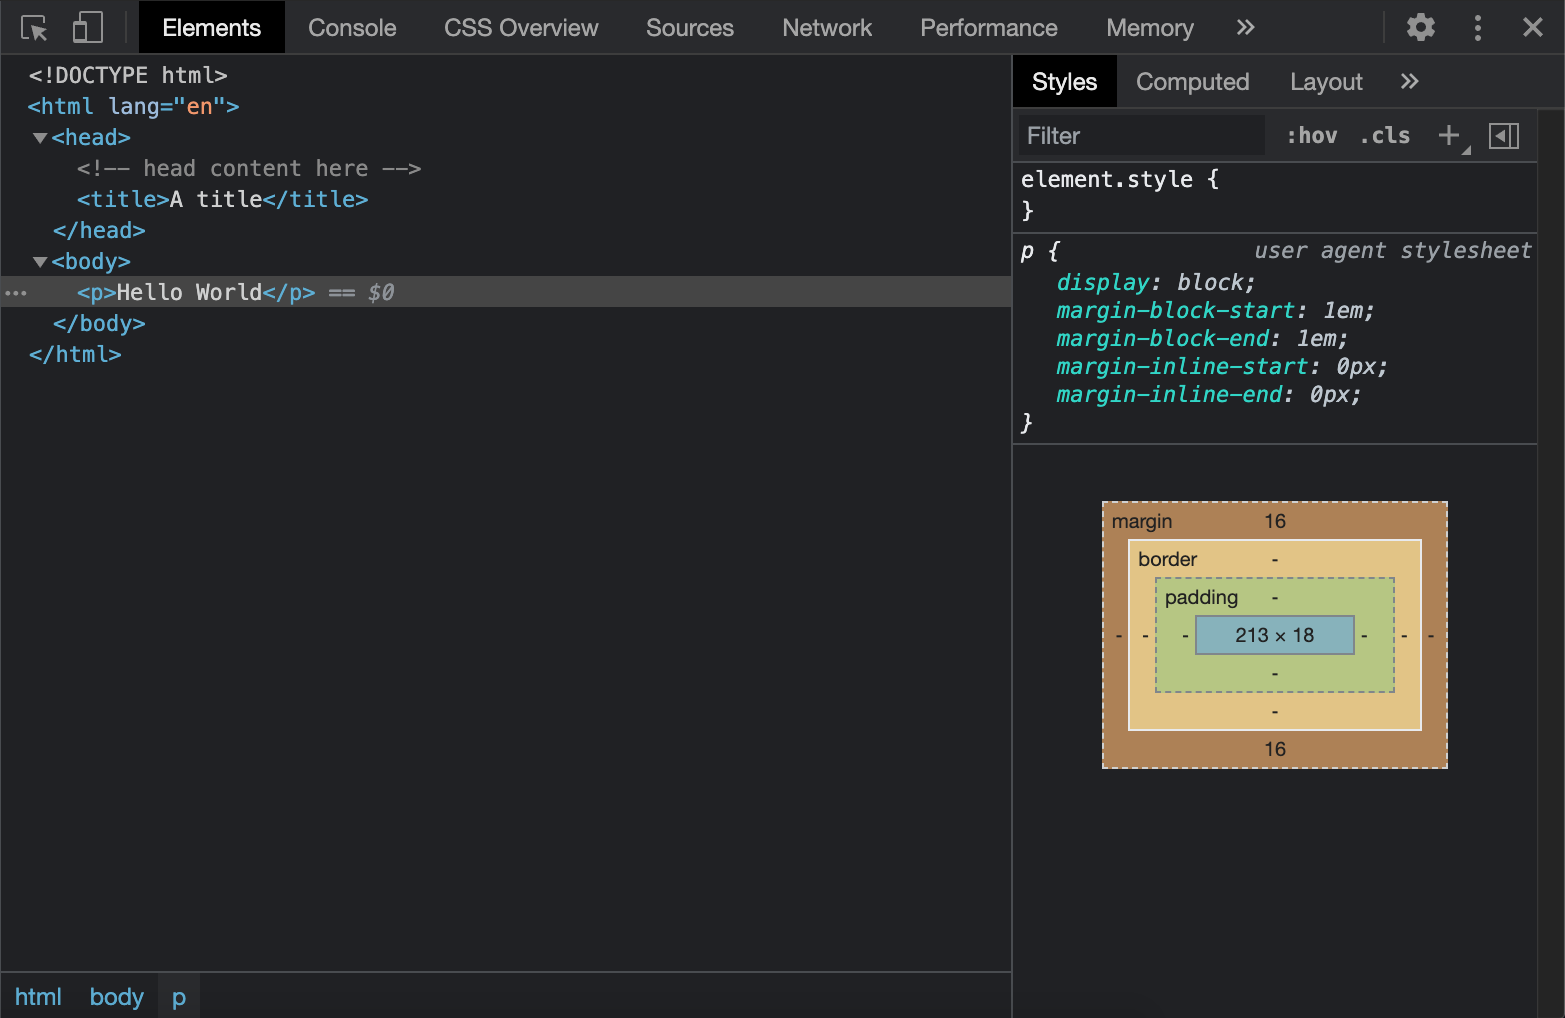
FIGURE 1.4: Inspection of the DOM in the Hello World example.
1.3.4.2 Web Inspector 101
In the following, we enumerate key features of the inspector Elements tab. In addition to exploring the HTML structure, the inspector allows you to:
- Dynamically change CSS at run time.
- Debug JavaScript code (put break points, …).
- Run JavaScript code from the console.
- Monitor any error or warning that may prevent your app or website from properly working.
Another important feature is the ability to switch between different devices, especially mobile platforms and do a global performance audit with Google LightHouse. The book from Colin Fay et al (Fay et al. 2020). details the most relevant elements for Shiny app development.
We propose a set of quick exercises to review the most important HTML inspector capabilities that are commonly needed during Shiny app customization. We consider the app already defined above:
ui <- fluidPage(p("Hello World"))

server <- function(input, output, session) {}

shinyApp(ui, server)
1.3.4.2.1 Exercise: Altering the DOM structure
- Run the
Hello Worldapp, right-click on the only text element and select inspect. - Notice we could have done similarly by clicking on the very top-left corner
Inspecticon (command + maj + C for Mac) and hovering over theHello Worldtext.
You should see a result similar to Figure 1.5, the Inspect icon being in blue. The selected element is highlighted, and a white box displays the main CSS properties like text-color, font-size, margins, as well as accessibility parameters.
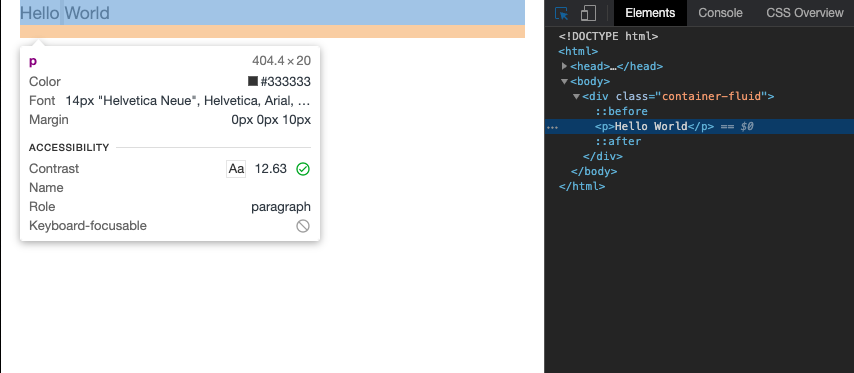
FIGURE 1.5: Inspection of the p element in the Hello World example.
- In the
Elementspanel, double-click between the<p>and</p>tags to edit the current text. Press enter when finished. - Let’s add some children to our
ptag. Right-click and select theEdit as HTMLoption. You may enter any valid HTML code inside. Don’t forget about some rules relative to inline and block tags (inline tags cannot contain block tags!!!).
As depicted in Figure 1.6, we could have done a right click on the p tag to display more options like:
-
Add/edit an attribute. You may try to add a class
class="awesome-text"and an idid="only-text". -
Delete the current tag (the
deletekey would do it as well). - Copy the element with all nested elements.
- Only copy the outside HTML (ignore nested elements).
-
Extract the CSS selector or JavaScript path (code to select the element):
body > div > panddocument.querySelector("body > div > p"), respectively. These two features are extremely handy as they save you time. Try to copy and pastedocument.querySelector("body > div > p")in the JavaScript console at the bottom of the inspector window. It returns the selected HTML element, as shown in Figure 1.7! Amazing isn’t it? - Hide the element.
-
Force a specific state. For instance buttons may be
active,inactive. We talk more about this in section 6.2.4.3.2.
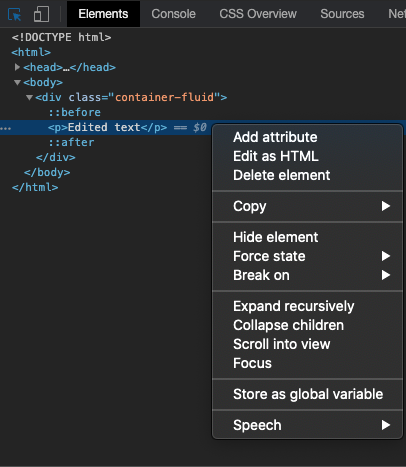
FIGURE 1.6: Modifications of the p element in the Hello World example.
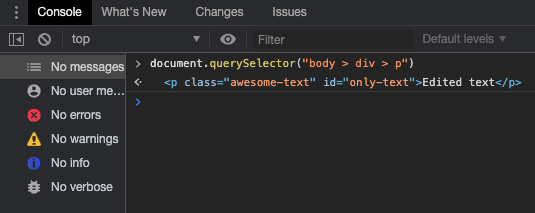
FIGURE 1.7: Extract the JavaScript path to select the p element.
Whenever you are looking for a specific tag in a more complex page, the search tag option is a game changer (Ctrl + F on Windows, command + F within the Elements tab on a Mac). See Figure 1.8.
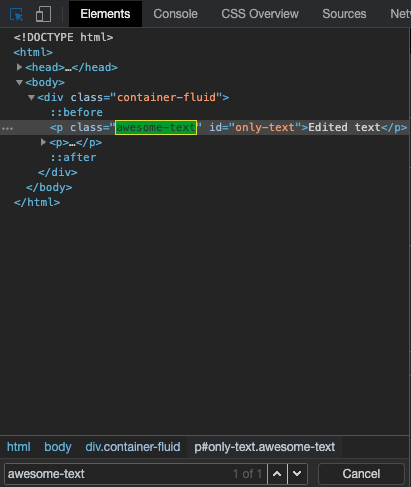
FIGURE 1.8: Search for element having the awesome-text class.
Finally, the inspector toolkit allows you to reorder DOM elements with a rather intuitive drag and drop feature. I invite the reader to take some time to experiment with those features as they will be crucial in the next chapters, particularly Chapter 6.
1.3.5 Preliminary introduction to CSS and JavaScript
To introduce this section, I propose looking at the very first website, early in the 1990’s (August 1991 exactly). From an aesthetic point of view (see Figure 1.9), this is far from what we can observe today as shown in Figure 1.10.
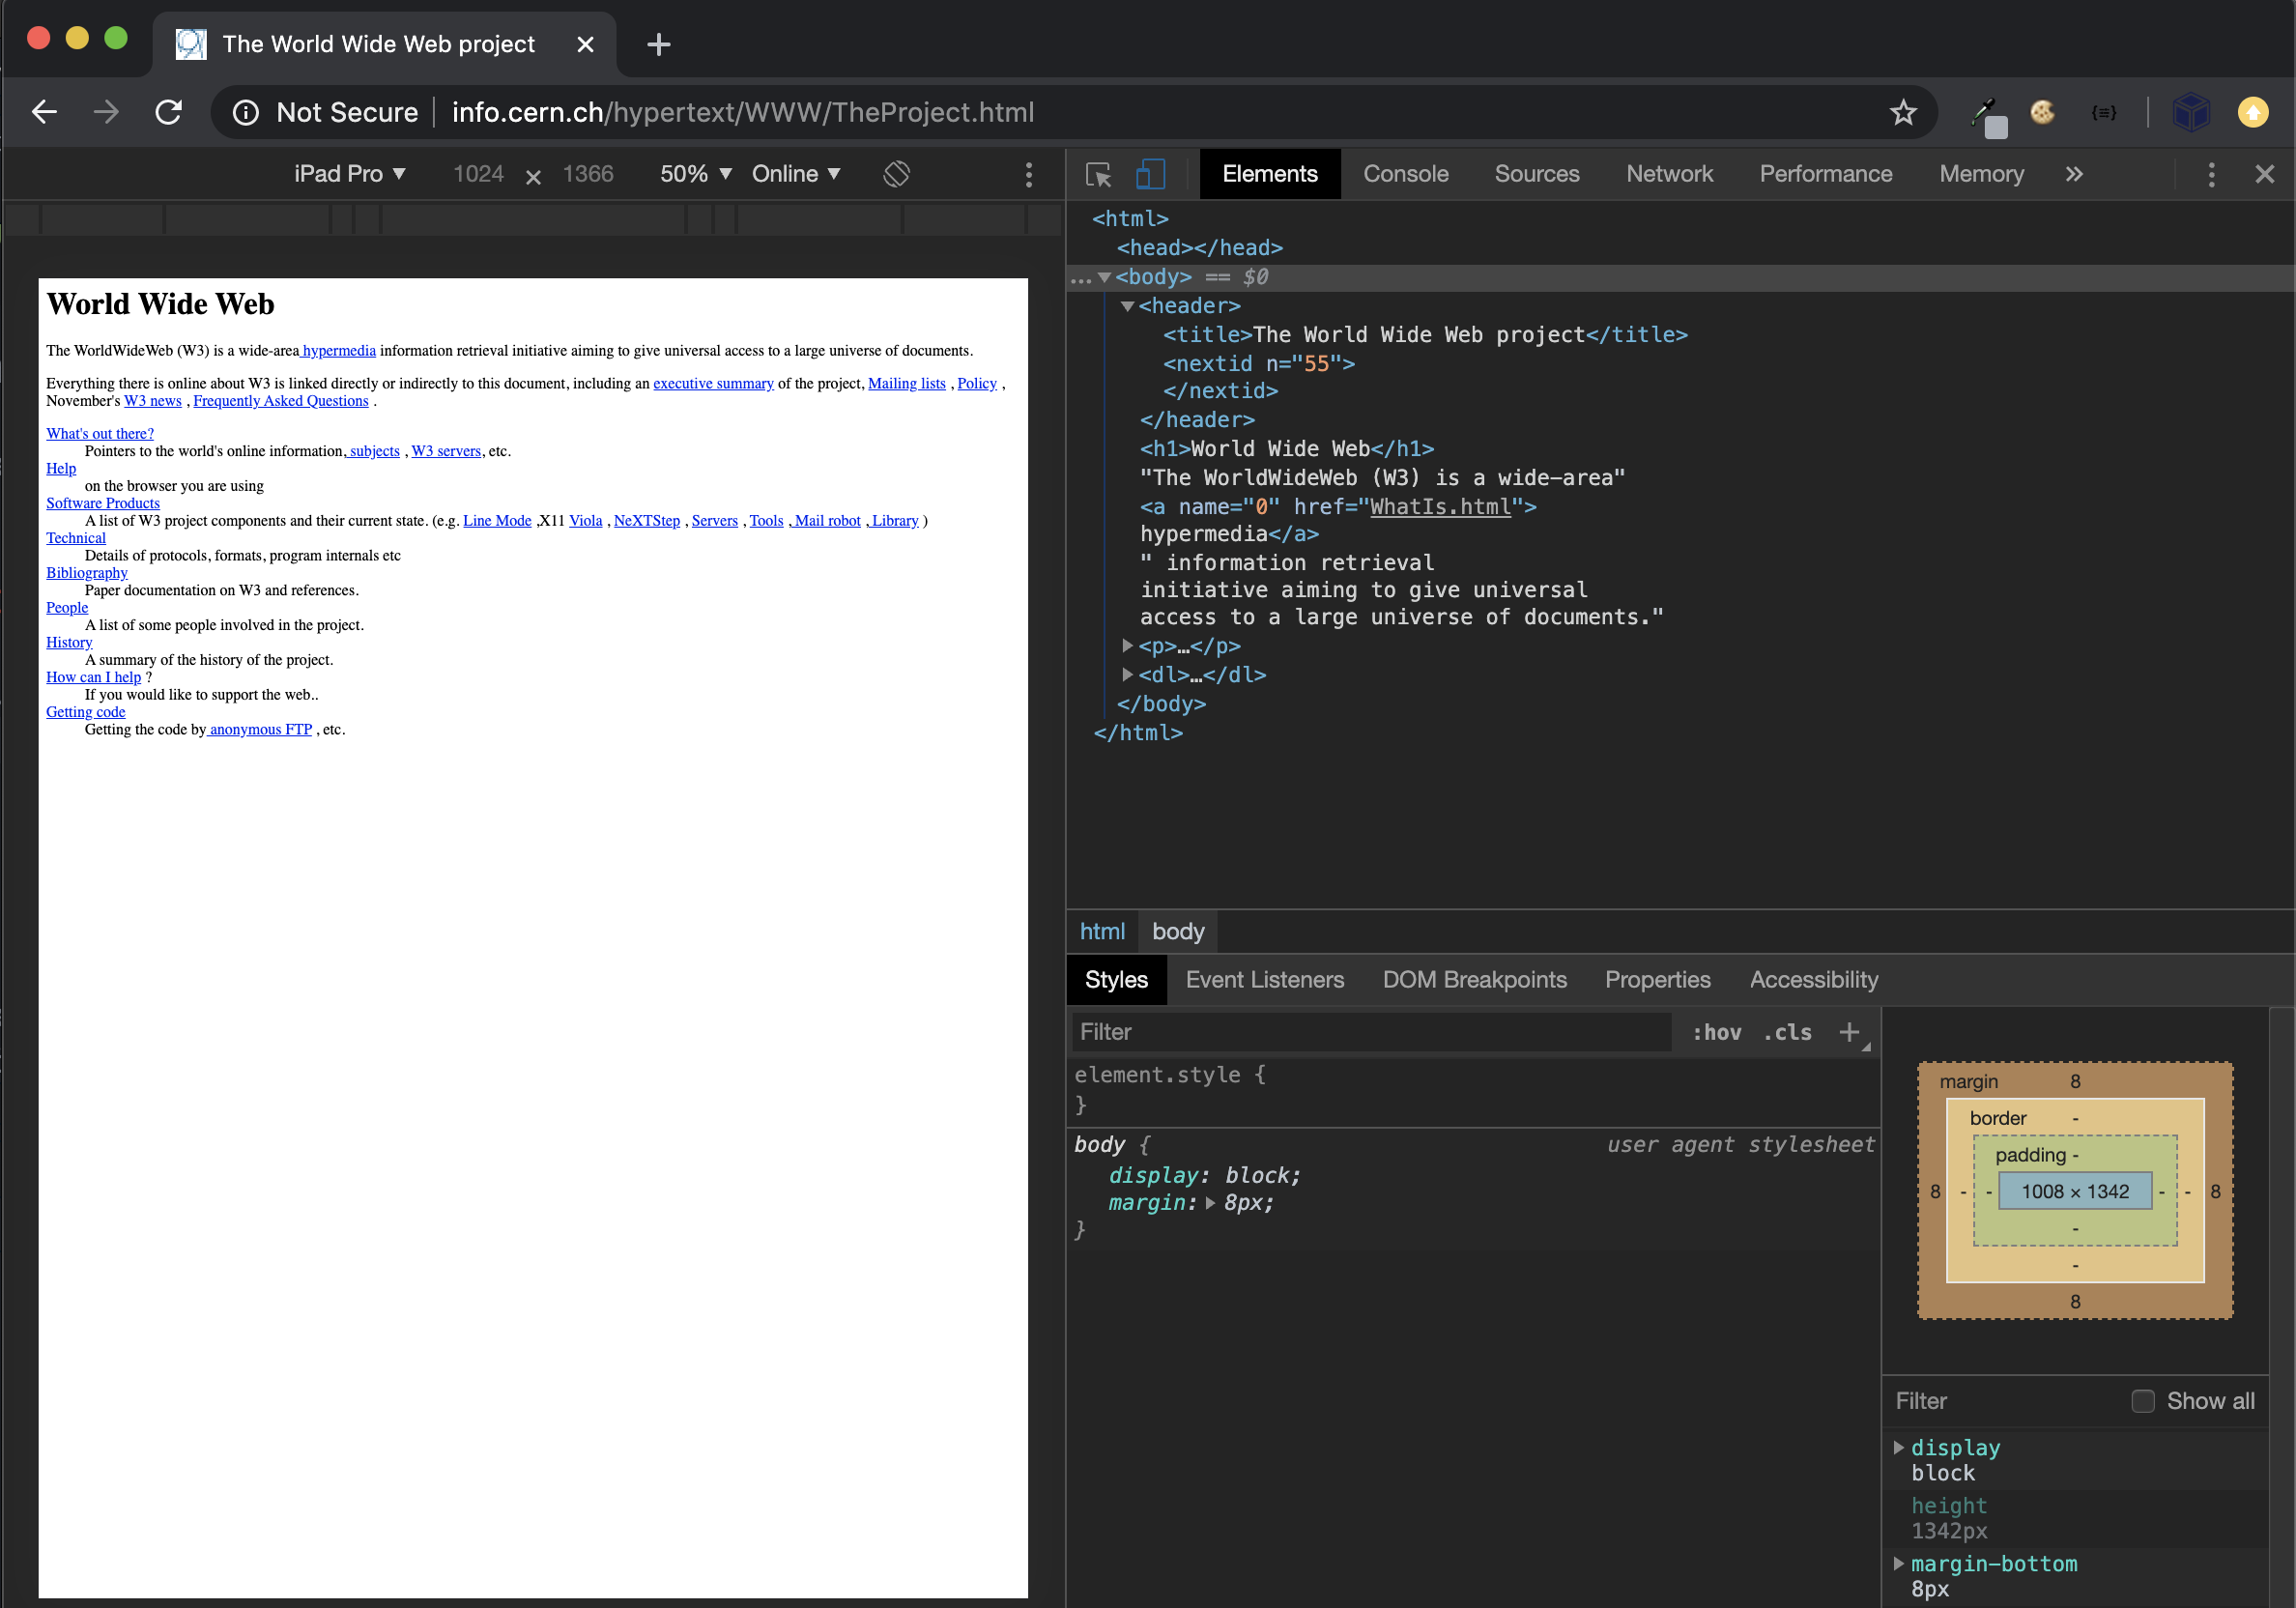
FIGURE 1.9: World Wide Web website.

FIGURE 1.10: RinteRface website: (https://rinterface.com).
How can we explain that difference? One of the main reasons is the absence of CSS (Cascading Style Sheets) as the first CSS release only appeared in December 1996, that is five years later than the first web site publication. CSS allows you to deeply customize the appearance of any web page by changing colors, fonts, margins and much more. We acknowledge that the role of JavaScript cannot be demonstrated through the previous example. Yet its impact is as important as CSS, so that it is now impossible to dissociate HTML, CSS and JavaScript.
1.3.5.1 HTML and CSS
CSS changes the style of HTML tags by targeting specific classes or ids. For instance, if we want all p tags to have red color we use:
p {
  color: red;
}
To include CSS in an HTML page, we use the <style> tag as follows:
<!DOCTYPE HTML>
<html lang="en">
  <head>
    <style type="text/css">
      p {
        color: red;
      }
    </style>
    <title>A title</title>
  </head>
  <body>
    <p>Hello World</p>
  </body>
</html>
You may update the hello-world.html script and run it in your web browser to see the difference. The example may be slight but shows how we may control the look and feel of the display. In a development context, CSS files may so big that it is better to include them in external files.
Let’s build a Shiny app that does similar things. As a reminder, you may use tags$style to include small pieces of CSS in your app:
ui <- fluidPage(
  tags$style("p { color: red;}"),
  p("Hello World")
)

server <- function(input, output, session) {}

shinyApp(ui, server)
Be prepared! In Chapter 6, we’ll dive into CSS and expose best practices.
1.3.5.2 HTML and JavaScript
JavaScript is a game changer to give life to your web apps. It is an object-oriented programming (OOP) language allowing interaction with the HTML elements.
In the following example, we defined the changeColor function that targets the element having hello id and change its color property to green. The HTML element has an onClick attribute that triggers the changeColor function each time the button is clicked.
<!DOCTYPE HTML>
<html lang="en">
  <head>
    <style type="text/css">
      p {
        color: red;
      }
    </style>
    <script language="javascript">
      // displays an alert
      alert('Click on the Hello World text!');
      // change text color
      function changeColor(color){
        document.getElementById('hello').style.color = color;
      }
    </script>
    <title>A title</title>
  </head>
  <body>
    <!-- onclick attributes applies the JavaScript
    function changeColor define above -->
    <p id="hello" onclick="changeColor('green')">Hello World</p>
  </body>
</html>
In a few lines of code, you can change the color of the text and this is only the beginning.
We see below that the process is not dramatically different in a Shiny app. We wrap our custom JavaScript in the tags$script function, as below:
ui <- fluidPage(
  tags$script(
    "alert('Click on the Hello World text!');
     // change text color
     function changeColor(color){
       document.getElementById('hello').style.color = color;
     }
    "
  ),
  p(id = "hello", onclick="changeColor('green')", "Hello World")
)

server <- function(input, output, session) {}

shinyApp(ui, server)
If you are not already familiar with JS, Chapter 10 provides some basic knowledge to unleash interactivity in your Shiny apps.
1.4 Summary
As demonstrated above, developing a Shiny app is basically building a website from R and is completely compatible with the web languages, that is, HTML, CSS and JavaScript. In the next chapter, we’ll discover how to manipulate HTML tags from R with the help of htmltools (Cheng, Sievert, et al. 2021), to seamlessly customize any existing Shiny element but also import any external HTML template.