11 Communicate between R and JS
This chapter aims at untangling what are the main mechanisms behind a Shiny app responsible for driving the R/JavaScript communication, which is quite frankly mind-blowing. Understanding this is crucial if you aim at developing your very own Shiny input widgets.
This is a feature leveraging the httpuv package. The HTTP protocol is not very convenient chaining numerous requests since the connection is closed after each request, as previously stated in section 5.2. If you already built complex apps festooned with inputs and outputs, you may imagine the amount of exchanges necessary between R and JS, thereby making HTTP definitely not suitable. What we would need instead is a permanent connection, allowing bidirectional fluxes, that is, if R wants to inform JS about something or if JS wants to send information to R.
11.1 Introductory example
The Shiny app shown in Figure 11.1 consists of an actionButton() and a sliderInput(). Clicking on the action button triggers an observeEvent(), which subsequently fires updateSlideInput(). Under the hood, clicking on the action button sends a message from the client (JS) to the server (R). This message is processed and the corresponding input value is updated on the server R, thereby invalidating any observer, reactive element. updateSlideInput() sends a message back to the client containing the id of the input to update. This message is received and processed by JS, thereby updating the corresponding input element on the client. You may imagine that when the slider is updated, it also sends a message back to the server, triggering a cascade of reactions.
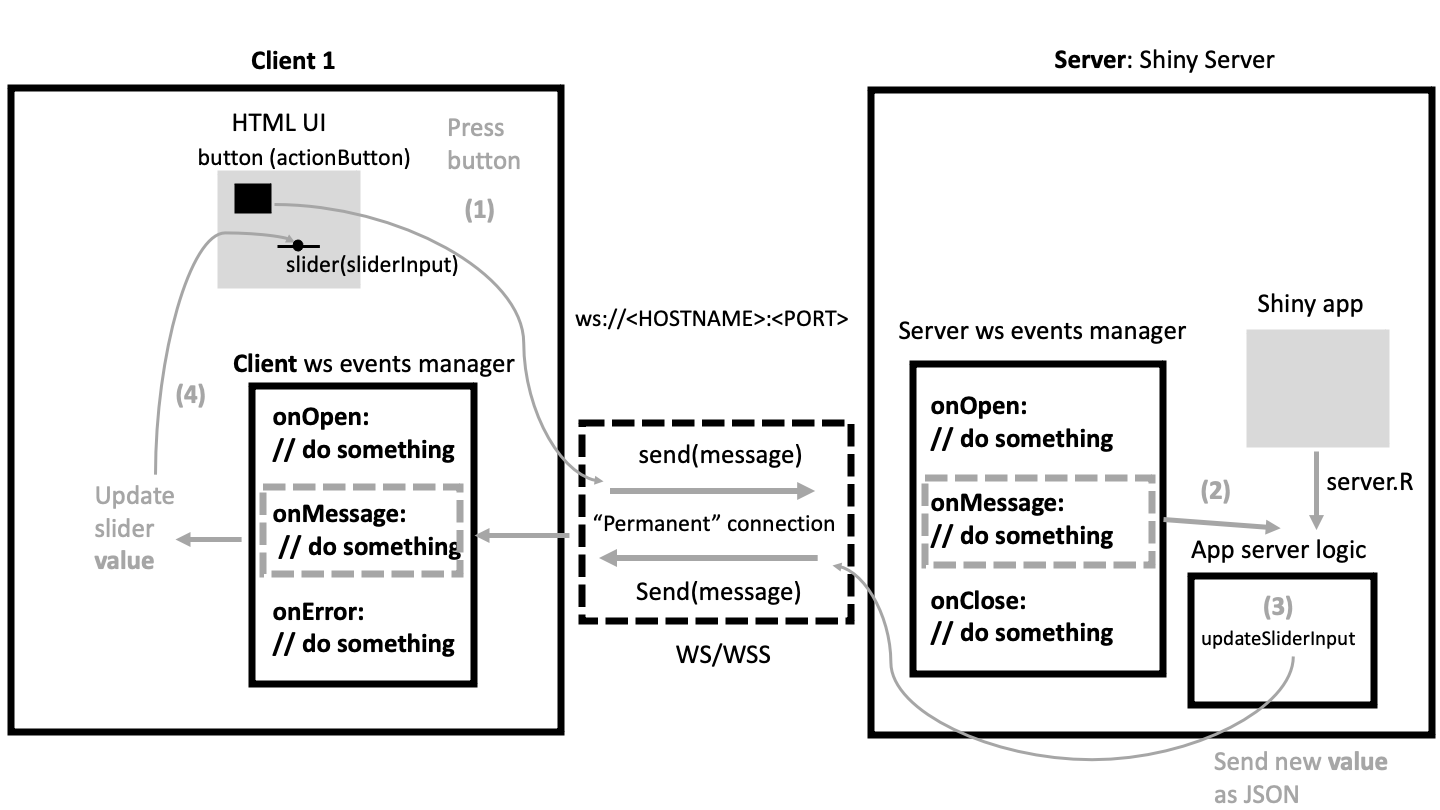
FIGURE 11.1: Websocket allows communication between server and client.
Reading this will probably raise a burning question: how can two different languages like R and JS communicate?
Let’s meet below to understand what are the mechanisms involved.
11.2 JSON: exhange data
Since R and JS are very different languages, we can’t just send R code to JS and conversely. We must find a common language to exchange data. Guess what? We’ll be using JSON. JSON stands for JavaScript Object Notation. JSON has the great advantage that it is suitable for many languages, particularly R. It has the same structure as a JS object but can be serialized as a character string, for instance:
my_json <- '
{
  "name": "David",
  "color": "purple",
  "planet": "Mars",
  "animals": [
    {
      "name": "Euclide",
      "type": "cat",
      "age": 7
    }
  ]
}
'
In the next section, we’ll see how we may interact with JSON.
11.2.1 Process JSON from R
There are two situations:
-
Read data from a JSON and convert it to the appropriate R structure, like
list(). - Export data from a R structure and convert it into JSON, for later use in another language, for instance JS.
The most commonly utilized R package is jsonlite (Ooms 2020), which allows reading JSON with fronJSON and exporting to JSON with
toJSON. Let’s try to read the above defined JSON:
#> List of 4
#>  $ name   : chr "David"
#>  $ color  : chr "purple"
#>  $ planet : chr "Mars"
#>  $ animals:'data.frame': 1 obs. of  3 variables:
#>   ..$ name: chr "Euclide"
#>   ..$ type: chr "cat"
#>   ..$ age : int 7
By default, this gives us a list. Interestingly, the nested array is converted into a dataframe. If you don’t like
this behavior, you may pass the simplifyVector = FALSE options, giving nested lists:
fromJSON(my_json, simplifyVector = FALSE)#> $name
#> [1] "David"
#>
#> $color
#> [1] "purple"
#>
#> $planet
#> [1] "Mars"
#>
#> $animals
#> $animals[[1]]
#> $animals[[1]]$name
#> [1] "Euclide"
#>
#> $animals[[1]]$type
#> [1] "cat"
#>
#> $animals[[1]]$age
#> [1] 7Inversely, assume we have a R list() that we want to transmit to JS. We apply toJSON:
#> {"name":["David"],"color":["purple"],"planet":["Mars"]}
toJSON(my_list, auto_unbox = TRUE, pretty = TRUE)#> {
#> "name": "David",
#> "color": "purple",
#> "planet": "Mars"
#> }Note the auto_unbox (unbox atomic vectors of length 1) and pretty (adds indentation) options that allow for a better rendering. There are many more available options and we invite the reader to refer to the jsonlite
documentation.
Most of the time, you will pass more complex data structures like nested lists. For instance imagine you have to send user profile information containing a unique id, name and organization, the latter being a nested list with fields like id, name, site, …:
my_list <- list(
  id = "01522",
  name = "David",
  organization = list(
    id = "AWER12",
    name = "RinteRface",
    site = "Switzerland"
  )
)

toJSON(my_list, auto_unbox = TRUE, pretty = TRUE)
#> {
#> "id": "01522",
#> "name": "David",
#> "organization": {
#> "id": "AWER12",
#> "name": "RinteRface",
#> "site": "Switzerland"
#> }
#> }11.2.2 Process JSON from JS
Like R, JS has two methods to process JSON, which are provided by the JSON class.
We parse a JSON, that is converting it from character to JS object with:
JSON.parse(my_json)Conversely, we convert a JS object to JSON leveraging JSON.stringify:
myObject = {
  "name": "David",
  "color": "purple",
  "planet": "Mars",
}
JSON.stringify(my_object)
Now that we have seen a convenient way to exchange data between two different languages, R and JS, we are going to explain how this communication is made possible. This involves web elements called websockets.
11.3 What is a websocket?
Before going further let’s define what is a websocket. It is an advanced technology allowing bidirectional communication between a (or multiple) client(s) and a server. For instance, a chat system may be built on top of a websocket.4 The server is generally created using Node.js libraries like ws and the client with JavaScript. In the R Shiny context, the server part is created from httpuv (Cheng and Chang 2021) and the client either with {websocket} (Chang et al. 2020) (see below) or directly from JavaScript, as described later:
library(httpuv)
# set the server
s <- startServer("127.0.0.1", 8080,
  list(
    onWSOpen = function(ws) {
      # The ws object is a WebSocket object
      cat("Server connection opened.\n")

      ws$onMessage(function(binary, message) {
        cat("Server received message:", message, "\n")
        ws$send("Hello client!")
      })
      ws$onClose(function() {
        cat("Server connection closed.\n")
      })
    }
  )
)
On the server side, startServer() also handles websockets. To proceed, the app list must contain an extra element, that is the onWSOpen function, defining all actions to perform after the connection is established. Those actions are listed in the httpuv WebSocket R6 class:
- onMessage is invoked whenever a message is received on this connection.
- onClose is invoked when the connection is closed.
- send sends a message from the server (to the client).
On the client, we may use the {websocket} WebSocket class provided by the websocket package:
library(websocket)
# set the client
ws <- websocket::WebSocket$new("ws://127.0.0.1:8080/")
ws$onMessage(function(event) {
  cat("Client received message:", event$data, "\n")
})

# Wait for a moment before running next line
ws$send("Hello server!")

# Close client
ws$close()
We briefly describe the above code:
- We create a new client socket instance, which triggers the server
onWSOpenfunction, displaying the welcome message. - We set the client
ws$onMessageevent manager that will print the message sent by the server. - Then a message is sent from the client with
ws$send, received on the server and sent back to the client, and so on. Figure 11.2 shows the main mechanisms. - The client connection is closed, which also closes the server connection.
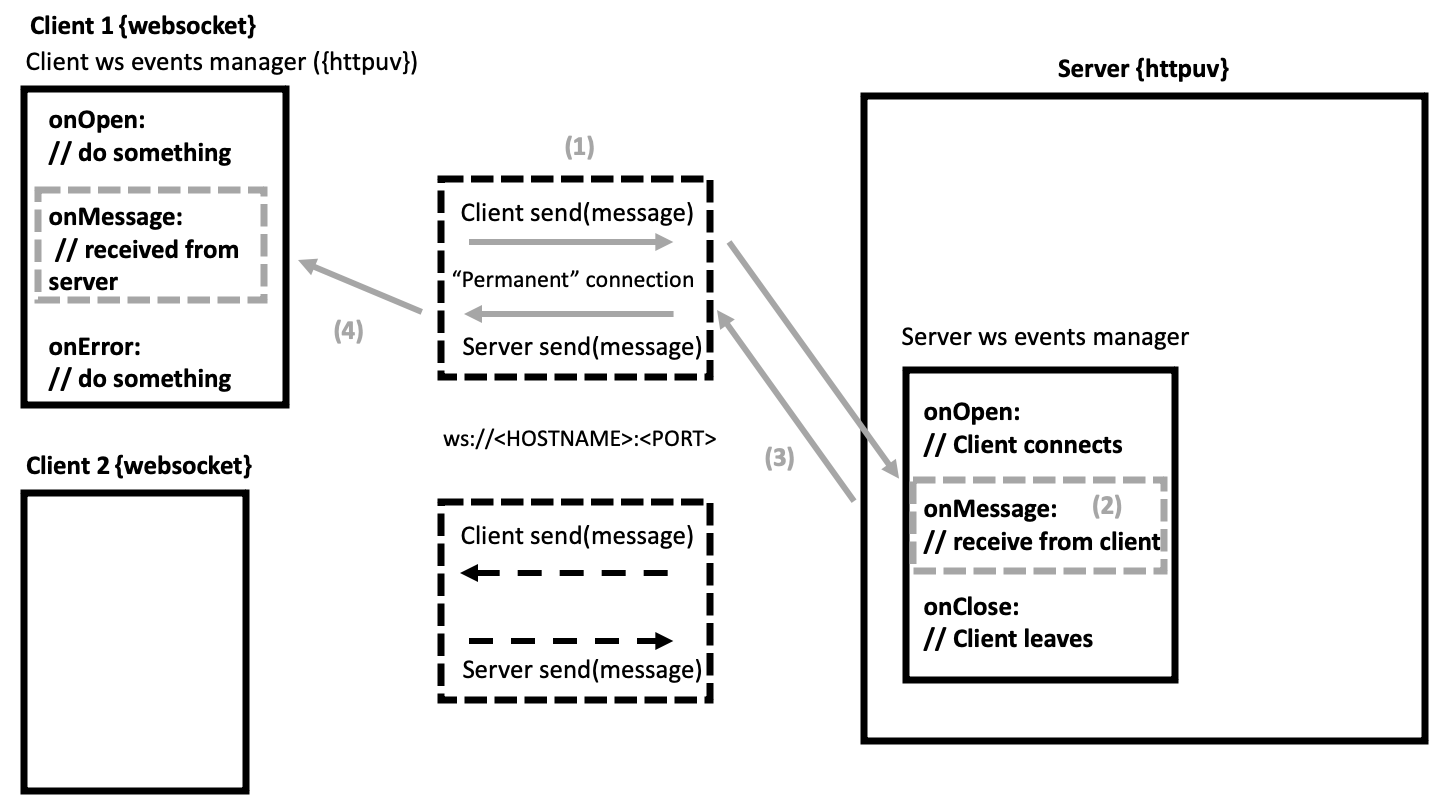
FIGURE 11.2: Typical websocket flow between client and server.
Interestingly, multiple clients can connect to the same server.
You may give it a try with the {OSUICode} side package:
library(OSUICode)
server <- websocket_server()
client_1 <- websocket_client()
client_2 <- websocket_client()
client_1$send("Hello from client 1")
client_2$send("Hello from client 2")
client_1$close()
client_2$send("Only client 2 is here")
client_2$close()
Sys.sleep(1)
server$stop()
whose output is shown below.
#> Server connection opened.
#> Server connection opened.
#> Server received message: Hello from client 1
#> Client received message: Hello client!
#> Server received message: Hello from client 2
#> Client received message: Hello client!
#> Server connection closed.
#> Server received message: Only client 2 is here
#> Client received message: Hello client!
#> Server connection closed.
Under the hood, whenever a client initiates a websocket connection, it actually sends an HTTP request to the server. This is called the handshake, utilizing the CONNECT HTTP method to establish a bridge between the HTTP server and the websocket server. If the server accepts, the returned HTTP code is 101, meaning that we switch protocole from HTTP to WS or WSS, as depicted by Figure 11.3.
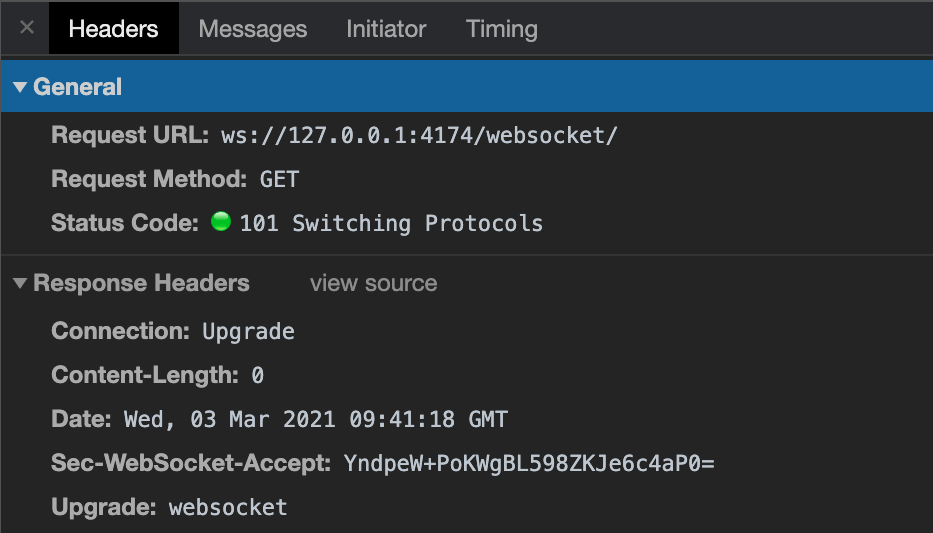
FIGURE 11.3: HTTP upgrade to WS in a Shiny app example.
11.3.1 Example
In practice, Shiny does not use {websocket}. As mentioned earlier, the client is directly built from JS. To better
understand the whole process, we are going to design a simple web page containing an HTML range slider and pass its value from JS to R through the websocket, so that R can produce a simple histogram. Moreover, R will also send a message to JS, thereby updating a gauge meter widget located in the HTML page.
To proceed, we need a few elements:
- The HTML page containing the slider, gauge and the JS logic to create the client websocket connection, process the slider value and update the gauge value.
- An app composed of an httpuv-powered HTTP server serving this HTML page as well as a websocket server to connect R and JS.
11.3.1.1 Create the app
To start the server, we leverage the startServer() function that expects:
A host, usually
127.0.0.1if you work locally.A port, like
8080(app may be accessed on<HOST>:<PORT>in your web browser).-
A list of functions describing the app, particularly:
-
callexpects the HTTP response. -
onWSOpenexpects the websocket server.
-
In the following, we gradually explain how to design each part.
11.3.1.1.1 Handle the websocket server
The most important element is the app, which consists of a server websocket (R) and an HTTP response (HTML, JS). The websocket call back may be defined as follows. We first raise a message upon client connection:
ws_handler <- function(ws) {
  # The ws object is a WebSocket object
  cat("New connection opened.\n")
}
The critical part is the onMessage callback, which has to process the client message.
ws_handler <- function(ws) {
  # The ws object is a WebSocket object
  cat("New connection opened.\n")

  ws$onMessage(function(binary, message) {
    # server logic
  }
}
As we’ll send a JSON (from the client), we leverage fromJSON() to properly treat the message. It is printed for debugging purposes, and the value is injected inside a hist(rnorm()) function. Copy the below code inside the ws$onMessage handler.
# capture client message
input_message <- jsonlite::fromJSON(message)

# debug
print(input_message)
cat("Number of bins:", input_message$value, "\n")

# create plot
hist(rnorm(input_message$value))
Still within ws$onMessage, we send a message to JS in order to update the gauge value. See it like an updateSlider() function for instance. We utilize toJSON() to send a random value to JS as well as a polite message:
# Send random value to JS
output_message <- jsonlite::toJSON(
  list(
    val = sample(0:100, 1),
    message = "Thanks client! I updated the plot..."
  ),
  pretty = TRUE,
  auto_unbox = TRUE
)
ws$send(output_message)

# debug
cat(output_message)
We finally add the onClose callback to handle client disconnection:
ws$onClose(function() {
  cat("Server connection closed.\n")
})
The whole code may be found in the {OSUICode} package (see https://github.com/DivadNojnarg/outstanding-shiny-ui-code/blob/b95f656bce9de7600c05b5045a4e005f70c4f83d/R/websocket.R#L145).
11.3.1.1.2 Handle the HTTP response
The HTTP response is returned by the call function and is typically defined as follows:
http_response <- function(req) {
  list(
    status = 200L,
    headers = list(
      'Content-Type' = 'text/html'
    ),
    body = "Hello world!"
  )
}
It returns a list composed of:
- A status code, 200 being the OK HTTP status.
- Some headers indicating the content nature.
- The body, which is what will be displayed upon client request.
To start the server, we leverage the startServer() function, giving it a default port 8080 and host such that the url is 127.0.0.1:8080:
startServer(
  "127.0.0.1",
  8080,
  list(call = http_response, onWSOpen = ws_handler)
)
The next step is to replace the http_reponse$body by a real HTML page containing the client websocket handler,
as well as the slider and gauge widgets.
11.3.1.2 Design the page content
The first task consists of setting up the websocket client connection:
- We initialize the socket connection with the
WebSocketAPI. It is crucial that the host and port match the parameters provided during the websocket server initialization. - We create the event registry that is
socket.onopen,socket.onmessage. Insidesocket.onmessage, we have to process the message sent from R withJSON.parse, which creates an object. Remember that we sent a list from R and are only interested in thevalelement.
Importantly, we must wait for all elements to be available in the DOM before starting any action. Therefore, we wrap the whole thing inside a document.addEventListener("DOMContentLoaded", ...).
document.addEventListener(
  'DOMContentLoaded', function(event) {
    // Capture gauge widget
    let gauge = document.getElementById('mygauge');
    // Initialize client socket connection
    let mySocket = new WebSocket('ws://<HOST>:<PORT>');
    mySocket.onopen = function (event) {
      // do things
    };
    // Handle server message
    mySocket.onmessage = function (event) {
      let data = JSON.parse(event.data);
      gauge.value = data.val;
    };
});
We eventually insert it inside the script tag of our basic HTML boilerplate, which also contains the gauge
skeleton, borrowed from the MDN resources. min, max and value set the range, while low, high and optimum are responsible for the color (red, yellow and green, respectively):
<!DOCTYPE HTML>
<html lang="en">
  <head>
    <script language="javascript">
      // ADD EVENT LISTENER HERE
    </script>
    <title>Websocket Example</title>
  </head>
  <body>
    <label for="mygauge">Gauge:</label>
    <meter id="mygauge" min="0" max="100" low="33" high="66"
    optimum="80" value="50"></meter>
  </body>
</html>
Once done, we have to take care of the range slider, whose code is taken from the MDN resources:
<div>
  <input type="range" id="slider" name="volume"
  min="0" max="100">
  <label for="slider" id ="sliderLabel">Value:</label>
</div>
It is a simple div containing an input tag as well as a label. The input tag has some attributes, notably the minimum and maximum value. The slider has to be inserted in the HTML boilerplate shown below:
<!DOCTYPE HTML>
<html lang="en">
  <head>
    <script language="javascript">
      // ADD EVENT LISTENER HERE
    </script>
    <title>Websocket Example</title>
  </head>
  <body>
    <!-- INSERT SLIDER HERE -->
    <br/>
    <label for="mygauge">Gauge:</label>
    <meter id="mygauge" min="0" max="100" low="33" high="66"
    optimum="80" value="50"></meter>
  </body>
</html>
The slider behavior is entirely controlled by JS. We recover its value with document.getElementById and
add it to the label inner HTML so as to know the current value. We also add an event listener to update the slider value each time the range is updated, either by drag or by keyboard action with oninput. It is best practice to
convert the slider value to a number with parseInt, as the returned value defaults to a string. Finally, we send the value through the websocket, converting it to JSON so that we may process it from R with jsonlite (or any other relevant package):
let sliderWidget = document.getElementById('slider');
let label = document.getElementById('sliderLabel');
label.innerHTML = 'Value:' + slider.value; // init
// on change
sliderWidget.oninput = function() {
  let val = parseInt(this.value, 10);
  mySocket.send(
    JSON.stringify({
      value: val,
      message: 'New value for you server!'
    })
  );
  label.innerHTML = 'Value:' + val;
};
11.3.2 Test it!
For convenience, the whole code is provided by OSUICode::httpuv_app(). Run that function in the R console
and browse to 127.0.0.1:8080 with Chrome. You should see the range slider, as well as its current value. We suggest
the reader have R and Chrome side by side, to properly see all messages sent between R and JS. In Chrome,
open the developer tools and navigate to the Network tab and select the websocket entry, as show Figure 11.4. From now, you may change the slider value. Notice the green arrow message appearing
in the developer tools. This indicates a message sent by the client: here a JSON containing the slider value as well as a tiny message, to be polite with the server. In the R console, you may inspect the received message (it should be the same as the client). R is instructed to create a new plot and, once done, sends a message back to the client (red arrow) to indicate that the plot is updated and a new value has been generated for the gauge.
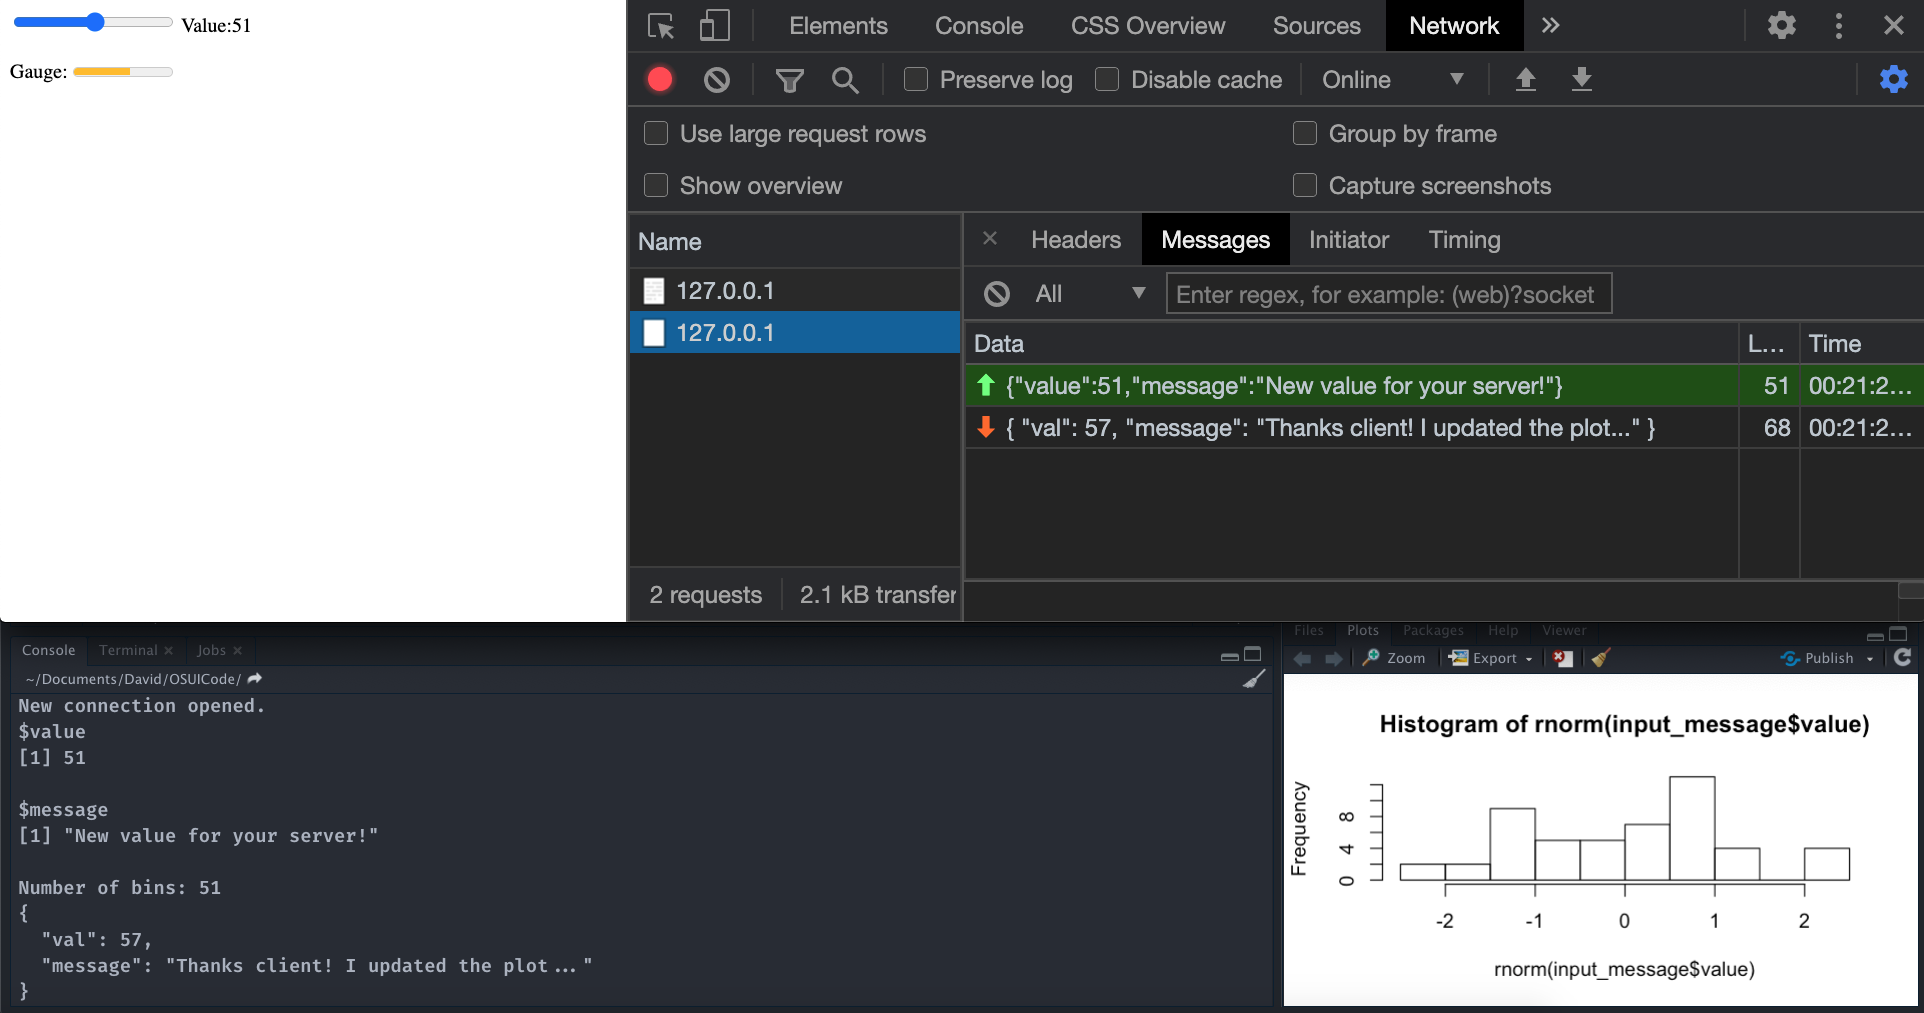
FIGURE 11.4: Server-client communication through a websocket.
11.4 Client concurrency
Not shown in the above sections, httpuv_app() exposes a delay parameter that simulates a computationally intense task on the server:
ws$onMessage(function(binary, message) {
  message <- jsonlite::fromJSON(message)
  print(message)
  cat("Number of bins:", message$value, "\n")
  hist(rnorm(message$value))
  if (!is.null(delay)) Sys.sleep(delay)
  ws$send("Thanks client! I updated the plot.")
})
This is to simulate concurrency that could occur between multiple clients. To test it, you may try to call my_app <- httpuv_app(5), open two browser tabs pointing to 127.0.0.1:8080, update the slider on the first client and update it on the second client. What happens? Why? This highlights one fundamental limitation in Shiny: as R is single-threaded, clients have to queue to get an answer from the server.
Once done, don’t forget to close the server connection with my_app$stop()!
In practice, Shiny’s core is much more complex, but hopefully, you should get a better understanding of the general idea. The reader must understand that when Shiny inputs/outputs are modified on the client by an end user, there are many exchanges between R and JS through the websocket. In the following, we briefly describe how Shiny leverages this technology, on both server-side and client-side.
11.5 Shiny and websockets
In the previous section, we showed how R and JS can communicate through a httpuv-powered websocket. Now let’s see what happens in the context of Shiny.
11.5.1 The Shiny session object
We won’t be able to go anywhere without giving some reminders about the Shiny session object. Why do we say object? session is actually an instance of the ShinySession R6 class.
Importantly, the session is unique to a given user. It means that two different clients cannot share the same session. This is important since it contains all information about input, output and client data.
Upon calling ShinySession$new(), the initialization method takes one parameter, namely the websocket. As shown in the last section, the websocket allows bidirectional exchanges between R and JS. The session object exposes two methods to communicate with JavaScript from R:
-
sendCustomMessage sends messages from R to JS. It calls the private
sendMessagemethod which itself callswrite. The message is sent only when the session is opened, through the websocketprivate$websocket$send(json). If theshiny.traceoption isTRUE, a message showing the sent JSON is displayed, which is useful for debugging. -
sendInputMessage is used to update inputs from the server. The message is stored in a message queue and ultimately sent through the websocket
private$websocket$send(json).
Curious readers will look at the shiny.R file.
We will discuss sendInputMessage and sendCustomMessage in Chapters 12 and 15.
11.5.2 Server side
On the server, that is R, a websocket is initiated in the startApp function, leveraging the httpuv package. Websocket handlers are defined by shiny:::createAppHandlers:
ws = function(ws) {

  # ....; Extra code removed

  shinysession <- ShinySession$new(ws)

  ws$onMessage(function(binary, msg) {
    # If unhandled errors occur, make sure they get
    # properly logged
    withLogErrors(messageHandler(binary, msg))
  })

  ws$onClose(function() {
    shinysession$wsClosed()
    appsByToken$remove(shinysession$token)
    appsNeedingFlush$remove(shinysession$token)
  })
  return(TRUE)
}
Overall, handlers drive the server websocket behavior. When the Shiny session is initialized, a message is sent through the WS, providing the sessionId, workerId, and user to the client (see Shiny.shinyapp.config and section 10.6.3):
private$sendMessage(
  config = list(
    workerId = workerId(),
    sessionId = self$token,
    user = self$user
  )
)
The workerId is not always used. In practice, it is relevant only in the context of solutions able to
load-balance clients across multiple workers, that is shinyapps.io, RStudio Connect and Shiny Server Pro.
ws$onMessage describes what should happen when the server receives an message from the client.
It applies the messageHandler function that, in short:
- Decodes the received message.
-
Processes the message. At initialization, the client sends a message with an
initkey, which tells Shiny to manageinputsbefore running any observer (sinceinputsdo not have values yet). After initialization, client messages have theupdatekey, meaning that we wait for observers to run before.
Finally, when the server connection is closed, all client connections are also closed.
11.5.3 Client side
On the JS side, the socket creation occurs in the shinyapps.js file:
var ws = new WebSocket(
  protocol +
  '//' +
  window.location.host +
  defaultPath
);
through the WebSocket object. protocol is the chosen protocol, either ws or wss (if using https). window.location.host contains the host name and its port.
Once the connection is opened, events are handled with the onopen event registry:
socket.onopen = function() {
  hasOpened = true;

  $(document).trigger({
    type: 'shiny:connected',
    socket: socket
  });

  self.onConnected(); // remove overlay

  socket.send(JSON.stringify({
    method: 'init',
    data: self.$initialInput
  }));

  while (self.$pendingMessages.length) {
    var msg = self.$pendingMessages.shift();
    socket.send(msg);
  }
}
The shiny:connected event is triggered, any disconnected overlay (the famous grayed-out screen) is then removed from the DOM. Initial input values are sent to the server via the send method. The onmessage registry aims at handling messages received from the server:
socket.onmessage = function(e) {
  self.dispatchMessage(e.data);
};
It subsequently invokes the dispatchMessage method that sends a message to all handlers, triggering the shiny:message event. Shiny has internal and custom-provided handlers (read user-defined) stored in separate arrays. Each time, a message type matches a given handler, it is treated. For instance, there is a dedicated internal handler for input messages, which bridges the gap between a given input and the corresponding input binding. This handler eventually triggers the inputBinding.receiveMessage method so that the input value is updated on the client. We discuss this in detail section 13.2.
Finally the onclose method is called when the websocket connection is closed.
socket.onclose = function() {
  // These things are needed only if we've successfully
  // opened the websocket.
  if (hasOpened) {
    $(document).trigger({
      type: 'shiny:disconnected',
      socket: socket
    });

    self.$notifyDisconnected();
  }

  self.onDisconnected(); // Run before self.$removeSocket()
  self.$removeSocket();
}
If the connection was opened, the shiny:disconnected event is triggered. Then, the disconnect overlay is added to the DOM (grayed-out), and the socket is removed.
Should any error occurs in the R code, the server sends the error through the websocket, which is captured by the client and displayed.
11.5.4 Debug websocket with Shiny
Let’s run the following app (see Figure 11.5, left panel):
library(shiny)
shinyApp(
  ui = fluidPage(
    selectInput(
      "variable",
      "Variable:",
      c("Cylinders" = "cyl",
        "Transmission" = "am",
        "Gears" = "gear")
    ),
    tableOutput("data")
  ),
  server = function(input, output) {
    output$data <- renderTable({
      mtcars[, c("mpg", input$variable), drop = FALSE]
    }, rownames = TRUE)
  }
)
After opening the HTML inspector, we select the network tab and search for websocket in the list. By choosing the message tab, you may inspect what R and JavaScript say to each others. As stated above, the first message sent contains initial input values. Then Shiny recalculates the table, notifies when the recalculation is done and becomes idle. The second message received from R is after updating the select input, which triggers the same event cycle.
Although complex, it is extremely useful to check whether the input and output communication is working properly. If not, we would see the error field identifying the issue.
Shiny.shinyapp.$socket.readyState returns the state of the socket connection. It should be 1 if your app is running. In some instances when the socket is closed, an error would be raised.
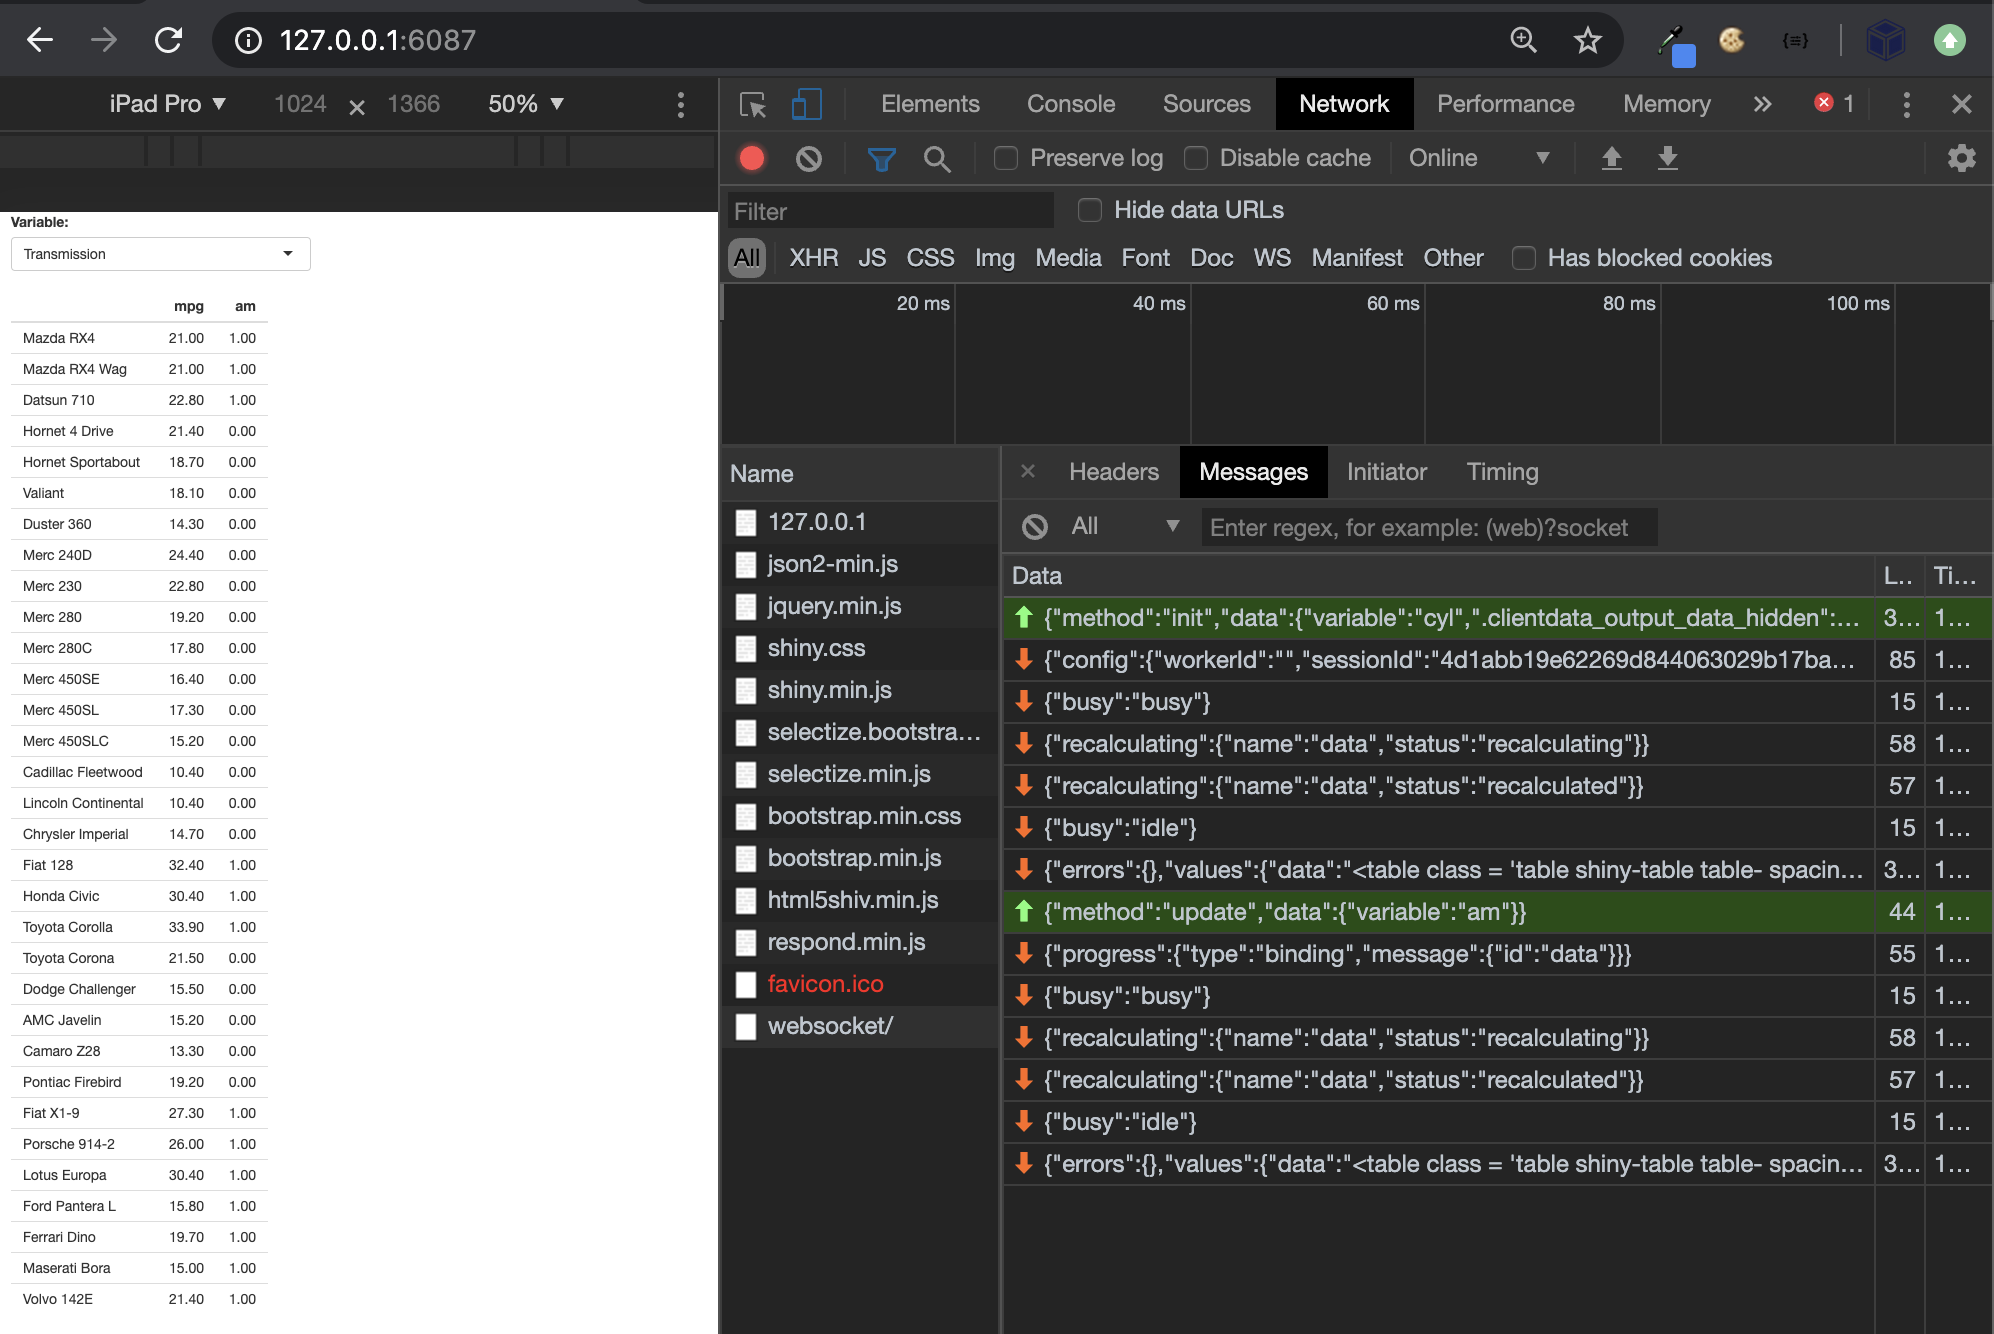
FIGURE 11.5: Inspect content exchanged in the websocket within a Shiny app.
It lets you imagine how many messages are exchanged for more complex apps.