12 Understand and develop new Shiny inputs
Shiny inputs are key elements of Shiny apps since they are a way for the end-user to interact with the app. You may know sliderInput(), numericInput() and checkboxInput(), but sometimes you may need fancier elements like knobInput() from shinyWidgets, as depicted in Figure 12.1 or even more sophisticated inputs like the shinyMobile smartSelect() (Figure 12.1, right panel). Have you ever wondered what mechanisms are behind inputs? Have you ever dreamed of developing your own?
The goal of this section is to understand how Shiny inputs work and how to create new ones.
FIGURE 12.1: Custom shiny inputs. left: knobInput from shinyWidgets; right: smart select from shinyMobile.
12.1 Input bindings
When we run our app, most of the time it works just fine. The question is, what is the magic behind? Upon initialization, Shiny runs several JavaScript functions, some of them being exposed to the programmer, through the Shiny JS object, already mentioned in section 10.6.3. To illustrate what they do, let’s run the app below:
### RUN ###
# OSUICode::run_example(
#  "input-system/dummy-app",
#   package = "OSUICode"
# )
We then open the HTML inspector and run Shiny.unbindAll(document); with document being the scope, that is where to search. Try to change the slider input. You will notice that nothing happens. Now let’s type Shiny.bindAll(document) and update the slider value. Moving the slider successfully updates the plot. Magic, isn’t it? This simply shows that when inputs are not bound, nothing happens so binding inputs is necessary.
We consider another example with multiple inputs and two buttons to bind/unbind inputs, respectively. Start it, change some input values, have a look at the corresponding text output. Click on unbind all and try to change some inputs. What happens? Click on bind and change another input value. What do you observe?
### RUN ###
# OSUICode::run_example(
#  "input-system/bind-unbind",
#   package = "OSUICode"
# )

### APP CODE ###
library(shiny)

ui <- fluidPage(
  actionButton(
    "unbind",
    "Unbind inputs",
    onclick = "Shiny.unbindAll();"
  ),
  actionButton(
    "bind",
    "Bind inputs",
    onclick = "Shiny.bindAll();"
  ),
  lapply(1:3, function(i) {
    textInput(paste0("text_", i), paste("Text", i))
  }),
  lapply(1:3, function(i) {
    uiOutput(paste0("val_", i))
  })
)

server <- function(input, output, session) {
  lapply(1:3, function(i) {
    output[[paste0("val_", i)]] <- renderPrint({
      input[[paste0("text_", i)]]
    })
  })
}

shinyApp(ui, server)
Let’s see below what is an input binding and how it works.
12.1.1 Input structure
In HTML, an input element is given by the <input> tag, as well as several attributes.
<input id = "id" type = "text" class = "..." value = value>-
id guarantees the input uniqueness and a way for Shiny to recover it in the
input$<id>element. -
type like
checkbox,button,text…type may also be a good target for the input binding find method, as explained below. - class may be required to find the element in the DOM. It is more convenient for an input binding to target a class (and all associated elements) rather than an id, which corresponds to one element by definition. It is also used by CSS to apply styles.
- value holds the input value.
12.1.2 Binding Shiny inputs
An input binding allows Shiny to identify each instance of a given input and what you may do with this input. For instance, a slider input must update whenever the range is dragged or when the left and right arrows of the keyboard are pressed. It relies on a class defined in the input_binding.js file.
Let’s describe each method chronologically. For better convenience, the book side package contains step-by-step demonstrations which may be found here. Each example is called by the customTextInputExample(), which takes the input binding step as the only parameter. For instance, customTextInputExample(1) will invoke the first step, while customTextInputExample(4) will include all steps from 1 to 4.
12.1.2.1 Find the input
The first step is critical, which requires locating the input in the DOM. On the R side, we define an input, with a specific attribute that will serve as a receptor for the binding. For most of inputs, this may be handled by the type attribute. In other cases, this may be the class, like for the actionButton(). On the JS side, we need a method able to identify this receptor. Moreover, two different types of inputs (for instance radioButton() and selectInput()) cannot have the same receptor for conflict reasons, whereas two instances of the same input type can. If your app contains 10 sliders, they all share the same input binding, and this is where the thing is powerful since they are all bound in one step. The receptor identifier is provided by the find method of the InputBinding class. This method must be applied on a scope; that is, the document. find accepts any valid jQuery selector:
find: function(scope) {
  return $(scope).find('.input-text');
}
Don’t forget the return statement. Omitting it would cause the binding step to fail, as well as all other downstream
steps.
Figure 12.2 summarizes this important step.
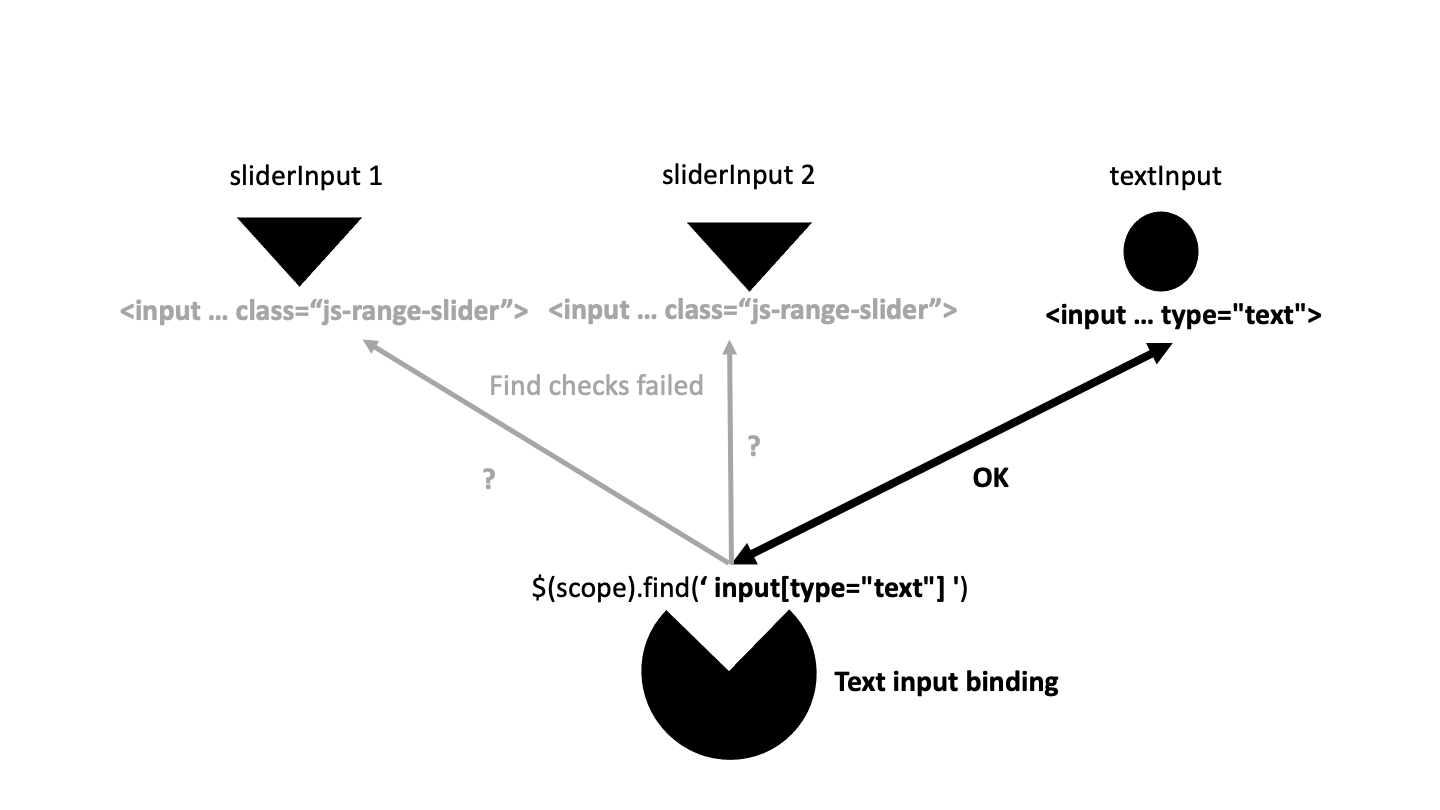
FIGURE 12.2: How to find inputs.
Below, we are going to re-create textInput() binding, step by step. As shiny already provides bindings for the textInput(), we don’t want them to recognize our new input. Therefore, we add a new input-text class and make our own input binding pointing to that specific class:
customTextInput <- function (
  inputId,
  label,
  value = "",
  width = NULL,
  placeholder = NULL,
  binding_step
) {

  # this external wrapper ensure to control the input width
  div(
    class = "form-group shiny-input-container",
    style = if (!is.null(width)) {
      paste0("width: ", validateCssUnit(width), ";")
    },
    # input label
    shinyInputLabel(inputId, label),

    # input element + JS dependencies
    tagList(
      customTextInputDeps(binding_step),
      tags$input(
        id = inputId,
        type = "text",
        class = "form-control input-text",
        value = value,
        placeholder = placeholder
      )
    )
  )
}
The last part of the code contains a tagList() with two elements:
- The element input binding,
customTextInputDeps().binding_stepallows us to review one step at a time, which is easier from a learning perspective. - The input tag.
Below is an example of how we managed the dependency creation in the side package. If we had multiple inputs, we would add more script to the dependency by passing a vector to the script parameter.
customTextInputDeps <- function(binding_step) {
  htmlDependency(
    name = "customTextBindings",
    version = "1.0.0",
    src = c(file = system.file(
      "input-system/input-bindings",
      package = "OSUICode"
    )),
    script = paste0(
      "customTextInputBinding_",
      binding_step,
      ".js"
    )
  )
}
Figure 12.3 shows the main elements of the textInput() widget. In the above code, shinyInputLabel is a Shiny internal function that creates the numeric input label, or in other words the text displayed next to it. The core input element is wrapped by tags$input.
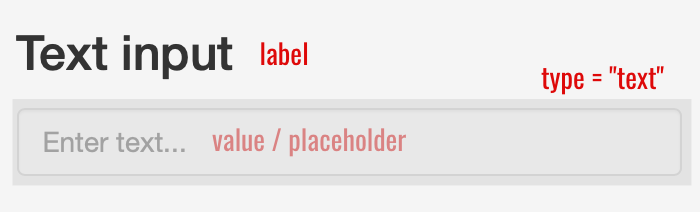
FIGURE 12.3: Shiny’s textInput elements.
We invite the reader to run the full working demonstration exposed below.
### RUN ###
# OSUICode::run_example(
#  "input-system/binding-find",
#   package = "OSUICode"
# )

### APP CODE ###
library(OSUICode)

customTextInputExample(1)
In short, this example consists of a simple text input and an output showing the current text input value:
customTextInputExample <- function(binding_step) {
  ui <- fluidPage(
    customTextInput(
      inputId = "caption",
      label = "Caption",
      value = "Data Summary",
      binding_step = binding_step
    ),
    textOutput("custom_text")
  )
  server <- function(input, output) {
    output$custom_text <- renderText(input$caption)
  }
  shinyApp(ui, server)
}
We open the developer tools to inspect the customTextInputBinding.js script, put a breakpoints in the find method and reload the page. Upon reload, the JavaScript debugger opens, as shown Figure 12.4. Type $(scope).find('.input-text') in the console, and see what is displayed. This is the DOM element, which you may highlight when you hover over the JavaScript output.
Building input bindings like this significantly ease the debugging process, and you’ll get more chances to be successful!
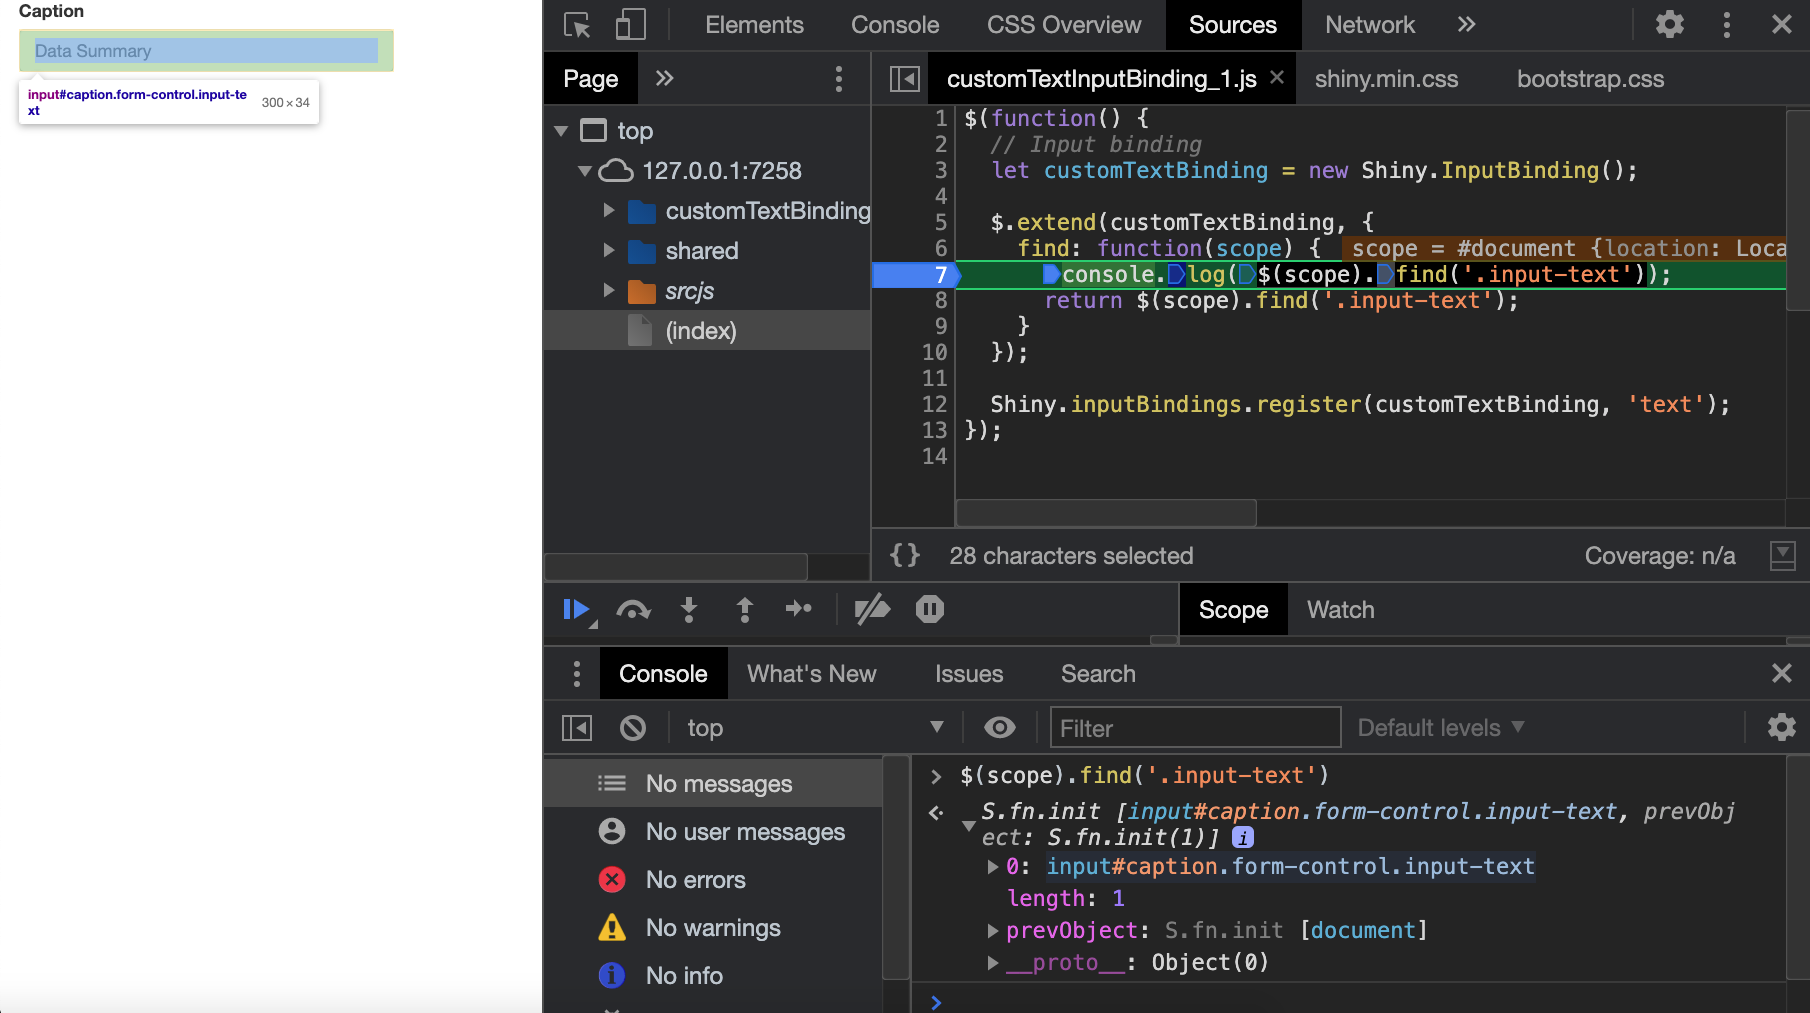
FIGURE 12.4: Find is the first method triggered.
Now, let’s see why it is better to target elements by type or class. We run the below example.
### RUN ###
# OSUICode::run_example(
#  "input-system/binding-find-2",
#   package = "OSUICode"
# )

### APP CODE ###
library(OSUICode)

customTextInputExampleBis()
This is a demonstration app containing two text inputs. Moreover, the binding is modified so that it looks for element having a specific id:
find: function(scope) {
  return $(scope).find('#mytextInput');
}
If you repeat the above debugging steps, $(scope).find('.input-text') only targets the
first text input, meaning that the second input will not be found and bound, as demonstrated in Figure 12.5.
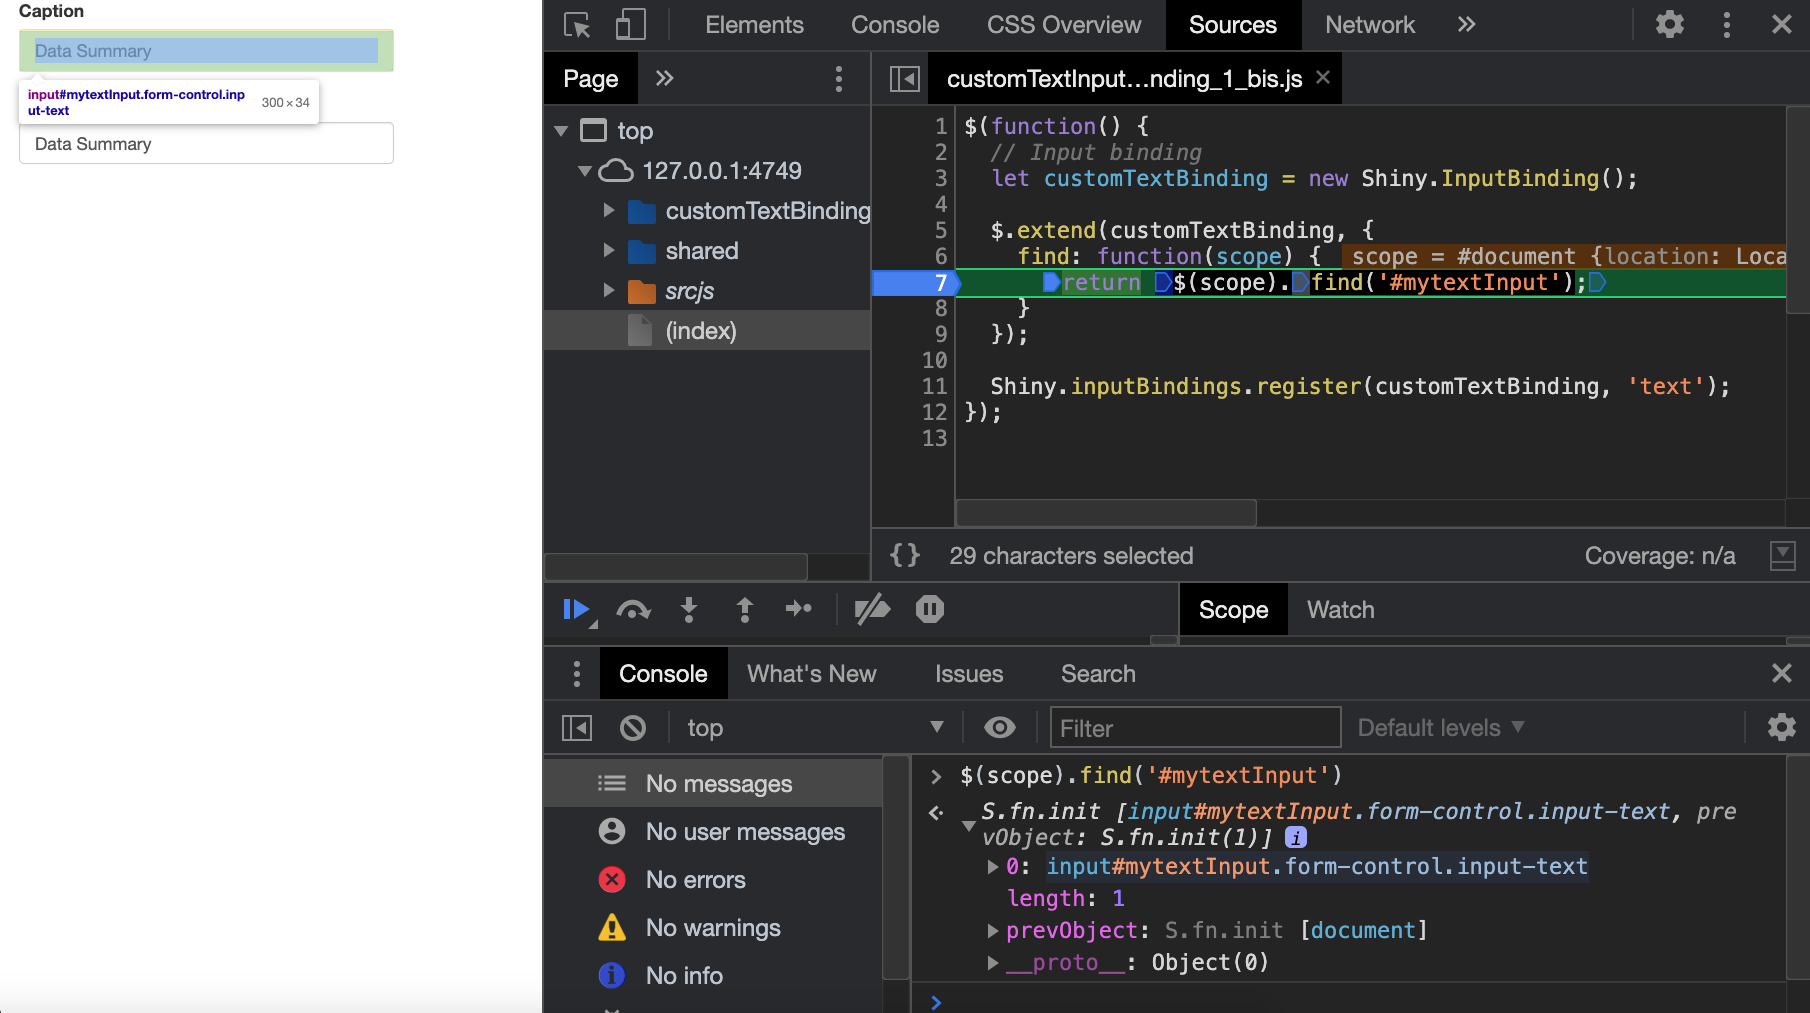
FIGURE 12.5: Find by id is a rather bad idea.
As a side note, you’ll also get an error in the binding (Uncaught Not implemented), indicating that the getValue method is not implemented yet. Fear not! We are going to add it very soon.
12.1.2.2 Initialize inputs
Upon initialization, Shiny calls the initializeInputs function that takes all input bindings and calls their initialize method before binding all inputs. Note that once an input has been initialized, it has a _shiny_initialized tag to avoid initializing it twice. The initialize method is not always defined but some elements require to be explicitly initialized or activated. For instance the Framework7 API, on top of which shinyMobile (Granjon, Perrier, and Rudolf 2021) is built, requires instantiating all elements. Below is an example for the toggle input:
// what is expected
let toggle = app.toggle.create({
  el: '.toggle',
  on: {
    change: function () {
      console.log('Toggle changed')
    }
  }
});
el: '.toggle' means that we are looking at the element(s) having the toggle class. app.toggle.create is internal to the Framework7 API. The corresponding shinyMobile input binding starts as follows:
let f7ToggleBinding = new Shiny.InputBinding();
  $.extend(f7ToggleBinding, {
    initialize: function(el) {
      app.toggle.create({el: el});
    },
    // other methods
});
Once initialized, we may use all specific methods provided by the API. Framework7 is clearly a gold mine, as its API provides many possible options for many inputs/widgets. We provide more examples in Chapters 23 and 25.
12.1.2.3 Get the value
The getValue method returns the input value. The way to obtain the value is different for almost all inputs. For instance, the textInput() is pretty simple since the value is located in the value attribute. el refers to the element holding the id attribute and recognized by the find method. Figure 12.6 shows the result of a console.log($(el));.

FIGURE 12.6: About the el element.
getValue: function(el) {
  console.log($(el));
  return $(el).val();
}
To get the value, we apply the jQuery method val on the $(el) element and return the result.
Don’t forget the return statement.
Similarly as in the find section, we run the below example and open the developer tools to inspect the customTextInputBinding_2.js script.
### RUN ###
# OSUICode::run_example(
#  "input-system/binding-get",
#   package = "OSUICode"
# )

### APP CODE ###
library(OSUICode)

customTextInputExample(2)
We put breakpoints in the getValue method and reload the page. Upon reload, the JavaScript debugger opens starts in find. You may click on the next blue arrow to jump to the next breakpoint that is getValue, as shown Figure 12.7. Typing $(el).val() in the console shows the current
text value.
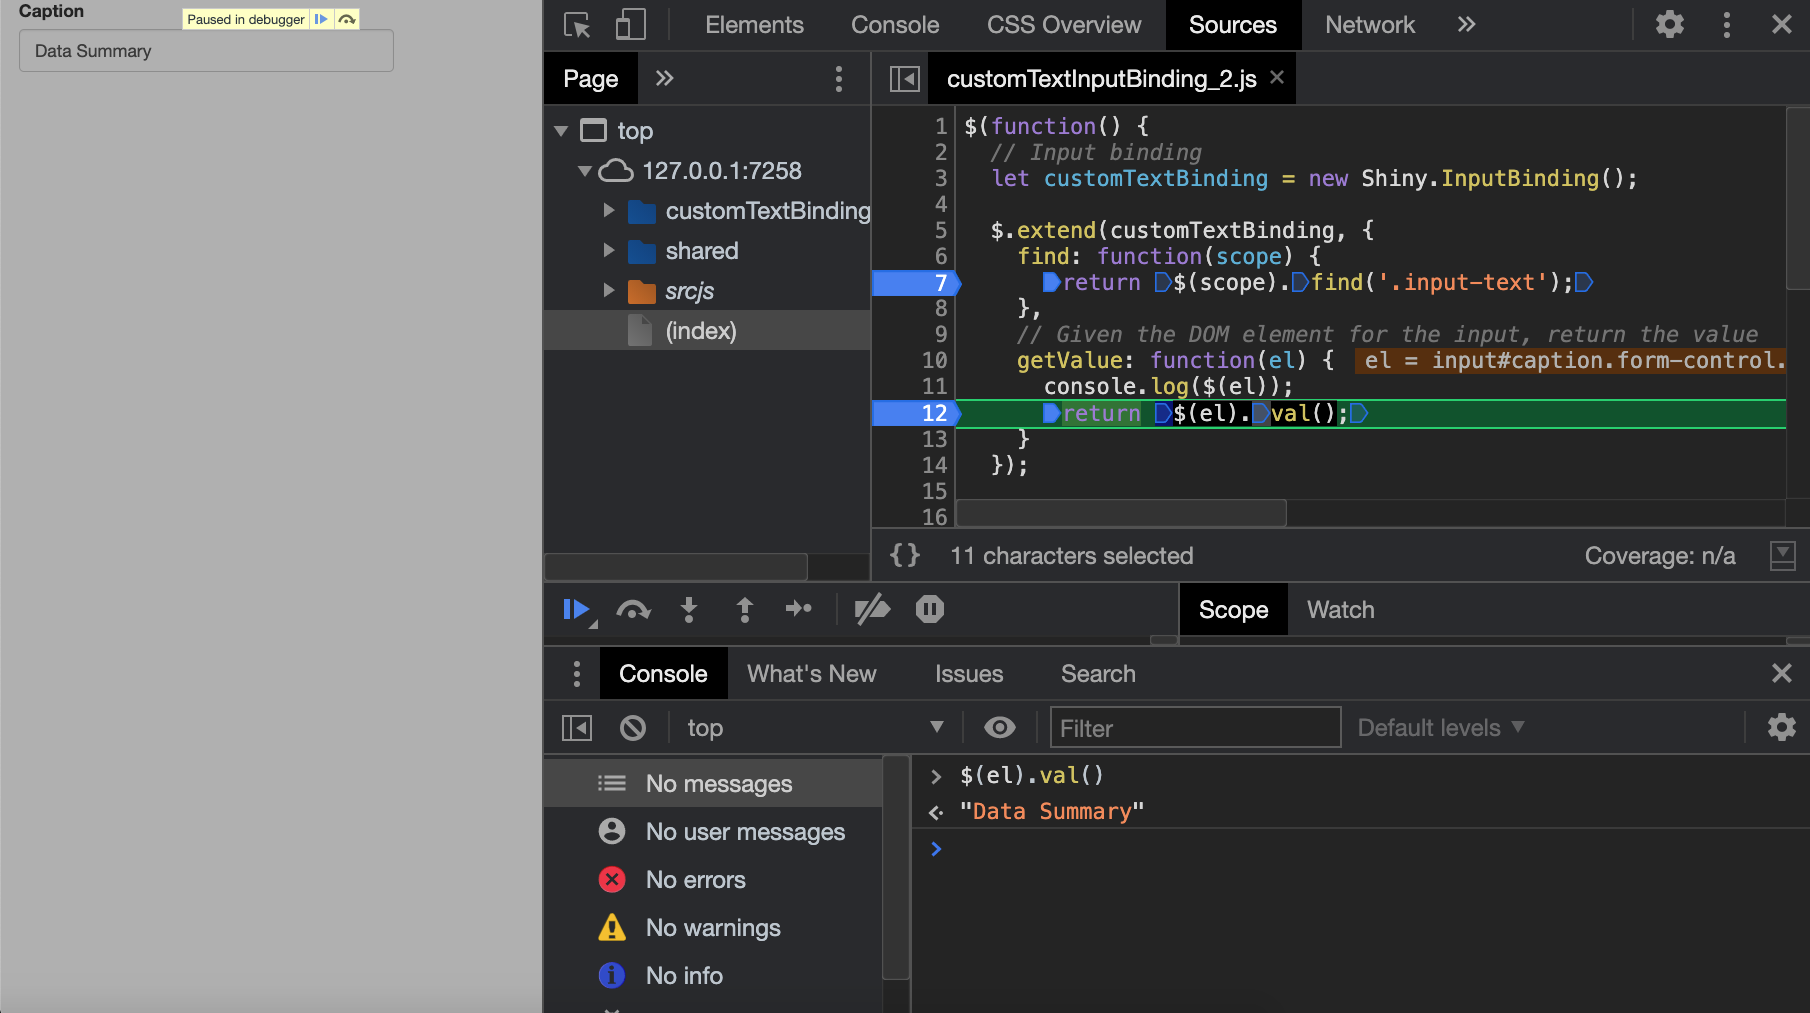
FIGURE 12.7: getValue returns the current input value.
Clicking on next again will exit the debugger. Interestingly, you’ll notice that a text appears below the input, meaning that the input$caption element exists and is internally tracked by Shiny. Notice that when you try to change the text content, the output value does not update as we would normally expect. We are actually omitting a couple of methods that prevent the binding from being fully functional. We will introduce them in the following sections.
12.1.2.4 Set and update
setValue is used to set the value of the current input. This method is necessary so that the input value may be updated. It has to be used in combination with receiveMessage, which is the JavaScript part of all the R updateupdateTextInput(). We usually call the setValue method inside.
// el is the DOM element.
// value represents the new value.
setValue: function(el, value) {
  $(el).val(value);
}
Let’s create a function to update our custom text input. Call it updateCustomTextInput. It requires at least three parameters:
- inputId tells which input to update.
-
value is the new value. This will be taken by the
setValueJS method in the input binding. -
session is the Shiny session object mentioned earlier in section 11.5.1. We will use the sendInputMessage to send values from R to JavaScript. The
receiveMessagemethod will applysetValuewith the data received from R. The current session is recovered withgetDefaultReactiveDomain().
updateCustomTextInput <- function(
  inputId,
  value = NULL,
  session = getDefaultReactiveDomain()
) {
  session$sendInputMessage(inputId, message = value)
}
We add setValue and receiveMessage to custom input binding.
Figure 12.8 illustrates the main mechanisms.
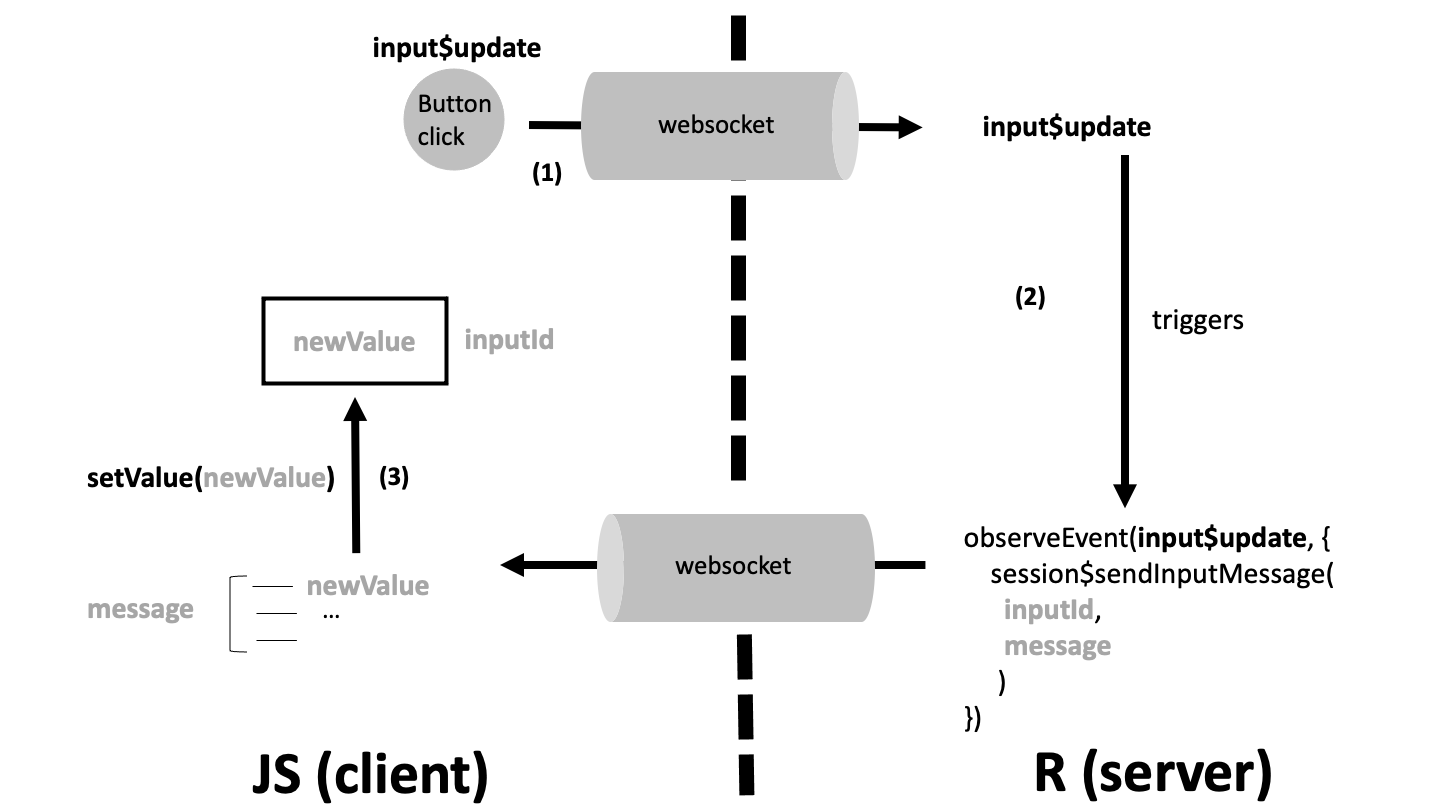
FIGURE 12.8: Events following a click on the update button. This figure demonstrates how R and JS communicate, through the websocket.
If we have to pass multiple elements to update, we would have to change the updateCustomTextInput function such as:
updateCustomTextInput <- function(
  inputId,
  value = NULL,
  placeholder = NULL,
  session = getDefaultReactiveDomain()
) {
  message <- dropNulls(
    list(
      value = value,
      placeholder = placeholder
    )
  )
  session$sendInputMessage(inputId, message)
}
shiny:::dropNulls is an internal function ensuring that the list does not contain NULL elements. We send a list from R, which is then serialized to a JSON object. In the receiveMessage method, properties like value may be accessed using the . notation. It is good practice to add a data.hasOwnProperty check to avoid running code
if the specified property does not exist:
// data are received from R.
// It is a JS object.
receiveMessage: function(el, data) {
  console.log(data);
  if (data.hasOwnProperty('value')) {
    this.setValue(el, data.value);
  }
  // other parameters to update...
}
this refers to the custom text input binding class (which is an object), so that this.setValue allows calling the setValue method.
Similarly to the previous sections, we run updateCustomTextInputExample(3) and open the developer tools to inspect the customTextInputBinding_3.js script.
### RUN ###
# OSUICode::run_example(
#  "input-system/binding-receive",
#   package = "OSUICode"
# )

### APP CODE ###
library(OSUICode)

updateCustomTextInputExample(3)
We put breakpoints in the receiveMessage and setValue methods and reload the page. Upon reload, the JavaScript debugger opens starts in find. You may click on the next blue arrow until you reach receiveMessage, as shown Figure 12.9. Inspecting the data object, it contains only one property, namely the value. In practice, there may be more complex structure. As an exercise, you may change the data.value to whatever value you want.
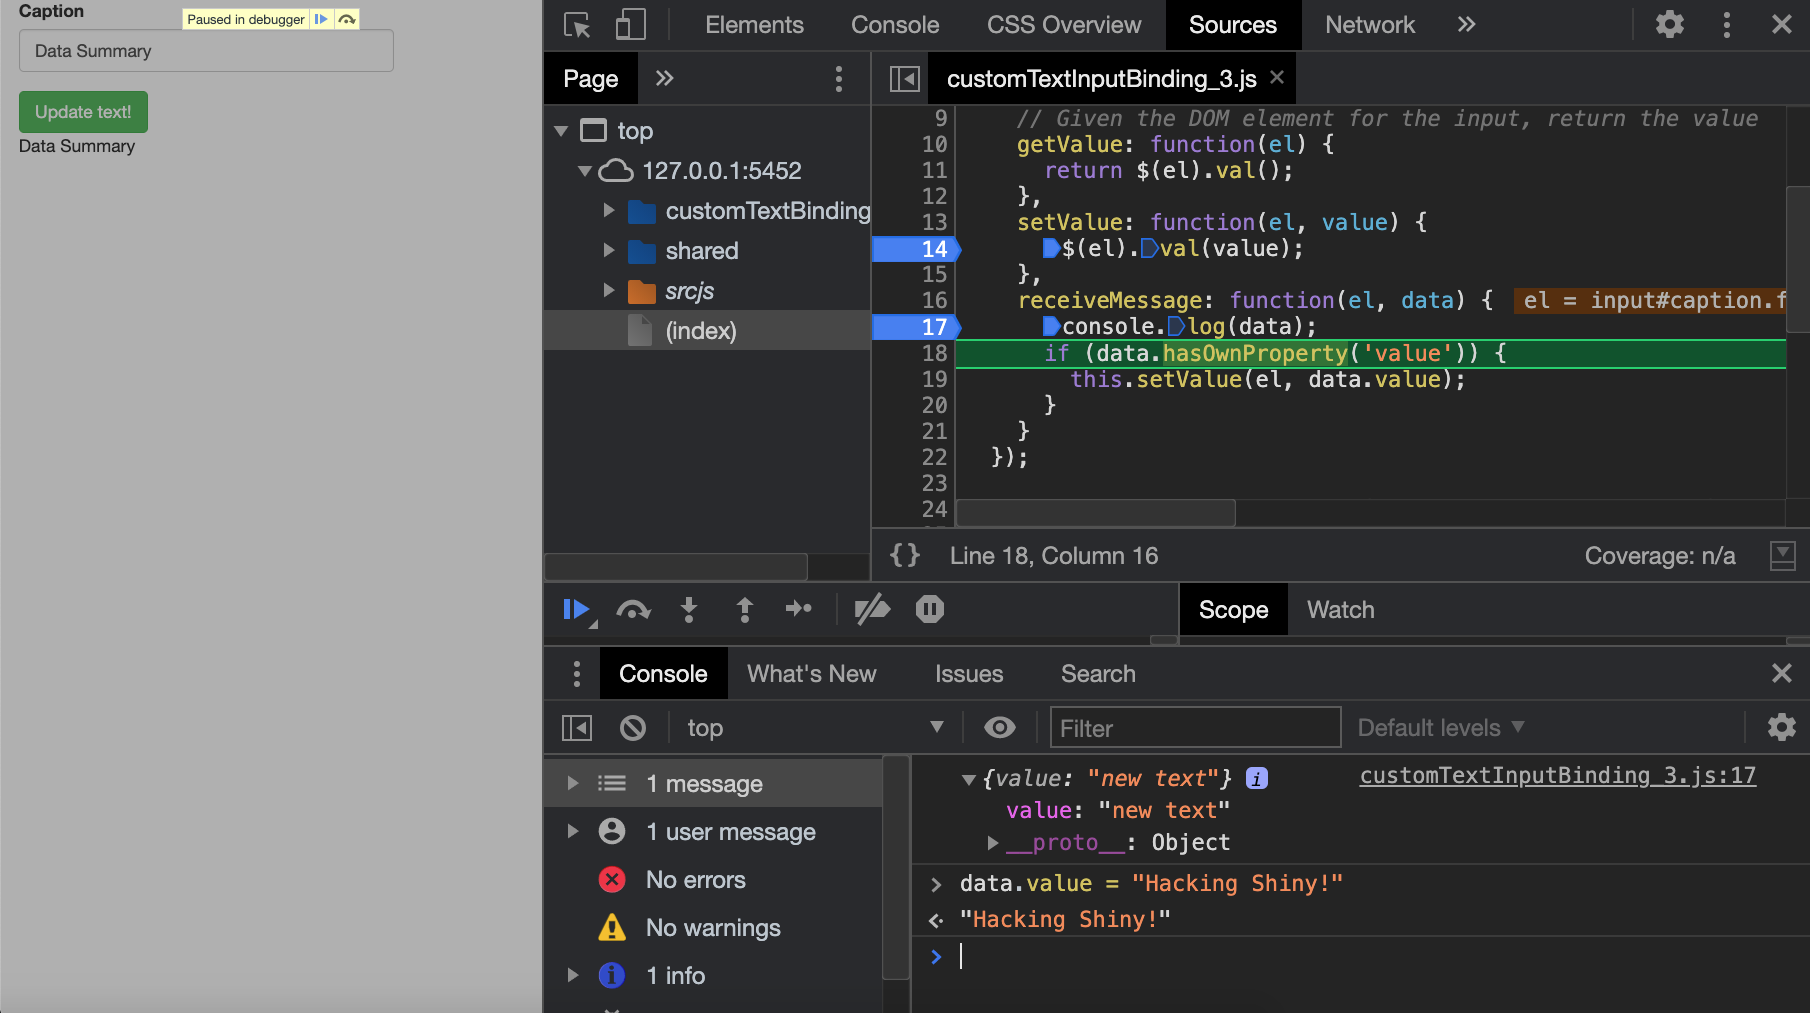
FIGURE 12.9: Receive a message from R.
Clicking on the next arrow makes us jump in the next call that is setValue, where we can print the value to check whether it is correct. Running $(el).val(value); in the debugger console instantaneously update the DOM element with the new text, as shown in Figure 12.10.
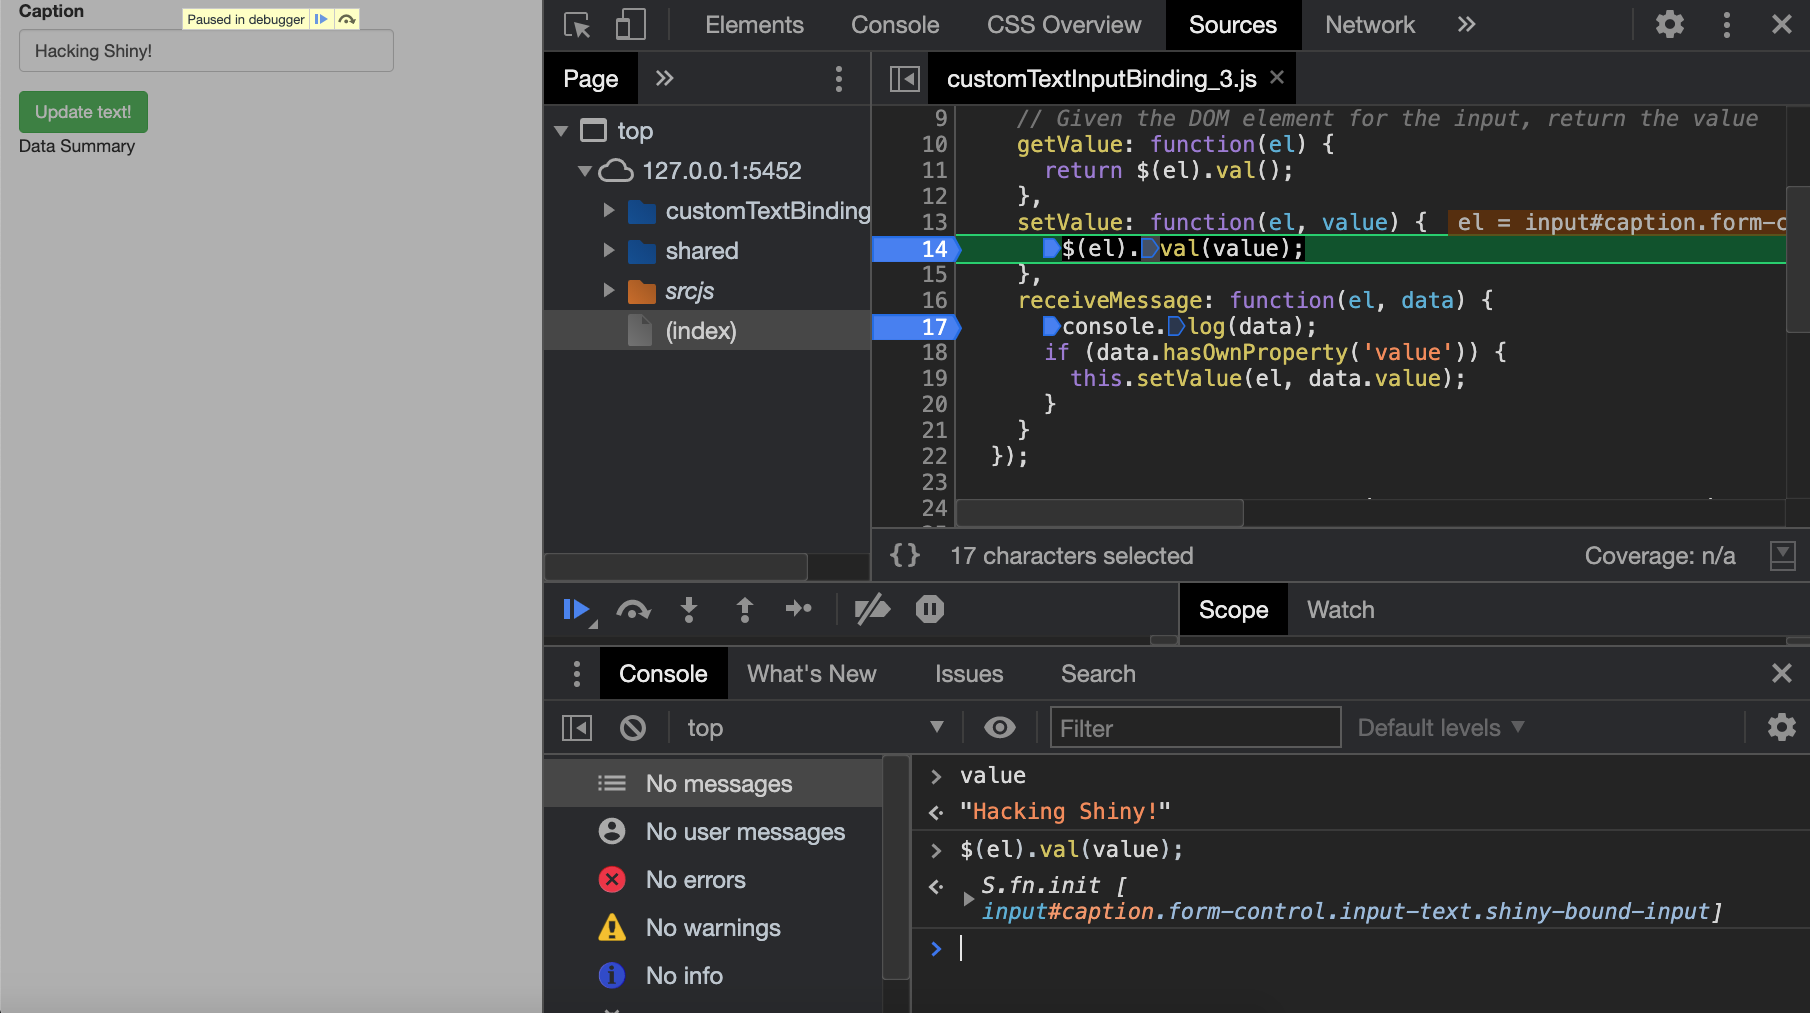
FIGURE 12.10: Set the new value.
So far so good. We managed to update the text input value on the client. Yet, after clicking the button, the output value still does not change. We are going to fix this missing step in the next section.
12.1.2.5 Subscribe
subscribe listens to events defining Shiny to update the input value and make it available in the app. Some API like Bootstrap explicitly mention those events (like hide.bs.tab, shown.bs.tab, …).
Going back to our custom text input, what event would make it change?
- After a key is released on the keyboard. We may listen to
keyup. - After copying and pasting any text in the input field or dictating text. The
inputevent may be helpful.
We add those events to our binding using an event listener seen in Chapter 10.
$(el).on(
  'keyup.customTextBinding input.customTextBinding',
  function(event) {
    callback(true);
});
Notice the event structure: EVENT_NAME.BINDING_NAME. It is best practice to follow this
convention.
The callback parameter ensures that the new value is captured by Shiny. Chapter 13 provides more details, but this is quite technical.
### RUN ###
# OSUICode::run_example(
#  "input-system/binding-subscribe",
#   package = "OSUICode"
# )

### APP CODE ###
library(OSUICode)

updateCustomTextInputExample(4)
We run the above example, open the HTML inspector, select the customTextInputBinding_4.js script and put a breakpoint in the getValue, as well as subscribe method. We enter a new text inside the input field, which triggers the debugger inside the subscribe call. Inspecting the event object, the type indicates the action, which is an input action and the target is the text input element itself, depicted in Figure 12.11.
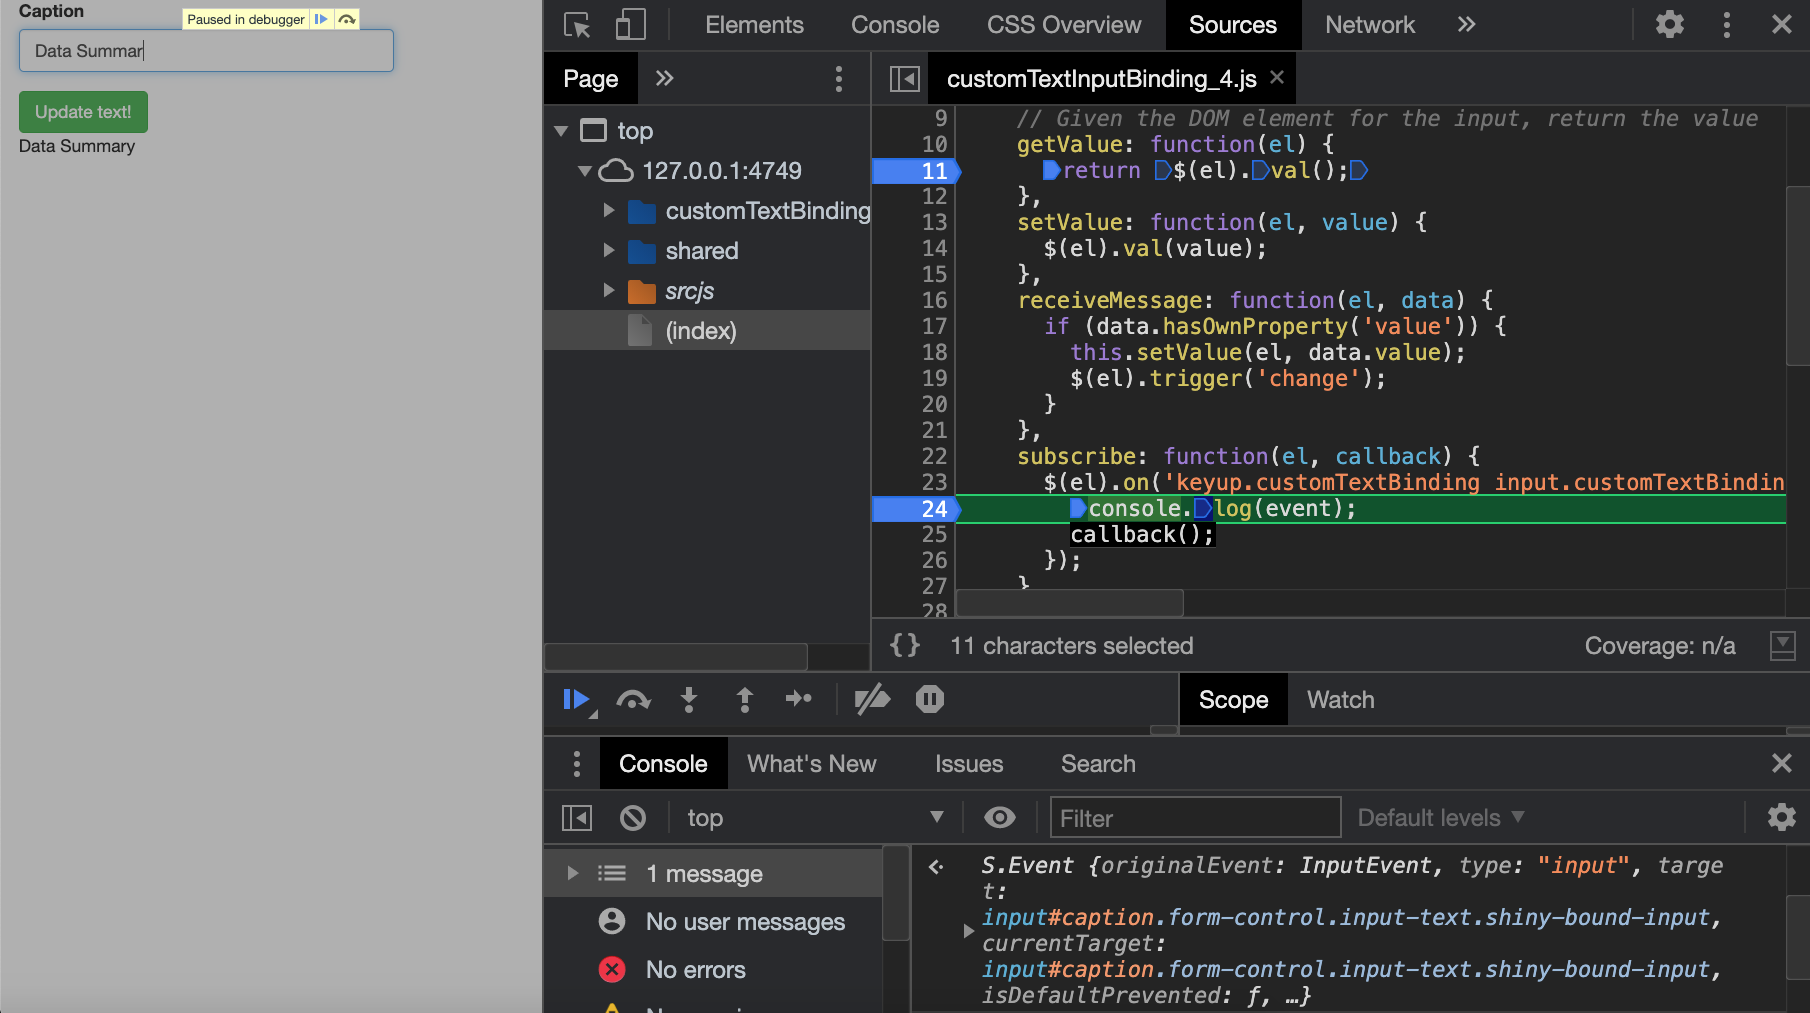
FIGURE 12.11: Subscribe method after the text input manual update.
We click on next and notice that we go back in the getValue method to get the new value.
You may check typing $(el).val() in the debugger console, like in Figure 12.12. Clicking next again shows the updated output value.
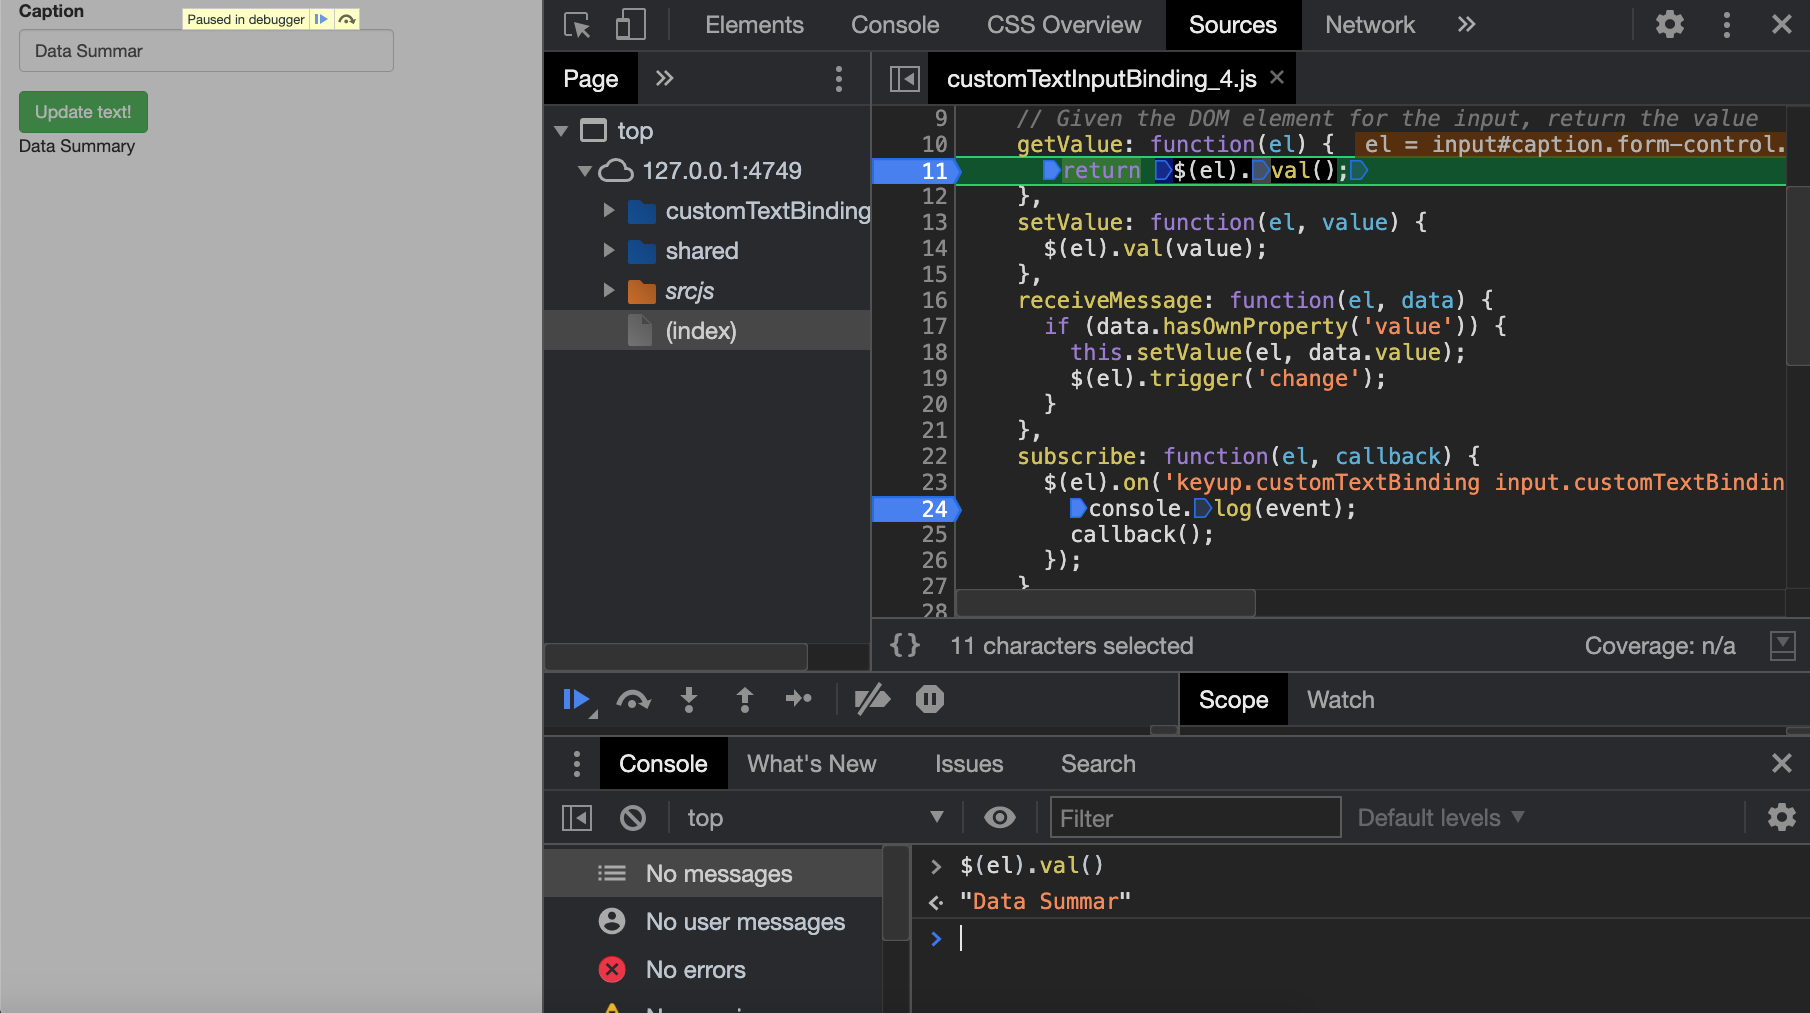
FIGURE 12.12: Subscribe is followed by a new getValue.
Hooray! The output result is successfully changed when the input value is manually updated. However, it is not modified when we click on the update button. What did we miss? Looking back at the receiveMessage method, we changed the input value, but how does Shiny knows that this step was successful? To check that no event is raised, we put a console.log(event); in the subscribe method. Any action like removing the text content or adding new text triggers event, but clicking on the action button does not. Therefore, we must trigger an event and add it to the subscribe method. We may choose the change event, which triggers when an element is updated. Notice the parameter passed to callback. We discuss it in the next part!
$(el).on('change.customTextBinding', function(event) {
  callback(false);
});
Besides, in the receiveMessage we must trigger a change event to trigger the subscribe method:
receiveMessage: function(el, data) {
  if (data.hasOwnProperty('value')) {
    this.setValue(el, data.value);
    $(el).trigger('change');
  }
}
Let’s try again.
### RUN ###
# OSUICode::run_example(
#  "input-system/binding-subscribe-2",
#   package = "OSUICode"
# )

### APP CODE ###
library(OSUICode)

updateCustomTextInputExample(5)
We put a new break point in the second event listener, that is, the one for the change event. Clicking on the button only triggers the change event, as shown Figure 12.13.
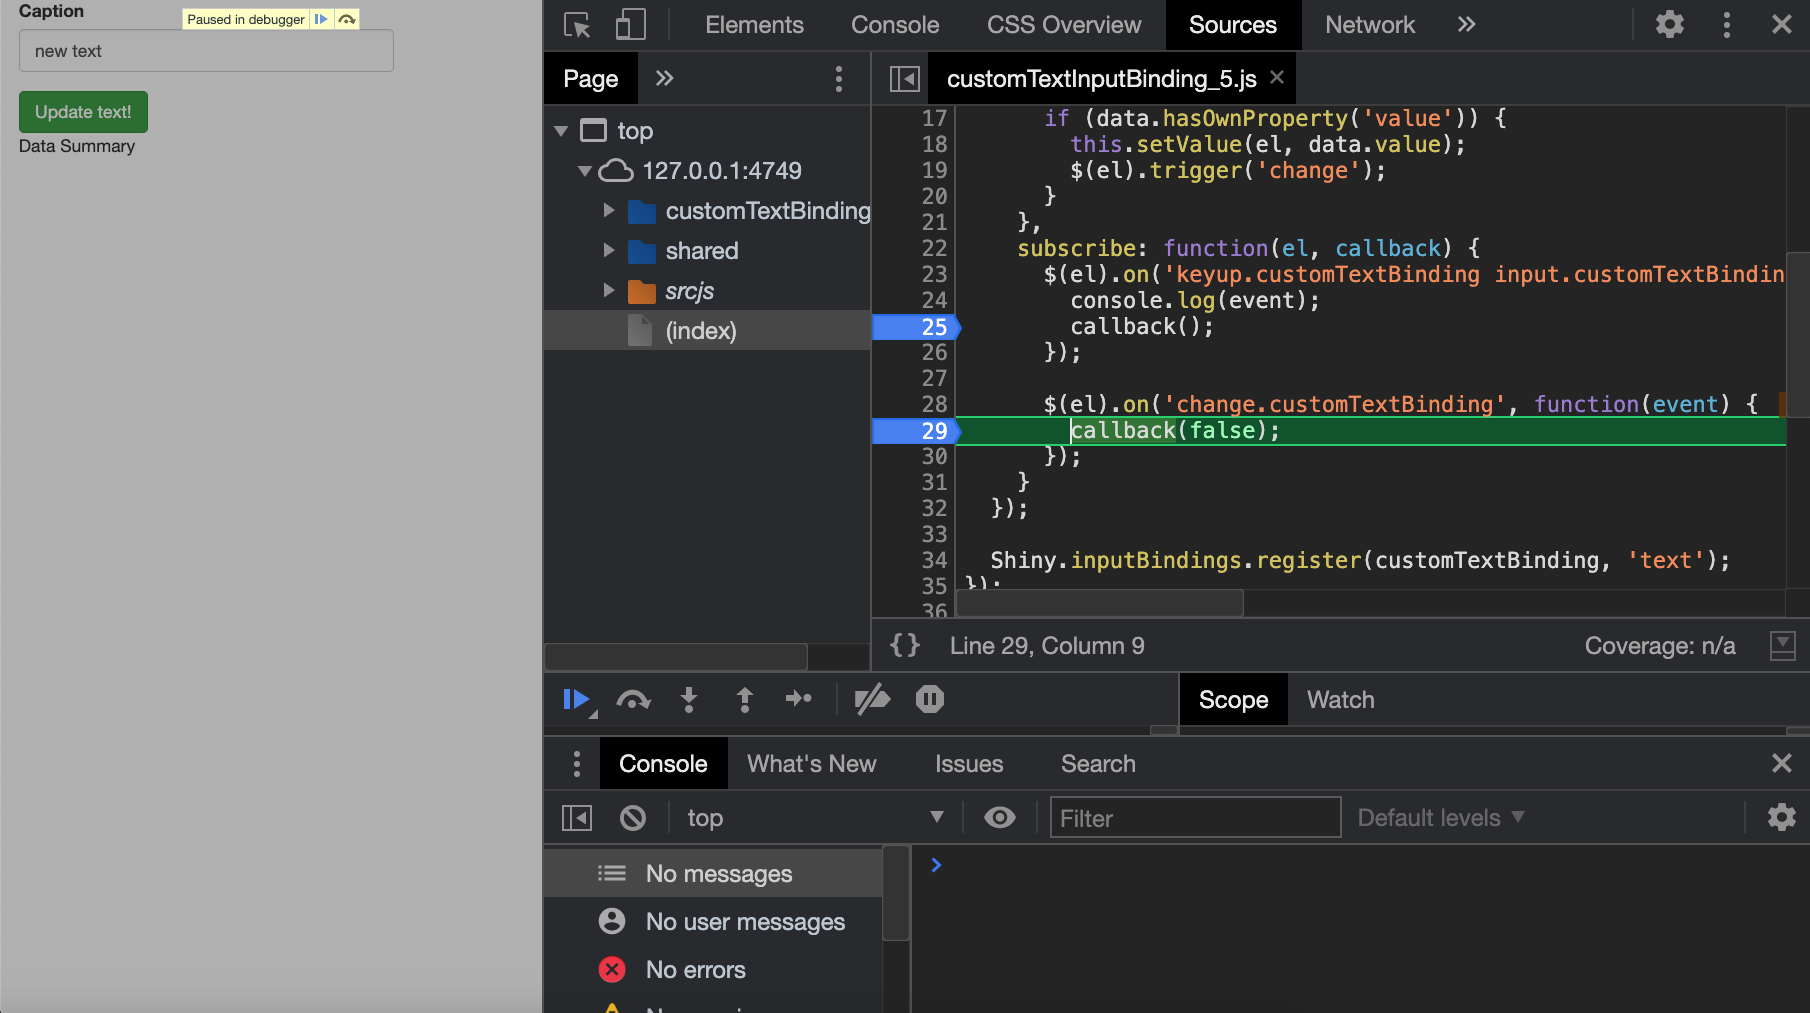
FIGURE 12.13: Add multiple event listeners inside the subscribe method.
… In some situations, we have to be careful with the this element. Indeed, called in an event listener, this refers to the element that triggered the event and not to the input binding object. For instance, below is an example where we need to trigger the getValue method inside an event listener located in the subscribe method. If you call this.getValue(el), you’ll get an error. The trick consists of creating a variable, namely self, which takes this as value, outside the event listener. In that case, self refers to the binding itself, and it makes sense to call self.getValue(el):
subscribe: function(el, callback) {
  self = this;
  $(el).on('click.button', function(e) {
    var currentVal = self.getValue(el);
    $(el).val(currentVal + 1);
    callback();
  });
}
Perfect? Not exactly.
12.1.2.6 Setting rate policies
It would be better to only change the input value once the keyboard is completely released for some time (and not each time a key is released). This is what we call debouncing, which allows a delay before telling Shiny to read the new value, and it is achieved using the getRatePolicy method. Additionally, we must also pass true to the callback in the subscribe method, in order to apply our specific rate policy (debounce, throttle). This is useful, for instance, when we don’t want to flood the server with useless update requests. For example, when using a slider, we only want to send the value as soon as the range stops moving and not all intermediate values. Those elements are defined here.
Run the below app and try to manually change the text input value by adding a couple of letters as fast as you can. What do you notice? We see the output value only updates when we release the keyboard.
### RUN ###
# OSUICode::run_example(
#  "input-system/binding-rate-policies",
#   package = "OSUICode"
# )

### APP CODE ###
library(OSUICode)

updateCustomTextInputExample(6)
You may adjust the delay according to your needs, but we caution to not set the delay too long as this becomes problematic too (unnecessary lags).
If you want to get an overview of all binding steps, you may try the following slide from the 2020 R in Pharma workshop.
12.1.2.7 Register an input binding
At the end of the input binding definition, we register it for Shiny.
let myBinding = new Shiny.inputBinding();
  $.extend(myBinding, {
  // methods go here
});

Shiny.inputBindings.register(
  myBinding,
  'PACKAGE_NAME.BINDING_NAME'
);
Best practice is to name it following PACKAGE_NAME.BINDING_NAME, to avoid conflicts.
Although the Shiny documentation mentions a Shiny.inputBindings.setPriority method to handle conflicting bindings, if you respect the above convention, this case almost never happens.
As a side note, if you think that the binding name is useless, have a look at the {shinytest} internal structure.
Under the hood, it has a file, which maps all input elements:
widget_names <- c(
    "shiny.actionButtonInput"  = "actionButton",
    "shiny.checkboxInput"      = "checkboxInput",
    "shiny.checkboxGroupInput" = "checkboxGroupInput",
Guess what? Those names are the ones given during the input binding registration.
12.1.2.8 Other binding methods
There are a couple of methods not described above that are contained in the InputBinding class prototype. They were not described before since, most of the time, we don’t need to change them and can rely on the defaults:
-
getId returns the object id (Figure 12.14). If you don’t provide your own method, the binding falls back to the default one provided in the
InputBindingclass. This method is called after thefindstep. Chapter 13 provides more details. -
getType required to handle custom data formats. It is called after
getId. An entire section 12.4 is dedicated to this.
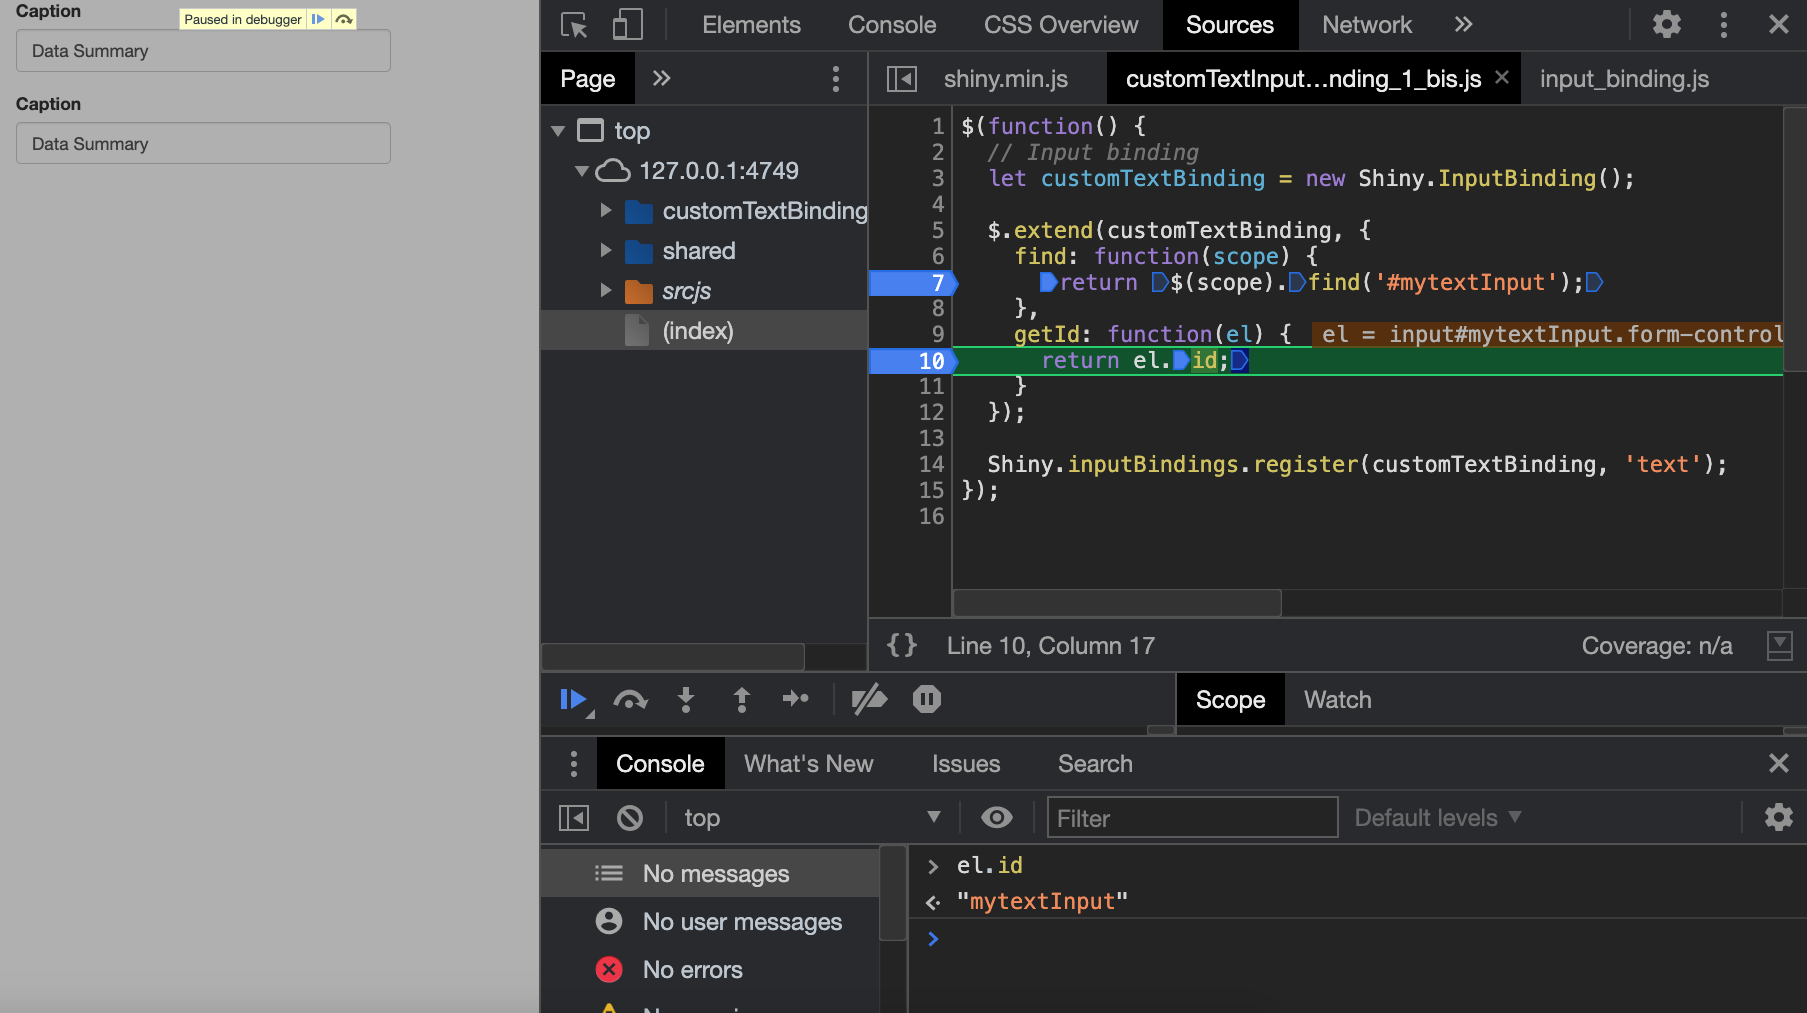
FIGURE 12.14: The binding getId method.
12.1.3 Edit an input binding
In some cases, we would like to access the input binding and change its default behavior, even though not always recommended, since it will affect all related inputs. As bindings are contained in a registry, namely Shiny.inputBindings, one may seamlessly access and modify them. This is a five-step process:
- Wait for the
shiny:connectedevent, so that theShinyJS object exists. - Unbind all inputs with
Shiny.unbindAll(). - Access the binding registry,
Shiny.inputBindings. - Extend the binding and edit its content with
$.extend(... {...}) - Apply the new changes with
Shiny.bindAll().
$(function() {
  $(document).on('shiny:connected', function(event) {
    Shiny.unbindAll();
    $.extend(Shiny
      .inputBindings
      .bindingNames['shiny.actionButtonInput']
      .binding, {
        // do whathever you want to edit existing methods
      });
    Shiny.bindAll();
  });
});
12.1.4 Update a binding from the client
The interest of receiveMessage and setValue is to be able to update the input
from the server side, that is R, through the session$sendInputMessage. Yet,
this task might be done directly on the client, thereby lowering the load on the server.
We consider the following example: a Shiny app contains two action buttons; clicking on the first one
increases the value of the second by 10. This won’t be possible with the classic approach since a button click
only increases its value by 1. How do we proceed?
- We first set an event listener on the first button.
- We target the second button and get the input binding with
$obj.data('shiny-input-binding'). - We recover the current value.
- We call the
setValuemethod, adding 10 to the current value. - Importantly, to let Shiny update the value on the R side, we must trigger an event that will be detected in the
subscribemethod. The action button only has one event listener, but other may be added. Don’t forget that triggering aclickevent would also increment the button value by 1! In the following, we have to customize thesubscribemethod to work around:
$(function() {
  // each time we click on #test (a button)
  $('#button1').on('click', function() {
    let $obj = $('#button2');
    let inputBinding = $obj.data('shiny-input-binding');
    let val = $obj.data('val') || 0;
    inputBinding.setValue($obj, val + 10);
    $obj.trigger('event');
  });
});
If you click on the second button, the value increments only by 1 and the plot will be only visible after 10 clicks, while only 1 click is necessary on the first button. The reset button resets the second action button value to 0.
$('#reset').on('click', function() {
  let $obj = $('#button2');
  let inputBinding = $obj.data('shiny-input-binding');
  inputBinding.reset($obj);
  $obj.trigger('change');
});
It implements the feature discussed in the previous part, where we extend the button binding to add a reset method and edit the subscribe method to add a change event listener, simply telling Shiny to get the new value. Contrary to click, change does not increment the button value, which is exactly what we want.
$.extend(
  Shiny
    .inputBindings
    .bindingNames['shiny.actionButtonInput']
    .binding, {
  reset: function(el) {
   $(el).data('val', 0);
  },
  subscribe: function(el, callback) {
    $(el).on('click.actionButtonInputBinding', function(e) {
      let $el = $(this);
      let val = $el.data('val') || 0;
      $el.data('val', val + 1);

      callback();
    });

    // this does not trigger any click and won't change
    // the button value
    $(el).on('change.actionButtonInputBinding', function(e) {
      callback();
    });
  }
});
The whole JS code is found in the {OSUICode} package (see https://github.com/DivadNojnarg/outstanding-shiny-ui-code/blob/b95f656bce9de7600c05b5045a4e005f70c4f83d/inst/input-system/input-bindings/editBinding.js#L1) and below is the related app. It is available as an HTML dependency with OSUICode::editBindingDeps(), whose output is shown Figure 12.15.
### RUN ###
# OSUICode::run_example(
#  "input-system/edit-binding-client",
#   package = "OSUICode"
# ) 
FIGURE 12.15: Edit and trigger an input binding from the client.
This trick has been extensively used in the virtual physiology simulator to trigger animations.
Another example of accessing a binding method from the client is found in the shinydashboard package.
12.2 Secondary inputs
The Shiny input binding system is too convenient to be only used for primary input elements like textInput(), numericInput(). It is a super powerful tool to unleash apps’s interactivity. In the following, we show how to add an input to an element that was not primarily designed to be a user input, also non-officially denoted as secondary inputs.
By convention, we’ll not use inputId but id for secondary inputs, which is the case in all the new versions of RinteRface packages like bs4Dash.
12.2.1 Boxes on steroids
You may know the shinydashboard box function. Boxes are containers with a title, body and footer, as well as optional elements. Those boxes may also be collapsed. It would be nice to capture the state of the box in an input, so as to trigger other actions as soon as this input changes. Since an input value is unique, we must add an id parameter to the box function. Below is what we had to modify compared to the shinydashboard::box() function.
box <- function(.., id = NULL, title = NULL, footer = NULL,
                 background = NULL, width = 6, height = NULL,
                 collapsible = FALSE, collapsed = FALSE) {

  # ....; Extra code removed

  tagList(
    boxDeps(), # required to attach the binding
    div(
      class = if (!is.null(width)) paste0("col-sm-", width),
      div(
        id = id, # required to target the unique box
        class = boxClass, # required to target all boxes
        # ....; Extra code removed (box header, body, footer)
      )
    )
  )
}
boxDeps() contains the JS dependencies to handle the box behavior.
boxDeps <- function() {
  htmlDependency(
    name = "boxBinding",
    version = "1.0.0",
    src = c(file = system.file(
      "input-system/input-bindings",
      package = "OSUICode"
    )),
    script = "boxBinding.js"
  )
}
As we may collapse and uncollapse the box, we create the updateBox() function, which will toggle it. In this example, it does not send any specific message since we’ll rely on internal AdminLTE JS methods to do the work.
updateBox <- function(
  id,
  session = getDefaultReactiveDomain()
) {
  session$sendInputMessage(id, message = NULL)
}
If you play with this example and inspect a box as shown in Figure 12.16, you’ll notice that when collapsed, a box gets the collapsed-box class, which is useful to keep in mind for the input binding design.
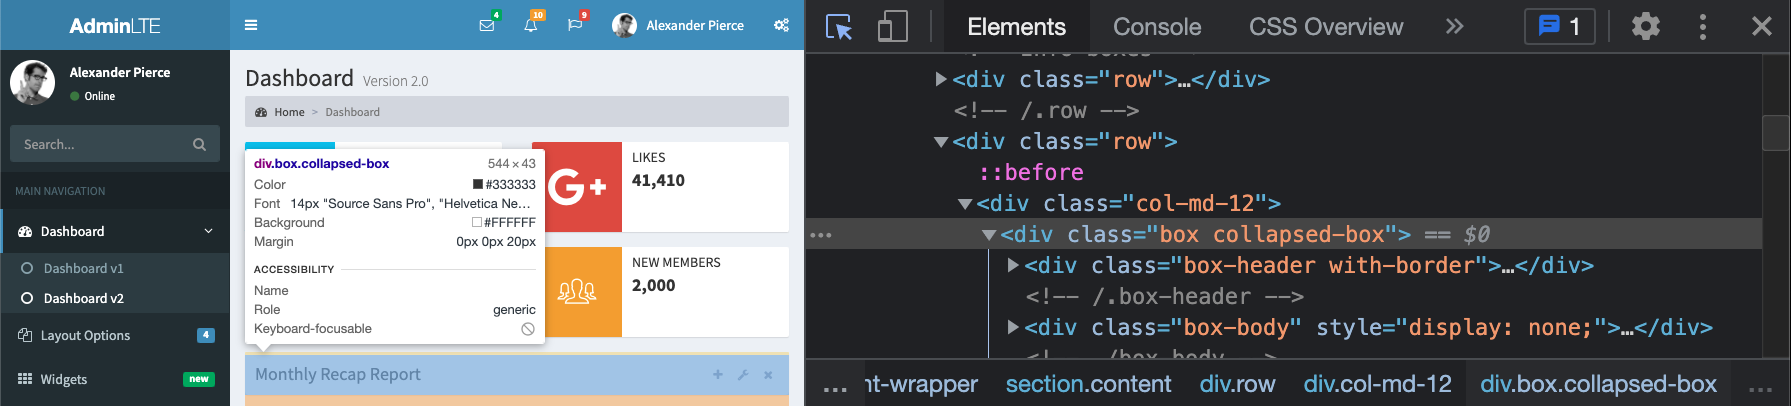
FIGURE 12.16: Collapsed AdminLTE2 box.
This is time to design the JS dependency, that is, boxBinding.js. Like all input bindings, it starts by instantiating a new object with Shiny.InputBinding(). At the end of the code, we register the binding so that Shiny knows it exists.
let boxBinding = new Shiny.InputBinding();
$.extend(boxBinding, {
  // Methods go here
});

Shiny.inputBindings.register(boxBinding, 'box-input');
The following are the main steps taken to design the binding.
-
find: there is nothing special to say, we are looking for elements having theboxclass.
find: function(scope) {
  return $(scope).find('.box');
}-
getValue: we check if the element has thecollapsed-boxclass and return an object, which will give a list in R. This is in case we add other elements like the remove action available in AdminLTE. We therefore access each input element withinput$<box_id>$<property_name>.
getValue: function(el) {
  let isCollapsed = $(el).hasClass('collapsed-box')
  return {collapsed: isCollapsed}; // this will be a list in R
}-
setValue: we call the plug and play AdminLTEtoggleBoxmethod.
setValue: function(el, value) {
  $(el).toggleBox();
}-
receiveMessage: we call thesetValuemethod and trigger a change event so that Shiny knows when the value needs to be updated withinsubscribe.
receiveMessage: function(el, data) {
  this.setValue(el, data);
  $(el).trigger('change');
}-
subscribe: as previously mentioned, it is necessary to know when to tell Shiny to update the value with thesubscribemethod. Most of the time, the change event might be sufficient, but as shinydashboard is built on top of AdminLTE2, it has an API to control the box behavior. We identify two events corresponding to the collapsible action:
- expanded.boxwidget (Triggered after the box is expanded)
- collapsed.boxwidget (Triggered after the box is collapsed)
After further investigations, those events are not possible to use since the AdminLTE library does not trigger them in the main JS code (see the collapse method). There are other solutions, and we decided to listen to the click event on the [data-widget="collapse"] element and delay the callback call by a value which is slightly higher than the default AdminLTE2 animation to collapse the box (500 ms). If you omit this part, the input will not have time to properly update.
subscribe: function(el, callback) {
  $(el).on(
    'click',
    '[data-widget="collapse"]',
    function(event) {
      setTimeout(function() {
        callback();
      }, 50);
  });

  $(el).on('change', function(event) {
    setTimeout(function() {
      callback();
    }, 50);
  });
}- Even though animations are nice, it might appear rather sub-optimal to wait 500 ms for a box to collapse. AdminLTE options allow you to change this through the
$.AdminLTE.boxWidgetobject. We specify theanimationSpeedproperty to 10 ms and update the input binding script to reduce the delay in thesubscribemethod (50 ms seems reasonable).
$(function() {
  // overwrite box animation speed.
  // Putting 500 ms add unnecessary delay for Shiny.
  $.AdminLTE.boxWidget.animationSpeed = 10;
});
We don’t need an extra listener for the updateBox() function since it also triggers a click on the collapse button, thereby forwarding to the corresponding listener. The whole code may be found here.
Let’s try our new toy in a simple app. The output is depicted in Figure 12.17.
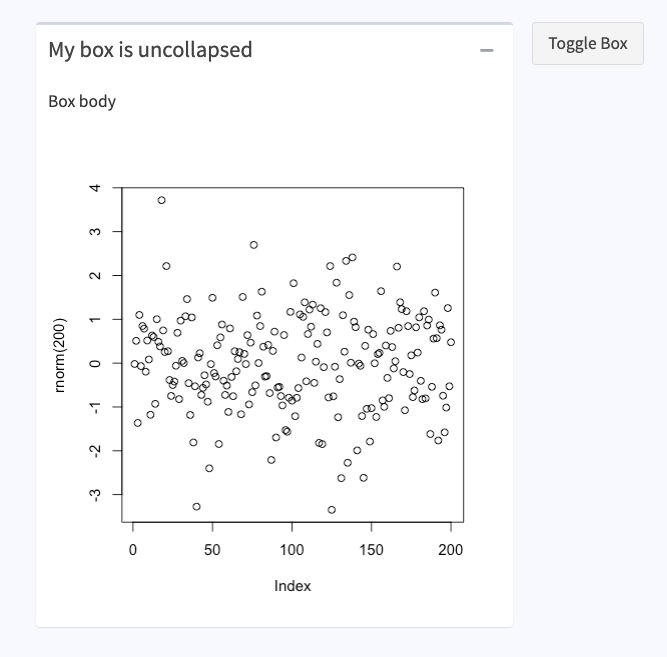
FIGURE 12.17: {shinydashboard} box with custom input binding listening to the box collapse state.
### RUN ###
# OSUICode::run_example(
#  "input-system/boxes-on-steroids",
#   package = "OSUICode"
# )
The bs4Dash box function follows the same principle, with extra features showed here. We leave the reader to explore the code as an exercise.
12.2.2 Further optimize boxes
We may imagine leveraging the input binding system to update any box property and get rid of the classic renderUI() approach. Indeed, until now, there would be only one way to update a box from the server. In the following code, we intentionally added a dummy task causing a 5 s delay in the card rendering. You’ll notice that nothing happens for some time, which is weird for the end user and might cause you to think about a possible app crash (Figure 12.18, left side).
### RUN ###
# OSUICode::run_example(
#  "input-system/update-box-renderUI",
#   package = "OSUICode"
# )

### APP CODE ###
library(shiny)
library(shinyWidgets)
library(OSUICode)

ui <- fluidPage(
  # import shinydashboard deps without the need of the
  # dashboard template
  useShinydashboard(),

  tags$style("body { background-color: ghostwhite};"),

  br(),
  uiOutput("custom_box"),
  selectInput(
    "background",
    "Background",
    choices = shinydashboard:::validColors
  )
)

server <- function(input, output, session) {

  dummy_task <- reactive({
    Sys.sleep(5)
    12
  })

  output$custom_box <- renderUI({
    dummy_task()
    box(
      title = "Box",
      width = dummy_task(),
      "Box body",
      background = input$background
    )
  })
}

shinyApp(ui, server)
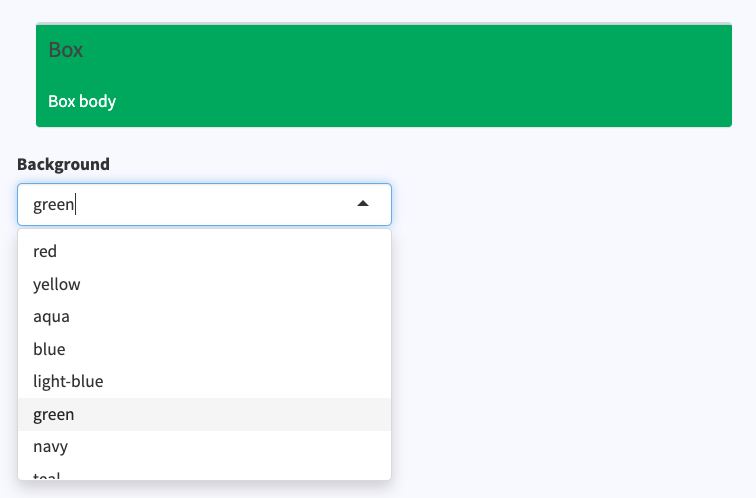
FIGURE 12.18: Left: what the user sees when app starts. Right: what the user sees after 5 s.
The whole piece of UI is re-rendered each time, while only the box class should be modified. As shown above, this does have substantial impact for a very complex app festooned with inputs/outputs, thereby altering the overall user experience.
Let’s provide some optimization and get rid of the renderUI().
Figure 12.19 summarizes the main idea, and you may use it as a mind map to follow the remainder of this section.
We proceed in two steps. The first part consists in customizing the previously designed box() function from 12.2.1 to gather as many parameters as possible in a list of options. For instance, we choose to extract width and title.
width is expected to be numeric, while title might be any HTML tag, a list of HTML tags, justifying the use of slightly more sophisticated code (we can’t use toJSON() on a Shiny tag … not yet). So that we don’t shoot ourselves in the foot, we create a specific object for the processed title, that is, processed_title. Indeed, a common mistake would be to re-inject the processed title later in the HTML box tag, which would cause an error. Its purpose is solely to be part of the configuration script required by JS.
box2 <- function(..., id = NULL, title = NULL, footer = NULL,
                 background = NULL, width = 6, height = NULL,
                 collapsible = FALSE, collapsed = FALSE) {

  if (!is.null(title)) {
    processed_title <- if (
      inherits(title, "shiny.tag.list") ||
      inherits(title, "shiny.tag")
    ) {
      as.character(title)
    } else {
      title
    }
  }

  props <- dropNulls(
    list(
      title = processed_title,
      background = background,
      width = width
    )
  )

  # ....; Extra code removed
}
This properties list has to be treated on the JS side, the reason why we remove NULL elements with dropNulls(), since we don’t want to send empty arrays. We choose the following approach, where we convert our properties to a JSON with toJSON() and embed them in a script tag. Note the data-for attribute pointing to the unique id parameter. This will guarantee the uniqueness of our configuration script.
box2 <- function(..., id = NULL, title = NULL, footer = NULL,
                 background = NULL, width = 6, height = NULL,
                 collapsible = FALSE, collapsed = FALSE) {

  # ....; Extra code removed

  configTag <- tags$script(
    type = "application/json",
    `data-for` = id,
    jsonlite::toJSON(
      x = props,
      auto_unbox = TRUE,
      json_verbatim = TRUE
    )
  )

}
To create the box HTML tag, we leverage the box() function. The next step is to add the configuration tag, which is achieved with the new htmltools tagQuery() API, extensively studied in section 2.6. We finally attach the not-yet-designed JS dependencies with tagList().
box2 <- function(..., id = NULL, title = NULL, footer = NULL,
                 background = NULL, width = 6, height = NULL,
                 collapsible = FALSE, collapsed = FALSE) {

  # ....; Extra code removed

  boxTag <- tagQuery(
    box(
      ..., id = id, title = title, footer = footer,
      background = background, width = width, height = height,
      collapsible = collapsible, collapsed = collapsed
    )
  )$
    append(configTag)$
    allTags()

  tagList(box2Deps(), boxTag)
}
Like in 12.2.1, we define the new dependencies, namely box2Deps(), referencing the boxBindingEnhance.js script, which we are going to design in few minutes.
box2Deps <- function() {
  htmlDependency(
    name = "boxBinding",
    version = "1.0.0",
    src = c(file = system.file(
      "input-system/input-bindings",
      package = "OSUICode"
    )),
    script = "boxBindingEnhanced.js"
  )
}
Then, we have to modify the updateBox() function such that it handles both toggle and update possibilities. options contains all changeable properties like title and width.
We don’t describe the toggle case since it is quite similar to the previous implementations. When the action is update, we enter the if statement and options must be processed. If the option element is a Shiny tag or a list of Shiny tags (tagList()), we convert it to character with as.character(). The returned message is a vector containing the action as well as the option list:
updateBox2 <- function(
  id,
  action = c("toggle", "update"),
  options = NULL,
  session = getDefaultReactiveDomain()
) {
  # for update, we take a list of options
  if (action == "update") {
    # handle case where options are shiny tag
    # or a list of tags ...
    options <- lapply(options, function(o) {
      if (inherits(o, "shiny.tag") ||
          inherits(o, "shiny.tag.list")) {
        o <- as.character(o)
      }
      o
    })
    message <- dropNulls(
      c(
        action = action,
        options = list(options)
      )
    )
    session$sendInputMessage(id, message)
  } else if (message == "toggle") {
    session$sendInputMessage(id, message = match.arg(action))
  }
}
Let’s define the new JS binding required by box2Deps(). We start from the previously defined binding in boxBindings.js and modify the setValue method to import our newly defined properties. The boxTag has two children, the box and the configuration script. $(el) refers to the box, therefore we have to look one level up to be able to use the find method (find always goes deeper in the DOM), namely $(el).parent(). From there, we only have to target the script tag $(el).parent().find('script[data-for="' + el.id + '"]'). In practice, you may reuse this piece of code in multiple places, for instance in the getValue method. To avoid duplication, we create an internal function, _getConfig. Note the _ prefix, which makes the difference between the default input binding methods (available for all bindings) and the user-defined methods, local to a specific binding. This function just returns the config script:
_getConfigScript: function(el) {
  return(
    $(el)
      .parent()
      .find('script[data-for="' + el.id + '"]')
  )
}
We also extract the _processConfig method that calls _getConfigScript and converts the script content to a JS object that we can manipulate. Notice the this keyword: it represents the input binding instance as explained in section 12.1.2.
_processConfig: function(el) {
  return(
    JSON.parse(
      this
      ._getConfigScript(el)
      .html()
    )
  )
}
Then, we call _processConfig inside setValue:
setValue: function(el, value) {
  let config = this._processConfig(el);
}
From the above code, config.width returns the initial width, while value.options.width contains the new width value provided in the updateBox2 message output. As a security, we don’t want to change config if the action provided in updateBox2 is not update (see if statement). Assuming value.action === "update", we can continue to develop our JS logic. Good practice is to check whether value.options.width exists with value.options.hasOwnProperty("width"). If yes, we ensure whether its value and config.width are different. We always choose ===, which compares the type and the value (== only compares the value such that "1" == 1 is true):
setValue: function(el, value) {
  let config = this._processConfig(el);

  if (value.action === 'update') {
    if (value.options.hasOwnProperty('width')) {
      if (value.options.width !== config.width) {
        this._updateWidth(
          el,
          config.width,
          value.options.width
        )
        config.width = value.options.width;
      }
    }
    // other items to update
  }
}
_updateWidth is a internal method defined in the input binding. It has three parameters, el, o and n (o and n being the old and new values, respectively):
_updateWidth: function(el, o, n) {
  // removes old class
  $(el).parent().toggleClass('col-sm-' + o);
  $(el).parent().addClass('col-sm-' + n);
  // trigger resize so that output resize
  $(el).trigger('resize');
}
We must trigger a resize event so that output correctly scales. The internal method is identified by an underscore since it is not an inherited Shiny.InputBinding method. We finally update the config value by the newly set value and repeat the process for any other property. Don’t forget to update the config script attached to the card tag at the end of the update condition, otherwise the input value won’t be modified:
// replace the old JSON config by the
// new one to update the input value
this
  ._getConfigScript(el)
  .replaceWith(
    '<script type="application/json" data-for="' +
    el.id +
    '">' +
    JSON.stringify(config) +
    '</script>'
  );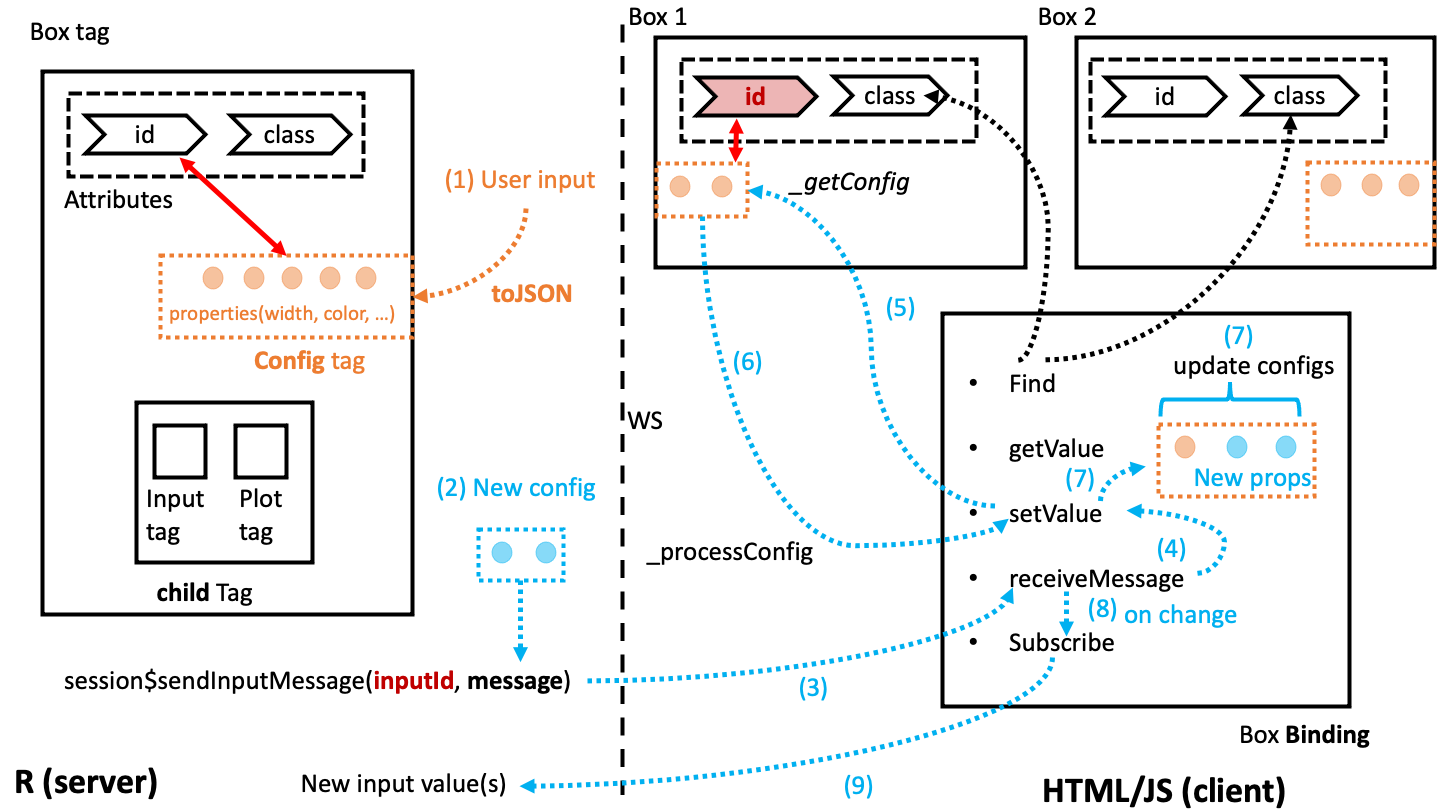
FIGURE 12.19: Box config tag concept and application.
The whole JS code may be found here. Below is the reworked version of the previously updated box without renderUI(). When the app starts, the box is displayed as shown in Figure 12.20, which is better for the end-user experience.
### RUN ###
# OSUICode::run_example(
#  "input-system/boxes-on-steroids-2",
#   package = "OSUICode"
# )

### APP CODE ###
library(shiny)
library(shinyWidgets)
library(OSUICode)

ui <- fluidPage(
  # import shinydashboard deps without the need of
  # the dashboard template
  useShinydashboard(),

  tags$style("body { background-color: ghostwhite};"),

  br(),
  box2(
    title = "My box",
    "Box body",
    id = "mybox",
    height = "400px",
    width = 6
  )
)

server <- function(input, output, session) {

  dummy_task <- reactive({
    Sys.sleep(5)
    12
  })

  observeEvent(dummy_task(), {
    updateBox2(
      "mybox",
      action = "update",
      options = list(
        width = dummy_task(),
        title = tagList(
          shinydashboardPlus::dashboardBadge(
            "New",
            color = "red"
          ),
          "New title"
        )
      )
    )
  })

}

shinyApp(ui, server)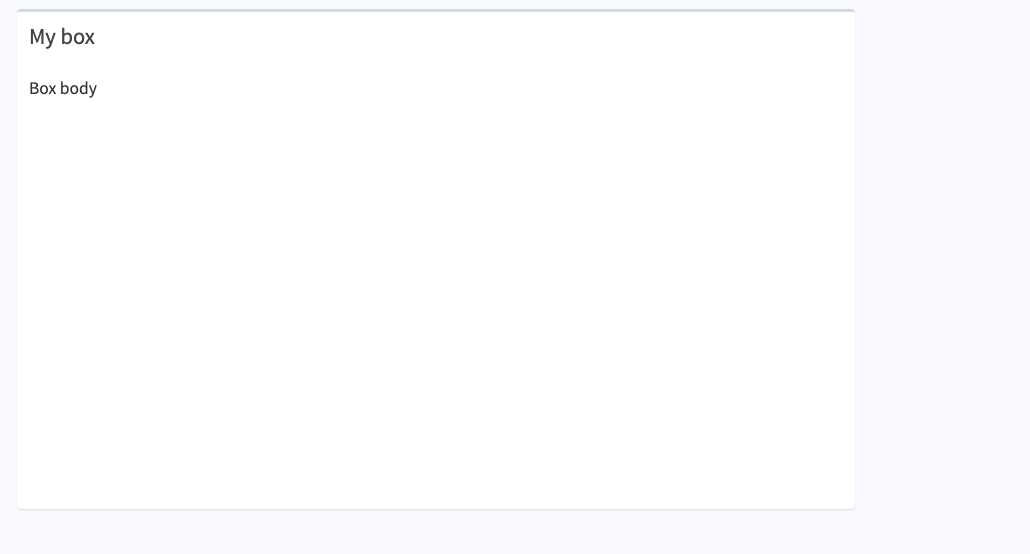
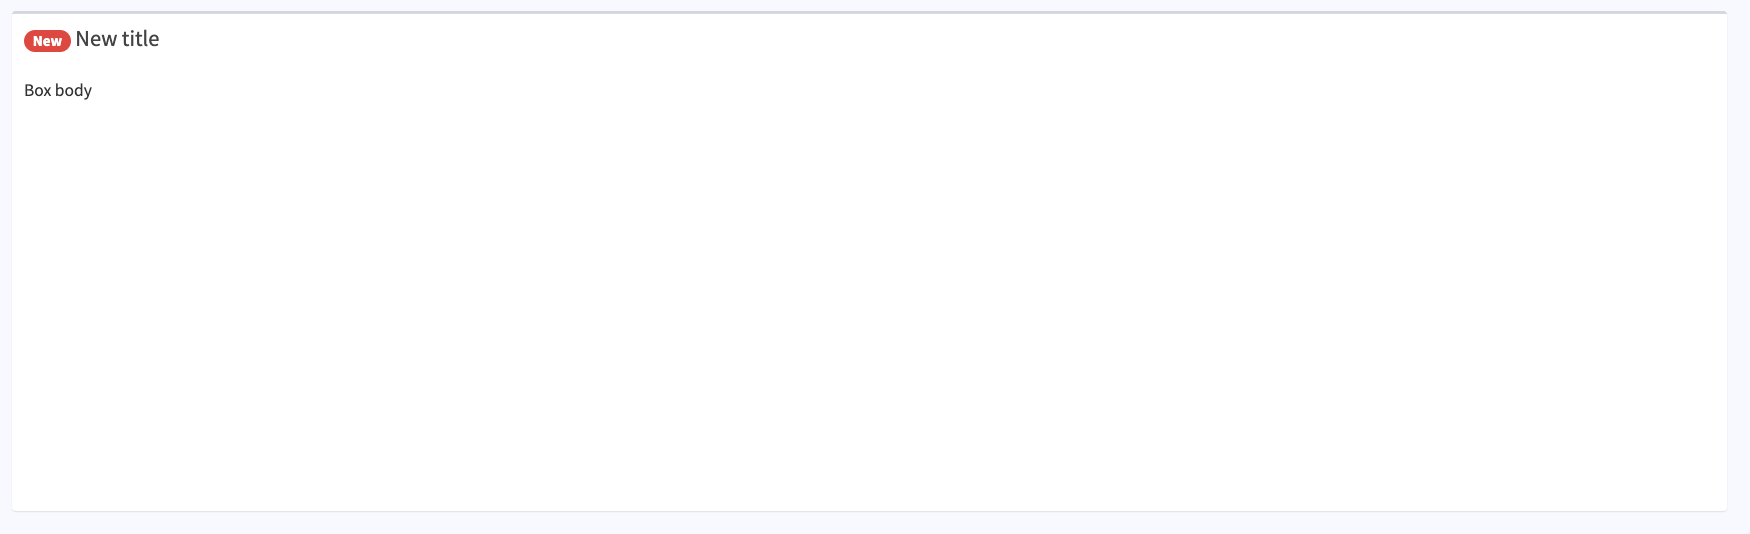
FIGURE 12.20: Left: what the user sees when app starts. Right: what the user sees after 5 s.
12.2.3 Exercise
In the above example, the title is also updated. In order to reproduce this behavior, you’ll have to update the boxBindingEnhanced.js to include the corresponding JS logic.
- Inside
boxBindingEnhanced.js, right after the updatewidthlogic, add anifstatement to check iftitlebelongs to the update properties, sent throughupdateBox2(). Fill in the blank.
if (value.options.hasOwnProperty(...)) {

}- Add a nested
ifstatement to check whether the new title is different from the old one (needless to update if both titles are the same).
if (value.options.hasOwnProperty(...)) {
  if (... !== ...) {

  }
}- On the R side, the new title will be provided as below:
updateBox2(
  "mybox",
  action = "update",
  options = list(
    title = tagList(
      shinydashboardPlus::dashboardBadge("New", color = "red"),
      "New title"
    )
  )
)
However, a valid AdminLTE box title has the following HTML structure:
<h3 class="box-title">
  <!-- TITLE CONTENT -->
</h3>
Modify the below code to wrap the provided title in a h3 tag with the box-title class.
if (value.options.hasOwnProperty(...)) {
  if (... !== ...) {
    let newTitle;
    newTitle = `<h3 class="box-title">${...}</h3>`
    newTitle = $.parseHTML(...);
  }
}- Locate the old title in the DOM and replace it with the new one.
if (value.options.hasOwnProperty(...)) {
  if (... !== ...) {
    let newTitle;
    newTitle = `<h3 class="box-title">${...}</h3>`
    newTitle = $.parseHTML(...);

    $(el)
      .find(...)
      .replaceWith($(...));
  }
}- Update the current config
titlevalue with the new one.
if (value.options.hasOwnProperty(...)) {
  if (... !== ...) {
    let newTitle;
    newTitle = `<h3 class="box-title">${...}</h3>`
    newTitle = $.parseHTML(...);

    $(el)
      .find(...)
      .replaceWith($(...));

    config.title = ...;
  }
}
Answers may be found here.
If it represents a significant amount of work, it is also guarantees to lower the load on the server side, thereby offering a faster end-user experience. A full working prototype has been implemented in shinydashboardPlus and bs4Dash (including all box parameters).
12.3 Utilities to quickly define new inputs
12.3.1 Introduction
If you ever wondered where the Shiny.onInputChange or Shiny.setInputValue comes from (see article), they are actually defined in the initShiny function.
exports.setInputValue = function(name, value, opts) {
  opts = addDefaultInputOpts(opts);
  inputs.setInput(name, value, opts);
};
We recommend using Shiny.setInputValue over Shiny.onInputChange, the latter being slightly misleading.
Briefly, this function avoids the creation of an input binding and is faster to code, but there is a price to pay: losing the ability to easily update the new input through R. Indeed, without an input binding, there is no R side updateInput function! By default, Shiny.setInputValue is able to cache the last set value from that input, so that if it is identical, no value is being assigned. If this behavior does not meet your expectations and you need to set the input even when the value did not change, be aware that you may specify a priority option like:
Shiny.setInputValue('myinput', value, {priority: 'event'});12.3.2 Examples
Shiny.setInputValue becomes powerful when combined with the numerous Shiny JavaScript events listed here. To get access to the Shiny JS object, we have to wait for the shiny:connected event. In the following, we create a custom input that stores whether the user has MacOS. On the R side, we’ll access it with input$isMac.
$(document).on('shiny:connected', function(event) {
  Shiny.setInputValue(
    'isMac',
    (navigator.appVersion.indexOf('Mac') != -1)
  );
});
This allows you to conditionally display elements and deeply customize the interface. In the following example, the card will show a different title if the user is browsing with MacOS.
### RUN ###
# OSUICode::run_example(
#  "input-system/set-input-value",
#   package = "OSUICode"
# )

### APP CODE ###
library(shiny)
library(OSUICode)
library(shinyWidgets)

ui <- fluidPage(
  useShinydashboard(),
  tags$head(
    tags$script(
      HTML("$(function() {
        $(document).on('shiny:connected', function(event) {
          Shiny.setInputValue(
            'isMac',
            (navigator.appVersion.indexOf('Mac') != -1)
          );
        });
      });"
    ))
  ),
  verbatimTextOutput("info"),
  box2(
    id = "mybox",
    title = "A box",
  )
)

server <- function(input, output) {
  output$info <- renderPrint(input$isMac)
  observeEvent({
    req(isTRUE(input$isMac))
  }, {
    updateBox2(
      "mybox",
      action = "update",
      options = list(
        title = "Only visible for Mac users"
      )
    )
  })
}

shinyApp(ui, server)
This is what we leverage in the shinyMobile package to store the current device information in a Shiny input. Briefly, Framework7 (on top of which is built shinyMobile) has a method Framework7.device, which gives many details related to the user device.
12.4 Custom data format
In some cases, the automatic Shiny R to JS data management may not meet our needs. We introduce input handlers, a tool to fine-tune the deserialization of data from JS.
12.4.1 The dirty way
For instance, assume we create a date in JS with new Date() and store it in a Shiny input with Shiny.setInputValue. On the R side, we will not obtain a date but a character, which is not convenient. This is where input handlers are useful since they allow you to manipulate data generated on the JS side before injecting them in R. Such handlers are created with registerInputHandler, which takes two parameters:
-
type allows the handler to connect to
Shiny.setInputValue. Note that the id is followed by the handler type, for instanceShiny.setInputValue('test:handler', ...)is connected toshiny::registerInputHandler('handler', ...). As recommended by the Shiny documentation, if the input handler is part of a package, it is best practice to name it likepackageName.handlerName. - a function to transform data, having data as main parameter.
Below we directly include JS code in the Shiny app snippet, which is not best practice but convenient for the demonstration. Only the second input will give the correct result thanks to the defined handler:
### RUN ###
# OSUICode::run_example(
#  "input-system/dummy-input-handler",
#   package = "OSUICode"
# )

### APP CODE ###
library(shiny)

registerInputHandler("myPKG.textDate", function(data, ...) {
  if (is.null(data)) {
    NULL
  } else {
    res <- try(as.Date(unlist(data)), silent = TRUE)
    if ("try-error" %in% class(res)) {
      warning("Failed to parse dates!")
      data
    } else {
      res
    }
  }
}, force = TRUE)

ui <- fluidPage(
  tags$script(HTML(
    "$(function(){
      $(document).on('shiny:connected', function() {
        var currentTime = new Date();
        Shiny.setInputValue('time1', currentTime);
        Shiny.setInputValue(
          'time2:myPKG.textDate',
          currentTime
        );
      });
    });
    "
  )),
  verbatimTextOutput("res1"),
  verbatimTextOutput("res2")
)

server <- function(input, output, session) {
  output$res1 <- renderPrint({
    list(class(input$time1), input$time1)
  })
  output$res2 <- renderPrint({
    list(class(input$time2), input$time2)
  })
}

shinyApp(ui, server)
12.4.2 The clean way: leverage getType
The cleanest way is to leverage the getType method from the InputBinding class.
Let’s refine our text input so that it handles dates. On the R side, in the customTextInput() function, we check the current value’s type:
type <- if (inherits(value, "Date")) {
  "date"
} else {
  NULL
}
We add a custom data attribute to the input tag, which won’t be displayed if the value is not a date:
tags$input(
  id = inputId,
  type = "text",
  class = "form-control input-text",
  value = value,
  placeholder = placeholder,
  `data-data-type` = type
)
We then define our custom handler. This code is run when the package is loaded and usually located in a zzz.R script:
.onLoad <- function(...) {
  registerInputHandler(
    "OSUICode.textDate", function(data, ...) {
      if (is.null(data)) {
        NULL
      } else {
        res <- try(as.Date(unlist(data)), silent = TRUE)
        if ("try-error" %in% class(res)) {
          warning("Failed to parse dates!")
          data
        } else {
          res
        }
      }
  }, force = TRUE)
}
shiny already handles dates, and we could use the built-in input handler. The current handler was only designed to explain the underlying processes.
On the JavaScript side, we refer to the OSUICode.textDate defined input handler. We recover the data-type value passed from R and call the handler if the type is a date. We return false otherwise, which is the default behavior:
getType: function getType(el) {
  var dataType = $(el).data('data-type');
  if (dataType === 'date') return 'OSUICode.textDate';
  else return false;
}
To use the Shiny built-in handler, we could return "shiny.date" instead. We then run:
### RUN ###
# OSUICode::run_example(
#  "input-system/input-handler-1",
#   package = "OSUICode"
# )

### APP CODE ###
library(OSUICode)

customTextInputHandlerExample(7)
which sets the value as text by default. After opening the HTML inspector and setting a breakpoint in the getType method (Figure 12.21), we check that the data type is not defined. Therefore, the input handler will not apply.
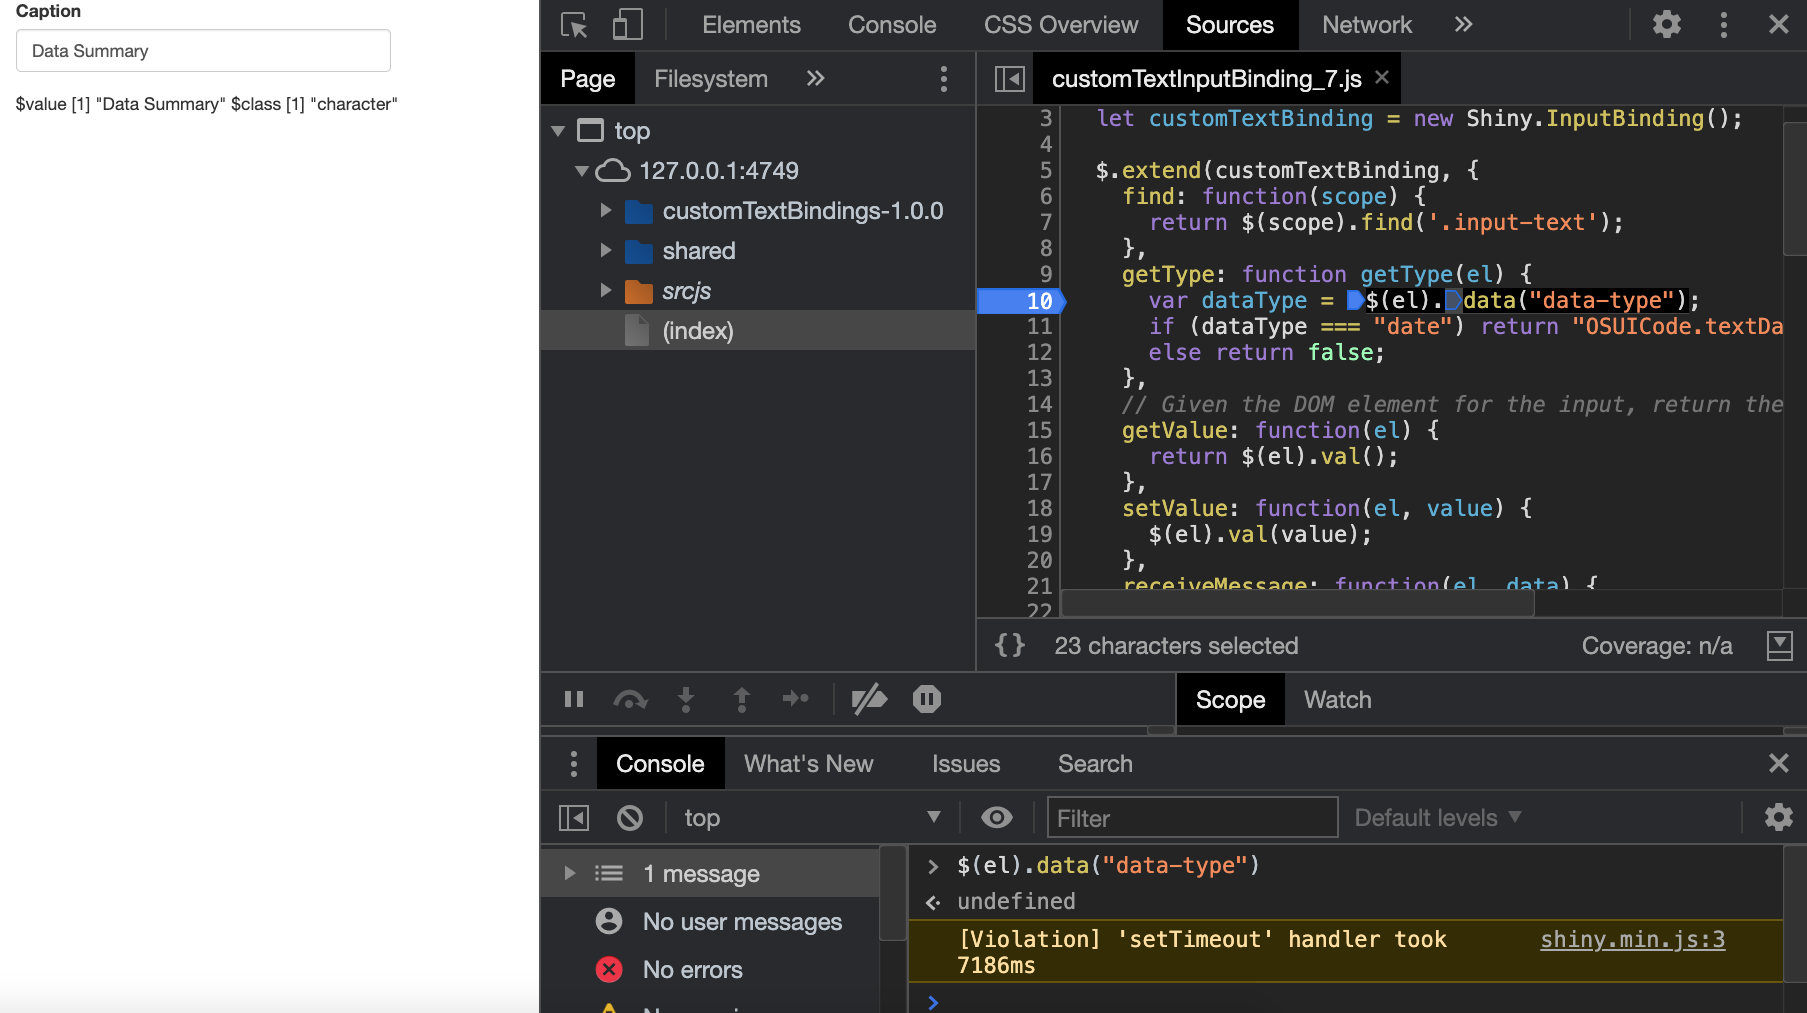
FIGURE 12.21: Example where getType does not call the input handler.
For the second example, we give a date value to the function:
### RUN ###
# OSUICode::run_example(
#  "input-system/input-handler-2",
#   package = "OSUICode"
# )

### APP CODE ###
library(OSUICode)

customTextInputHandlerExample(7, Sys.Date())
As illustrated Figure 12.22, the date is properly processed. Moreover, if you type any other valid date in the text field like 2020-11-12, it will be recognized as a date, while entering a text will return a character element. This is a way to obtain a slightly more clever text input widget.
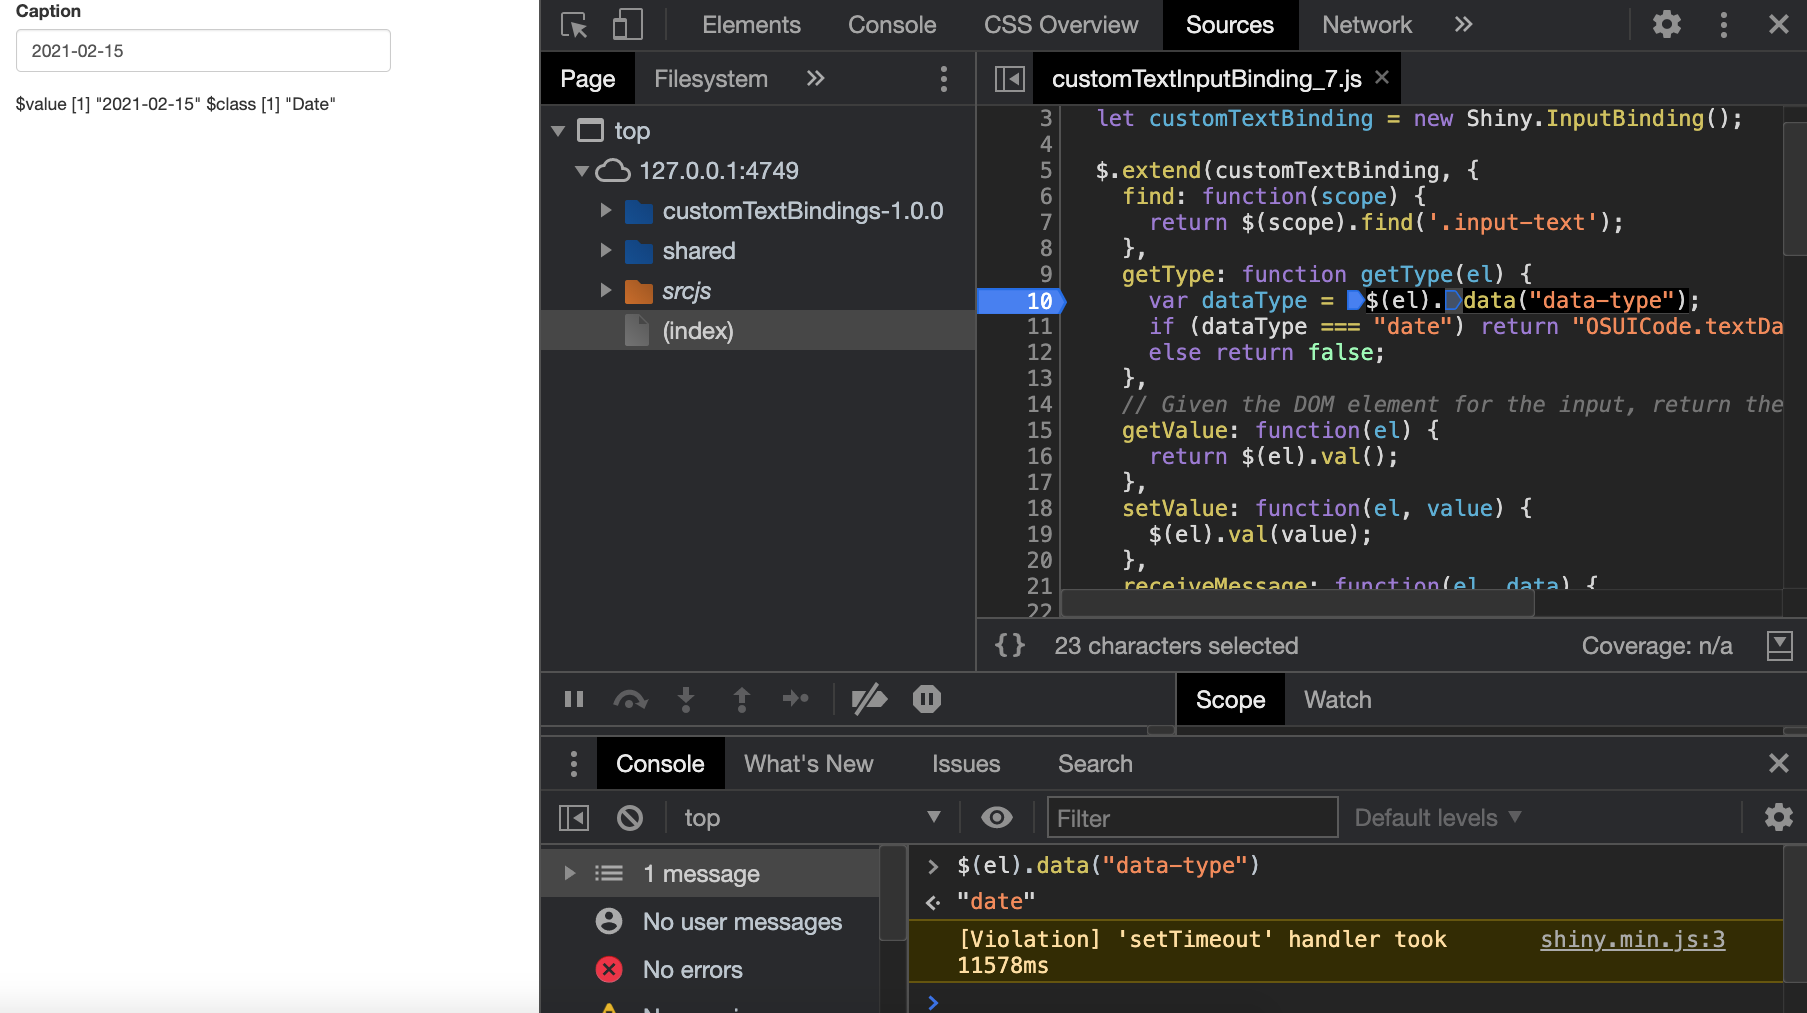
FIGURE 12.22: Passing a date to a text input correctly processes it.
Importantly, since the data-type is set at app startup by checking the class of the value, it will never change later. For instance, if you start the app with the text input value to be a simple text, setting it to a date through the app does not convert it into a date since $(el).data("data-type") always returns undefined! Therefore, if you want to be able to use both text and dates, be sure to wisely set the initial value.
To finish, we could seamlessly make our text input even more clever, by handling numbers. Even though Shiny has a shiny.number input handler, it simply makes sure that whenever the input is missing a value, NA is returned instead of "".
(Figure 12.23).
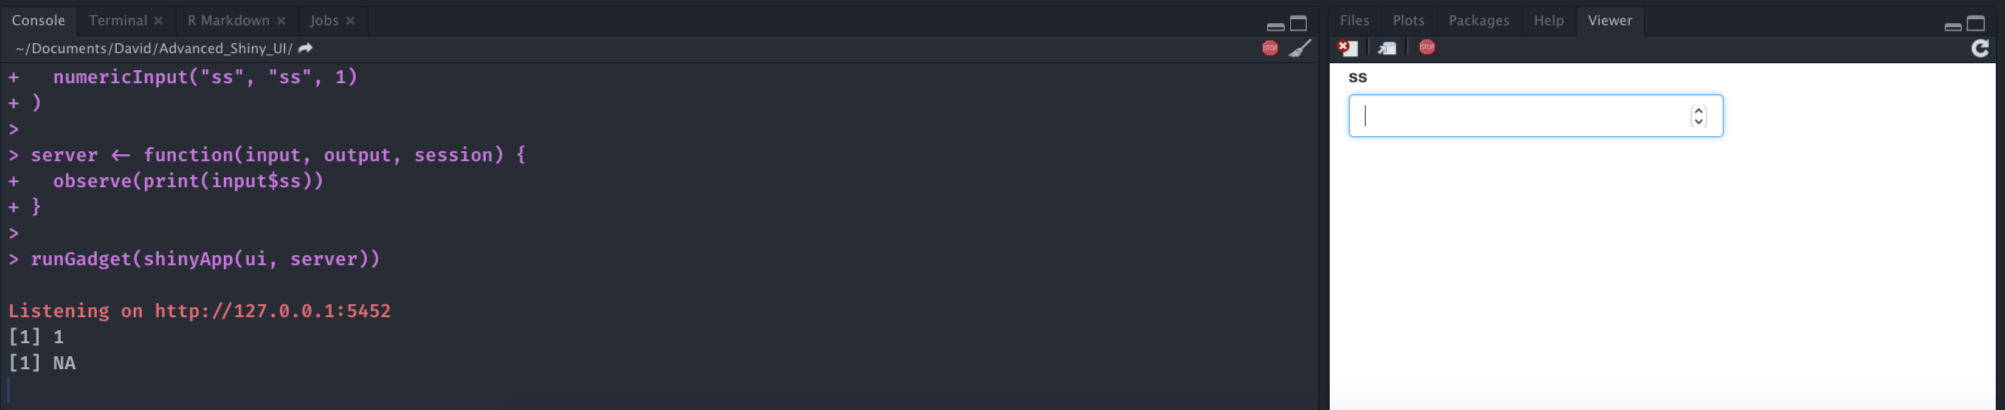
FIGURE 12.23: shiny.number input handler ensures that an empty numericInput returns NA instead of "".
What we want is a handler that recognizes the string "1" and convert it to a number. In R, converting a string to a number gives NA:
as.numeric("test")#> Warning: NAs introduced by coercion#> [1] NATherefore, if we obtain NA, we return original data so that the input gives the correct type. In the zzz.R script, right after our previous handler, we can write:
registerInputHandler(
  "OSUICode.textNumber", function(data, ...) {
    if (is.null(data)) {
      NULL
    } else {
      res <- as.numeric(unlist(data))
      if (is.na(res)) {
        data
      } else {
        res
      }
    }
  }, force = TRUE)
We also update the JavaScript getType method as follows:
getType: function getType(el) {
  var dataType = $(el).data('data-type');
  if (dataType === 'date') return 'OSUICode.textDate';
  else if (dataType === 'number') return 'OSUICode.textNumber';
  else return false;
}
On the R side, don’t forget to add an extra else if statement to the customTextInput() function:
type <- if (inherits(value, "Date")) {
  "date"
} else if (inherits(value, "numeric")) {
  "number"
} else {
  NULL
}
If we run:
### RUN ###
# OSUICode::run_example(
#  "input-system/input-handler-3",
#   package = "OSUICode"
# )

### APP CODE ###
library(OSUICode)

customTextInputHandlerExample(7, 1)
we obtain the desired behavior shown Figure 12.24.
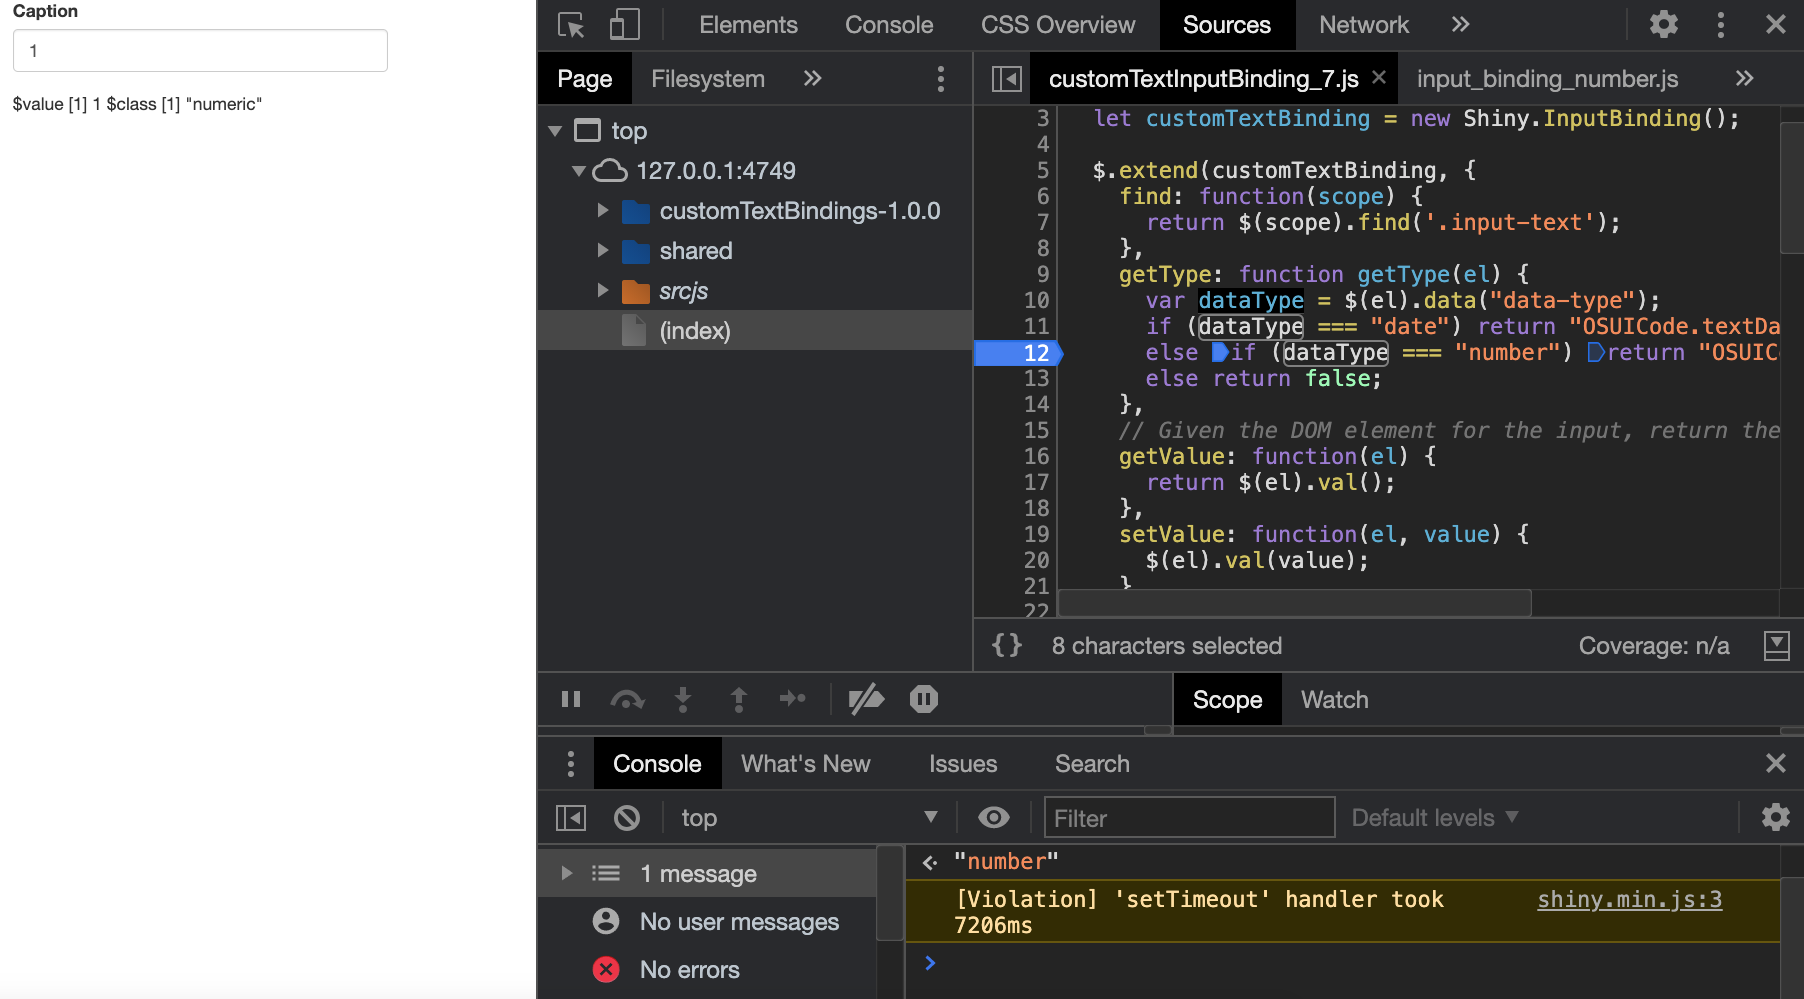
FIGURE 12.24: Passing a number to a text input correctly processes it.