15 Optimize your apps with custom handlers
The three previous chapters are largely dedicated to Shiny input elements. Yet, not everything is input in Shiny. This chapter shows how you may leverage the internal Shiny JavaScript tools to build highly interactive and optimized interfaces.
15.1 Introduction
As shown in Hadley Wickham’s Mastering Shiny book (Hadley 2021), many functions can update UI components from the server. You can use all updateupdateTextInput() or updateTabsetPanel().
Other tools to manage your UI consist of toggle functions like hideTab(), showTab(), the limit being the very few number of them, which often obliges to use packages like shinyjs (Attali 2020) or write custom JavaScript code. Finally, insertUI() and removeUI() allow users to dynamically insert or remove any element, anywhere in the DOM. Let’s start this chapter with the less optimized approach, that is renderUI(), to highlight its caveats and introduce better approaches to optimize your apps.
15.2 The renderUI case
The renderUI() and uiOutput() couple is the most famous way to render any HTML block from the server, without too much pain. While the update<INPUT_NAME> and toggle tools are component-specific, meaning they only target the element to modify, renderUI re-renders the whole block each time an associated reactive dependency is invalidated, even though only a little part would deserve to be updated. You should avoid choosing this approach since it implies poor performances in complex apps. We consider a simple app in which a 3 s computation is required to get the slider input value, subsequently triggering the slider input rendering:
### RUN ###
# OSUICode::run_example(
#  "custom-handlers/renderUI-delay",
#   package = "OSUICode"
# )

### APP CODE ###
library(shiny)
ui <- fluidPage(
  uiOutput("moreControls")
)

server <- function(input, output) {

  sliderValue <- reactive({
    # computationally intensive task
    Sys.sleep(3)
    1
  })

  output$moreControls <- renderUI({
    sliderInput("n", "N", sliderValue(), 1000, 500)
  })
}
shinyApp(ui, server)
The same example with the updateSliderInput() functions:
### RUN ###
# OSUICode::run_example(
#  "custom-handlers/update-slider",
#   package = "OSUICode"
# )

### APP CODE ###
library(shiny)

ui <- fluidPage(
  sliderInput("n", "N", 100, 1000, 500)
)

server <- function(input, output, session) {

  sliderValue <- reactive({
    # computationally intensive task
    Sys.sleep(3)
    150
  })

  observeEvent(sliderValue(), {
    updateSliderInput(
      session,
      "n",
      value = sliderValue()
    )
  })
}
shinyApp(ui, server)
As already discussed in section 12.2.2, the first approach’s biggest problem is the 3 s delay, during which nothing happens, which may discourage the end users. The second approach is already much better, even though they may be tempted to play with the slider (and they will!), until it suddenly changes value, thereby creating a possibly weird situation.
Below is an very naive and dirty example where renderUI() makes an entire dropdown menu re-render each time something changes in the renderUI() expression, which is definitely not optimal. React users would probably leap off their chairs if they ever heard about this. Indeed, in React, we only re-render what needs to be updated!
Run the app below, open the HTML inspector and click to add one message. Notice that the entire block is updated, whereas only the corresponding HTML element should (Figure 15.1). No doubt that any advanced user sees a place for insertUI().
This requires bs4Dash >= 2.0.0.
### RUN ###
# OSUICode::run_example(
#  "custom-handlers/renderUI-dropdownMenu",
#   package = "OSUICode"
# )

### APP CODE ###
library(bs4Dash)
library(tibble)

new_message <- tibble(
  message = "New message",
  from = "Paul",
  time = "yesterday",
  color = "success"
)

shinyApp(
  ui = dashboardPage(
    dark = FALSE,
    header = dashboardHeader(
      rightUi = uiOutput("messages", container = tags$li)
    ),
    sidebar = dashboardSidebar(),
    controlbar = dashboardControlbar(),
    footer = dashboardFooter(),
    title = "test",
    body = dashboardBody(actionButton("add", "Add message"))
  ),
  server = function(input, output) {

    messages <- reactiveValues(
      items = tibble(
        message = rep("A message", 10),
        from = LETTERS[1:10],
        time = rep("yesterday", 10),
        color = rep("success", 10)
      )
    )

    observeEvent(input$add, {
      messages$items <- add_row(messages$items, new_message)
    })

    output$messages <- renderUI({
      dropdownMenu(
        badgeStatus = "danger",
        type = "messages",
        lapply(seq_len(nrow(messages$items)), function(r) {
          temp <- messages$items[r, ]
          messageItem(
            message = temp$message,
            from = temp$from,
            time = temp$time,
            color = temp$color
          )
        })
      )
    })
  }
)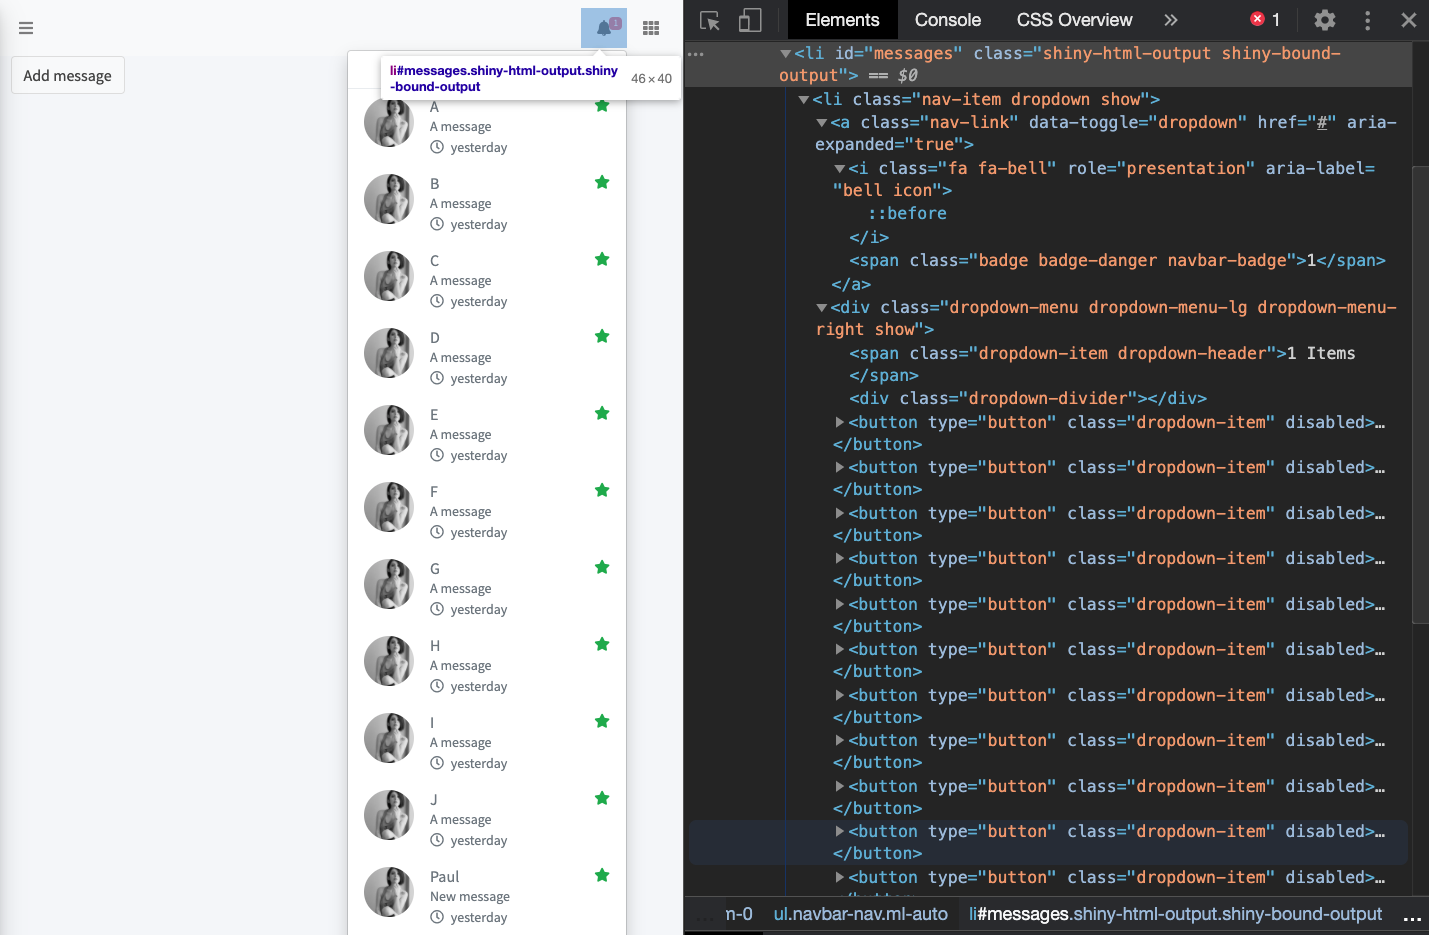
FIGURE 15.1: renderUI is not specific.
This lack of specificity justifies why you should avoid this method as much as possible, as it overloads the server. Later in this chapter, we leverage custom handlers to solve this problem. Overall, it’s more work, maybe more complex but ensures it is specific and more optimized.
15.3 Other Shiny handlers
As mentioned in Chapter 13.2, all update<INPUT_NAME> functions are Shiny defined messages handlers.
15.3.1 The insertUI case
Under the hood, insertUI() sends a R message through session$sendInsertUI, via the websocket:
session$sendInsertUI(
  selector = selector,
  multiple = multiple,
  where = where,
  content = processDeps(ui, session)
)

sendInsertUI = function(selector, multiple, where, content) {
  private$sendMessage(
    `shiny-insert-ui` = list(
      selector = selector,
      multiple = multiple,
      where = where,
      content = content
    )
  )
}
The content is processed by shiny:::processDeps() that:
- Finds and resolves any HTML dependency, as shown in Chapter 4.
- For each dependency, makes sure the corresponding files can be accessed on the server with
createWebDependency()andaddResourcePath(). - Returns a list of the HTML element and dependencies. The HTML will be accessed by
message.content.htmland dependencies bymessage.content.deps.
I strongly discourage using shiny:::processDeps() or any other internal function, since they might change in future Shiny releases. Instead, we’ll leverage the htmltools::renderTags() function mentioned earlier in section 5.7.1.
On the UI side, Shiny has a predefined message handler:
addMessageHandler('shiny-insert-ui', function(message) {
  let targets = $(message.selector);
  if (targets.length === 0) {
    // render the HTML and deps to a null target, so
    // the side-effect of rendering the deps, singletons,
    // and <head> still occur
    console.warn(
      'The selector you chose ("' +
      message.selector +
      '") could not be found in the DOM.'
    );
    exports.renderHtml(
      message.content.html,
      $([]),
      message.content.deps
    );
  } else {
    targets.each(function (i, target) {
      exports.renderContent(
        target,
        message.content,
        message.where
      );
      return message.multiple;
    });
  }
})
It checks whether the provided selector has multiple DOM elements. If at least one item is found, it calls renderContent(html, el, dependencies), which triggers renderHtml(html, el, dependencies):
- Processes the provided HTML (treats the head, body and singletons).
- Renders all given dependencies into the page’s head.
-
Inserts the HTML into the page at the position provided in the
insertUIwhere parameter. Internally, this calls theinsertAdjacentHTMLmethod. - Initializes any input, binds them to the scope and sends the value to the server so that output/observers are invalidated. Outputs are also bound. Skipping this step will result in a broken Shiny app.
Keep renderContent and renderHtml in mind; we’ll use them in section 15.4.2.
15.3.2 Example
Going back to the previous example, why don’t we just go for insertUI()? To save space, we encapsulated the dashboard UI inside a function that will be reused across some example.
dropdownMenuUI <- function() {
  bs4Dash::dashboardPage(
    dark = FALSE,
    header = bs4Dash::dashboardHeader(
      rightUi = OSUICode::dropdownMenu(
        badgeStatus = "danger",
        type = "messages"
      )
    ),
    sidebar = bs4Dash::dashboardSidebar(),
    controlbar = bs4Dash::dashboardControlbar(),
    footer = bs4Dash::dashboardFooter(),
    title = "test",
    body = bs4Dash::dashboardBody(
      actionButton("add", "Add dropdown item")
    )
  )
### RUN ###
# OSUICode::run_example(
#  "custom-handlers/insertUI-dropdownMenu-1",
#   package = "OSUICode"
# )

### APP CODE ###
library(shiny)
library(bs4Dash)
library(OSUICode)

ui <- dropdownMenuUI()

shinyApp(
  ui = ui,
  server = function(input, output, session) {

    observeEvent(input$add, {
      insertUI(
        selector = ".dropdown-menu >
        .dropdown-item.dropdown-header",
        where = "afterEnd",
        ui = messageItem(
          message = paste("message", input$add),
          image = dashboardUserImage,
          from = "Divad Nojnarg",
          time = "today",
          color = "success"
        )
      )
    })
  }
)
If the item is inserted, the item counter as well as the dropdown text are not, as depicted in Figure 15.2. We can’t blame insertUI() for this, since this is the fault of the bs4Dash component, which actually has interconnected HTML pieces. Indeed, the bs4Dash::dropdownMenu() function generates HTML, detecting the number of bs4Dash::messageItem(). This works well when the app fires, but the component is not able to maintain an up-to-date state.

FIGURE 15.2: insertUI is not specific enough.
We may fix that by adding extra insertUI() and removeUI() to replace those parts (insertUI() does not update the targeted item). Moreover, we must set correct priority for each observeEvent() (try to remove them; it will fail) to ensure that remove happens before insert.
### RUN ###
# OSUICode::run_example(
#  "custom-handlers/insertUI-dropdownMenu-2",
#   package = "OSUICode"
# )

### APP CODE ###
library(shiny)
library(bs4Dash)
library(OSUICode)

ui <- dropdownMenuUI()

shinyApp(
  ui = ui,
  server = function(input, output, session) {
    # remove old badge
    observeEvent(input$add, {
      removeUI(selector = ".badge-danger.navbar-badge")
    }, priority = 1)
    # insert new badge
    observeEvent(input$add, {
      insertUI(
        selector = "[data-toggle=\"dropdown\"]",
        where = "beforeEnd",
        ui = tags$span(
          class = "badge badge-danger navbar-badge",
          input$add
        )
      )
    })

    # remove old text counter
    observeEvent(input$add, {
      removeUI(selector = ".dropdown-item.dropdown-header")
    }, priority = 1)

    # insert new text counter
    observeEvent(input$add, {
      insertUI(
        selector = ".dropdown-menu",
        where = "afterBegin",
        ui = tags$span(
          class = "dropdown-item dropdown-header",
          sprintf("%s Items", input$add)
        )
      )
    })

    # Insert message item
    observeEvent(input$add, {
      insertUI(
        selector = ".dropdown-menu >
        .dropdown-item.dropdown-header",
        where = "afterEnd",
        ui = messageItem(
          message = paste("message", input$add),
          image = user,
          from = "Divad Nojnarg",
          time = "today",
          color = "success"
        )
      )
    })

  }
)
So many observeEvent() used for a simple action! Imagine if we had 10 similar tasks … Isn’t there a way to do all of this at once, thereby reducing the server code? Moreover, setting priorities in observeEvent() is a rather bad smell of poorly designed Shiny app.
It seems that we have to create our own message handler.
15.4 Custom handlers
Custom handlers are a specific category of message handlers, as they are user-defined.
15.4.1 Theory
Shiny provides tools to ease the communication between R and JavaScript, as illustrated in Chapter 11. We already discussed the usage of session$sendInputMessage() in the input binding Chapter 12. The other important method is session$sendCustomMessage(type, message). It works by pairing with the JS method Shiny.AddCustomMessageHandler, tightly linked by the type parameter.
say_hello_to_js <- function(
  text,
  session = getDefaultReactiveDomain()
) {
  session$sendCustomMessage(type = 'say-hello', message = text)
}
The JavaScript part is defined below:
$(function() {
  Shiny.AddCustomMessageHandler(
    'say-hello', function(message) {
      alert(`R says ${message} to you!`)
  });
});
The following Shiny app example will simply print a welcome message every 5 seconds. We obviously set options(shiny.trace = TRUE) so as to capture all messages sent between R and JS. Figure 15.3 summarizes the main mechanisms involved in the R to JS communication. The corresponding code may be found here. Don’t forget to load the say_hello_to_js() function before:
### RUN ###
# OSUICode::run_example(
#  "custom-handlers/say-hello",
#   package = "OSUICode"
# )

### APP CODE ###
library(shiny)
ui <- fluidPage(tags$script(src = "say_hello_handler.js"))
server <- function(input, output, session) {
  observe({
    invalidateLater(5000)
    say_hello_to_js("hello")
  })
}
shinyApp(ui, server, options = list(shiny.trace = TRUE))
FIGURE 15.3: From R to JavaScript with the customMessageHandler API.
Combining Shiny.setInputValue and Shiny.addCustomMessageHandler, here is a fun example
that sets the body background as a result of a simple button click. A demonstration may be run from the {OSUICode} side package.
### RUN ###
# OSUICode::run_example(
#  "custom-handlers/get-random-pokemon",
#   package = "OSUICode"
# )

### APP CODE ###
library(shiny)

ui <- fluidPage(
  tags$button(id = "button", "Go!", class = "btn-success")
) %>% tagList(pokemonDeps())

server <- function(input, output, session) {

  observeEvent(input$pokeData, {
    background <- input$pokeData$sprites$other$
      `official-artwork`$front_default
    message(background)
    session$sendCustomMessage(
      type = "update_background",
      message = background
    )
  })
}

shinyApp(ui, server)
On the JS side, the getPokemon function, whose script is adapted from Colin Fay et al. (see here), fetches the pokeapi data and if successful sets an input value, which will be subsequently available on the R side.
const getPokemon = () => {
  // FETCHING THE API DATA
  let randId = Math.floor(Math.random() * (+151 + 1 - +1)) + +1;
  fetch('https://pokeapi.co/api/v2/pokemon/' + randId)
  // DEFINE WHAT HAPPENS WHEN JAVASCRIPT RECEIVES THE DATA
    .then((data) => {
      // TURN THE DATA TO JSON
      data.json().then((res) => {
        // SEND THE JSON TO R
        Shiny.setInputValue('pokeData', res, {priority: 'event'})
      })
    })
    // DEFINE WHAT HAPPENS WHEN THERE IS AN ERROR FETCHING THE API
    .catch((error) => {
      alert('Error catching result from API')
    })
};
input$pokeData is actually a quite complex list, and some manipulation is done from R in the observeEvent() block. Once done, we send the data back to JS through the websocket (the session object sends a message).
An event listener is set to the only button on the page so that each time we click, we call getPokemon to select a random background image.
// add event listener
$('#button').on('click', function() {
  getPokemon();
});
This last piece of JS code ensures adding the randomly selected background contained in the message parameter to the body tag.
// update background based on R data
Shiny.addCustomMessageHandler(
  'update_background', function(message) {
    $('body').css({
      'background-image':'url(' + message +')',
      'background-repeat':'no-repeat'
    });
});$(function() {
// INSERT PREVIOUS CODE HERE
});15.4.2 Toward custom UI management functions
15.4.2.1 An insertMessageItem function
In this example, we go back to the bs4Dash::dropdownMenu() issue, discussed earlier
in the chapter. We propose a method only involving custom message handlers.
insertDropdownItem <- function(
  item,
  session = shiny::getDefaultReactiveDomain()
) {
  session$sendCustomMessage(
    type = "add-dropdown-item",
    message = as.character(item)
  )
}
We create the insertMessageItem function with two parameters:
- item, the HTML element we want to insert in the DOM.
-
session, used to send a message to JavaScript with
session$sendCustomMessage.
We don’t use htmltools::renderTags as it is very unlikely that our messageItem contains any extra dependency. Item is converted to a character (important) and sent to JavaScript through the Shiny session R6 object. We give it a type, that is add-message-item, to be able to identify it from JavaScript with Shiny.addCustomMessageHandler.
$(function() {
  Shiny.addCustomMessageHandler(
    'add-message-item', function(message) {
      // since we do not re-render the dropdown,
      // we must update its item counter
      let $items = $('.dropdown-menu')
        .find('.dropdown-item')
        .length;
      $('.dropdown-item.dropdown-header').html($items + ' Items');
      $('.nav-item.dropdown').find('.navbar-badge').html($items);
      // convert string to HTML
      let itemTag = $.parseHTML(message)[0];
      $(itemTag).insertAfter($('.dropdown-item.dropdown-header'));
  });
});
We also update the dropdown menu item counter as well as the icon text since the dropdown menu is not re-rendered. The number of items is given by the dropdown children (without the dropdown-divier class). These two extra JS steps save us from creating extra observeEvent() on the server, as shown before.
We then recover the sent message on the JS side with Shiny.addCustomMessageHandler, parse the string to HTML with $.parseHTML and insert it after the header (that is the next UI element of the dropdown body). The bs4Dash::dropdownMenu() is modified so that dependencies are attached.
dropdownDeps <- function() {
  htmltools::htmlDependency(
    name = "bs4-dropdown",
    version = "1.0.0",
    src = c(file = "custom-handlers/add-message-item"),
    script = "add-message-item.js",
    package = "OSUICode"
  )
}

dropdownMenu <- function(
  ..., # ...; comment extra parameters
) {

  # ... ; Did not change

  shiny::tags$li(
    dropdownDeps(), # added dependencies
    class = "nav-item dropdown",
    # ... ; Did not change
  )
}
You may run the example yourself.
### RUN ###
# OSUICode::run_example(
#  "custom-handlers/add-message-item",
#   package = "OSUICode"
# )

### APP CODE ###
library(shiny)
library(bs4Dash)
library(OSUICode)

usr <- "https://adminlte.io/themes/v3/dist/img/user2-160x160.jpg"

shinyApp(
  ui = dashboardPage(
    header = dashboardHeader(
      rightUi = OSUICode::dropdownMenu(
        badgeStatus = "danger",
        type = "messages"
      )
    ),
    sidebar = dashboardSidebar(),
    controlbar = dashboardControlbar(),
    footer = dashboardFooter(),
    title = "test",
    body = dashboardBody(actionButton("add", "Add dropdown item"))
  ),
  server = function(input, output, session) {

    observeEvent(input$add, {
      insertMessageItem(
        messageItem(
          message = paste("message", input$add),
          image = usr,
          from = "Divad Nojnarg",
          time = "today",
          color = "success"
        )
      )
    })
  }
)
This solution significantly lightens the server code since everything may be done on the JS side in one step.
15.4.2.2 A chat system for {shinydashboardPlus}
shinydashboardPlus user messages provide an easy way to create a chat system within a Shiny app. userMessages() hosts the main container, while userMessage() is the message element. All of this is pure HTML:
<div class="direct-chat-msg">
  <div class="direct-chat-info clearfix">
    <span class="direct-chat-name pull-left">
      Alexander Pierce
    </span>
    <span class="direct-chat-timestamp pull-right">
      23 Jan 2:00 pm
    </span>
  </div>
  <!-- /.direct-chat-info -->
  <img class="direct-chat-img" src="dist/img/user1-128x128.jpg"
  alt="message user image">
  <!-- /.direct-chat-img -->
  <div class="direct-chat-text">
    Is this template really for free? That's unbelievable!
  </div>
  <!-- /.direct-chat-text -->
</div>
Figure 15.4 shows the overall appearance.
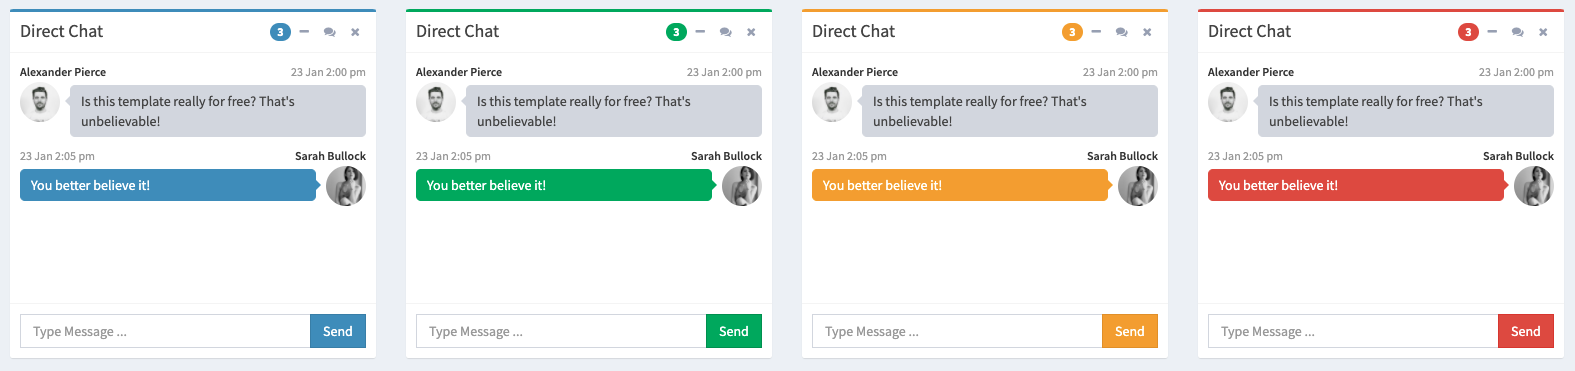
FIGURE 15.4: Chat user interface for AdminLTE2.
Given that no JavaScript API is available to handle messages, that is send/receive/edit/remove action, we are going to design a dedicated R and JavaScript API step by step.
15.4.2.2.1 HTML elements
The message container is a simple div element:
<div class="direct-chat-messages">...</div>where ... receives all messages (userMessage()). From the AdminLTE demonstration page, the class direct-chat-warning gives the yellow color to the sent messages, while received messages are always gray. In shinydashboardPlus, the container is defined as below:
userMessages <- function(..., id = NULL, status, width = 4,
                         height = NULL) {
  cl <- "direct-chat-messages direct-chat"
  if (!is.null(height)) shiny::validateCssUnit(height)
  if (!is.null(status)) {
    validateStatus(status)
    cl <- paste0(cl, " direct-chat-", status)
  }
  msgtag <- shiny::tags$div(
    class = cl,
    ...,
    style = if (!is.null(height)) {
      sprintf("height: %s; overflow-y: auto;", height)
    } else {
      "height: 100%;"
    }
  )

  shiny::tags$div(
    id = id,
    class = if (!is.null(width)) paste0("col-sm-", width),
    msgtag
  )

}
The most important element is the id parameter that makes the link with the custom message handler on the JavaScript side.
The userMessage() element’s class varies depending whether it is received or sent, which actually changes its position (left and right, respectively).
messageCl <- "direct-chat-msg"
if (type == "sent") messageCl <- paste0(messageCl, " right")
The message tag is made of three parts:
-
The author tag, defined in the
messageInfovariable.# message info messageInfo <- shiny::tags$div( class = "direct-chat-info clearfix", shiny::tags$span( class = if (type == "right") { "direct-chat-name pull-right" } else { "direct-chat-name" }, author ), if (!is.null(date)) { shiny::tags$span( class = if (type == "right") { "direct-chat-timestamp right" } else { "direct-chat-timestamp" }, date ) } ) -
The author image, contained in the
messageImgvariable.# message author image messageImg <- shiny::tags$img( class = "direct-chat-img", src = image ) -
The message itself, defined in the
messageTxtvariable. Note the corresponding HTML classes likedirect-chat-textsince we will use them in the JS code.# message Text messageTxt <- shiny::tags$div( class = "direct-chat-text", ... )
The entire code is shown below.
userMessage <- function(..., author, date = NULL, image = NULL,
                        type = c("sent", "received")) {

  type <- match.arg(type)
  messageCl <- "direct-chat-msg"
  if (type == "sent") messageCl <- paste0(messageCl, " right")

  # ... Message info ...

  # ... Message text ...

  # ... Message image ...

  shiny::tags$div(
    class = messageCl,
    messageInfo,
    messageImg,
    messageTxt
  )

}
15.4.2.2.2 Handle interactions
userMessages() and userMessage() alone only provide a static API. Let’s design an updateUserMessages() function that offers ways to update the message container. That function must allow users to:
- Add any message to the list.
- Remove any existing message.
- Update a selected message.
For now, we assume we add only one message at a time. updateUserMessages() is linked to any userMessages() container by the id parameter. In order to delete/update a message, we define an index parameter.
Don’t forget that the first element of a vector has index 1 in R, while JS starts from 0.
Consequently, we have to decrease the R index by 1 so that JS receives the correct number. We must also provide a content parameter so as to update any existing message content. The content has to be compatible with the userMessage structure. We expect the user to pass a list like:
list(
  author = "David",
  date = "Now",
  image = OSUICode::dashboardUserImage,
  type = "received",
  text = tagList(
    sliderInput(
      "obs",
      "Number of observations:",
      min = 0,
      max = 1000,
      value = 500
    ),
    plotOutput("distPlot")
  )
)
Interestingly, we may offer the ability to add input/output elements in the message content (as shown above) with dependencies that are not yet made available to shiny. We therefore assume that if the content is a shiny tag or a list of shiny tags, it may contain elements with extra dependencies and leverage the htmltools::renderTags() function on the R side for all elements with lapply() function. Finally, the message is sent to JS with session$sendCustomMessage:
updateUserMessages <- function(
  id,
  action = c("add", "remove", "update"),
  index = NULL,
  content = NULL,
  session = shiny::getDefaultReactiveDomain()
) {
  action <- match.arg(action)

  content <- lapply(content, function(c) {
    if (inherits(c, "shiny.tag") ||
        inherits(c, "shiny.tag.list")) {
      # necessary if the user pass input/output with deps
      # that are not yet available in the page before
      # inserting the new tag
      c <- htmltools::renderTags(c)
    }
    c
  })

  session$sendCustomMessage(
    "user-messages",
    list(
      id = session$ns(id),
      action = action,
      index = index,
      body = content
    )
  )
}
We also share the container id to be able to select the appropriate target on the JS side. As a reminder, the message handler name has to be the same on the JS side!
Note the session$ns that actually makes sure this function can work within shiny modules (https://shiny.rstudio.com/reference/shiny/1.6.0/moduleServer.html).
We are now all done on the R side but still have to design the JS interface. The first step is to create a custom message handler skeleton:
Shiny.addCustomMessageHandler(
  'user-messages', function(message) {
    // JS logic
});
where the message parameter is actually the message sent through the R updateUserMessages() function. We recall that if we send a list, it is subsequently converted into a JS object. Therefore, to access the container id element, we do:
message.idand similarly for other elements. There may be nested lists, like the message content, which is not very complex to handle: we simply use the . JS notation to access lower-level elements, that is message.content.text for the message text.
The second step is to store all message elements in multiple variables separated by commas. This step is not mandatory but improves the code readability:
Shiny.addCustomMessageHandler(
  'user-messages', function(message) {
    // Variables definition
    let id = message.id,
      action = message.action,
      content = message.body,
      index = message.index;
});
In the following, we show how to process any message content. For sake of simplicity, we assume we are able to only edit the message text. As mentioned earlier, there are two possible cases:
- The text is simple text or simple HTML without any extra dependency, we do nothing more than storing it into a meaningful variable.
- The text is a list of Shiny tags containing input/output with extra dependencies like
sliderInput(). We have to leverage therenderHtmlmethod to correctly process the missing dependencies passed from R viahtmltools::renderTags()inupdateUserMessages().
This yields:
Shiny.addCustomMessageHandler(
  'user-messages', function(message) {
  // ... Variables definition ...

  // Process message content
  if (content.hasOwnProperty('text')) {
    let text;
    if (content.text.html === undefined) {
      text = content.text;
    } else {
      text = Shiny.renderHtml(
        content.text.html,
        $([]),
        content.text.dependencies
      ).html;
    }
  }

});
hasOwnProperty checks whether content has a text property, which avoids running code
whenever not necessary.
Then, the next step is to implement the multiple options provided by the user (update, add, remove). We consider the simplest case, that is remove a message. We remind the reader that the action contains the user choice in updateUserMessages(). What do we need to remove a given message?
- Its index contained in the index variable.
- The container id.
- Remember that a message has the
direct-chat-msgclass. - Use the
removejQuery method.
We, therefore, target the main container with $("#" + id), look for its messages with find(".direct-chat-msg"), specify the target using eq(index - 1) (index is the R value) and apply the remove method:
Shiny.addCustomMessageHandler(
  'user-messages', function(message) {
  // ... Variables definition ...

  // ... Process message content ...

  if (action === 'remove') {
    $('#' + id)
      .find('.direct-chat-msg')
      .eq(index - 1)
      .remove();
  }

});
We could add more security with console.warn whenever the user wants to delete a message that does not exist. We leave it to the reader as an exercise.
The second case consists of adding a new message. We define new variables containing the author, the date, the image and the message type.
// ... Other conditions ....
else if (action === 'add') {
  // Variables definition
  let author = content.author,
    date = content.date,
    image = content.image,
    type = content.type;
}
Below is a reminder of the message HTML structure:
<div class="direct-chat-msg">
  <div class="direct-chat-info clearfix">
    <span class="direct-chat-name pull-left">
      AUTHOR (TO REPLACE)
    </span>
    <span class="direct-chat-timestamp pull-right">
      DATE (TO REPLACE)
    </span>
  </div>
  <!-- /.direct-chat-info -->
  <img class="direct-chat-img" src="IMAGE URL (TO REPLACE)"
  alt="message user image">
    <!-- /.direct-chat-img -->
  <div class="direct-chat-text">MAIN CONTENT (TO REPLACE)
  </div>
  <!-- /.direct-chat-text -->
</div>
In our JS logic, we use the same template and replace any relevant element (see capital letters) by the previously created variables. We might use the string interpolation.
// ... Other conditions ...
else if (action === 'add') {
  // ... Variables definition ...

  // build the new message
  let newMessage = `
    <div class="direct-chat-info clearfix">
      <span class="direct-chat-name">
        ${author}
      </span>
      <span class="direct-chat-timestamp"
        style="margin-left: 4px">
        ${date}
      </span>
    </div>
    <img class="direct-chat-img" src="${image}"/>
    <div class="direct-chat-text">${text}</div>`;
}
We wrap all of these elements in a direct-chat-msg div, whose class may vary depending on the message type. If sent, the class is direct-chat-msg right and direct-chat-msg otherwise.
// ... Other conditions ...
else if (action === 'add') {
  // ... Variables definition ...

  // ... build the new message ...

  // build wrapper
  let newMessageWrapper;
  if (type === 'sent') {
    newMessageWrapper = `
      <div class="direct-chat-msg right">
        ${newMessage}
      </div>`;
  } else {
    newMessageWrapper = `
      <div class="direct-chat-msg">
        ${newMessage}
      </div>`;
  }

}
The final step is to target the main container with $("#" + id), look for the messages slot find(".direct-chat-messages") (the message container is nested in the main wrapper) and append it
to the DOM. We used append, which adds the message at the end but could choose prepend to add it on top
of all other messages. This behavior may be defined by the programmer with no option for the end user.
Alternatively, the developer could expose an external parameter to control the add position.
// ... Other conditions ...
else if (action === 'add') {
  // ... Variables definition ...

  // ... build the new message ...

  // ... build wrapper ...

  // append message
  $('#' + id)
    .find('.direct-chat-messages')
    .append(newMessageWrapper);
}
Finally, the last case is to update a given message. As stated above, we only edit the
message text and the date. To update the message, we target the messages container with $("#" + id),
look for all texts with find(".direct-chat-text"), refine our choice by targeting the good element with
eq(index - 1) and call replaceWith containing the new text element:
// ... Other conditions ...
else if (action === 'update') {
  // today's date
  let d = new Date();
  let month = d.getMonth() + 1;
  let day = d.getDate();
  let today = d.getFullYear() + '/' +
    ((''+month).length<2 ? '0' : '') + month + '/' +
    ((''+day).length<2 ? '0' : '') + day;

  // we assume only text may be updated.
  // Does not make sense to modify author

  $('#' + id)
    .find('.direct-chat-text')
    .eq(index - 1)
    .replaceWith(`
      <div class="direct-chat-text">
        <small class="text-red">
          (modified: ${today})
        </small>
        <br>
      </div>
    `)
}
Don’t forget to unbind, re-initialize and bind all inputs by successively calling Shiny.unbindAll();, Shiny.initializeInputs(); and Shiny.bindAll();. If you omit this part, the newly inserted input/output elements won’t work.
Shiny.addCustomMessageHandler(
  'user-messages', function(message) {
  // ... Variables definition ...

  // ... Process message content ...

  // unbind all
  Shiny.unbindAll();

  if (action === 'remove') {
    // ... Remove logic ...
  } else if (action === 'add') {
    // ... Add logic ...
  } else if (action === 'update') {
    // ... Update logic ...
  }

  // Calls .initialize() for all of the input objects
  // in all input bindings.
  Shiny.initializeInputs();
  Shiny.bindAll(); // bind all inputs/outputs

});
The whole JS code may be found here.
Output is shown in Figure 15.5. To reproduce that figure, run the below demonstration, click on add message, then click on update message leaving the numeric input to 1.
### RUN ###
# OSUICode::run_example(
#  "custom-handlers/shinydashboardPlus-chat",
#   package = "OSUICode"
# ) 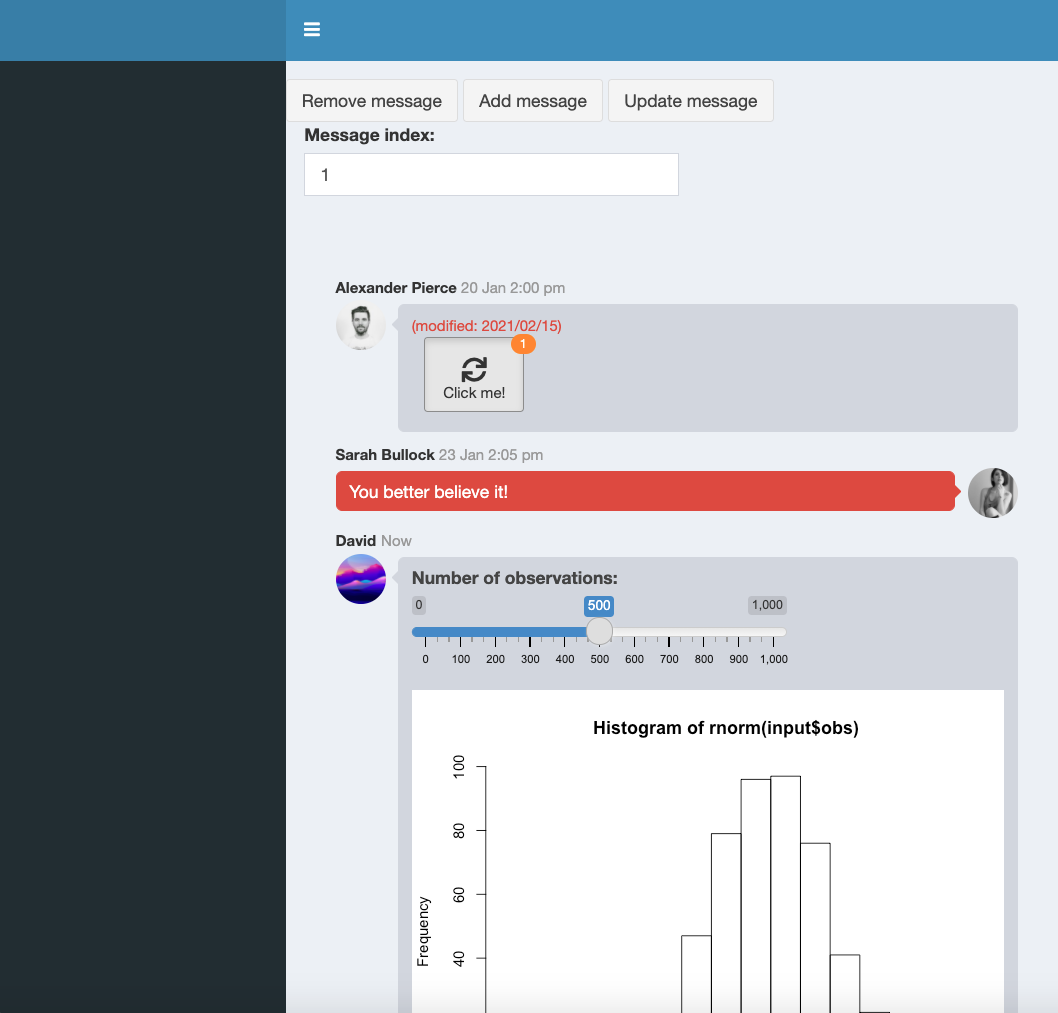
FIGURE 15.5: Chat user interface for {shinydashboardPlus}.
Why can’t we use the renderContent JS function, thereby allowing us to remove the three extra steps (unbind, initialize and bind inputs)? This would lead to a timing issue. Indeed,
let’s say we first click on add message which creates one slider input and one plot output.
It works well the first time since those element don’t exist for Shiny. If we remove the newly created message and click again on add, we obtain an error message Uncaught Duplicate binding for ID distPlot. The root cause is rather obvious and internal to renderContent. The later cannot be called before the target is in the DOM. It means that during some time, we actually added a second output (identical to the first one) without unbinding the first, thereby causing the duplication error.
Chapter 19 provide another case study to practice custom handler design.