2 Manipulate HTML tags from R with {htmltools}
htmltools (Cheng, Sievert, et al. 2021) is a R package designed to:
- Generate HTML tags from R.
- Handle web dependencies (see Chapter 4).
Historically, htmltools was extracted out of shiny (Chang et al. 2021) to be able to extend it, that is, develop custom HTML tags, import extra dependencies from the web. That’s why both packages have many common functions!
The ultimate goal of htmltools is to manipulate, combine and rearrange tags in order to create flexible and rich HTML structures from R. Would you believe that the below example heavily relies on htmltools (Figure 2.1)?
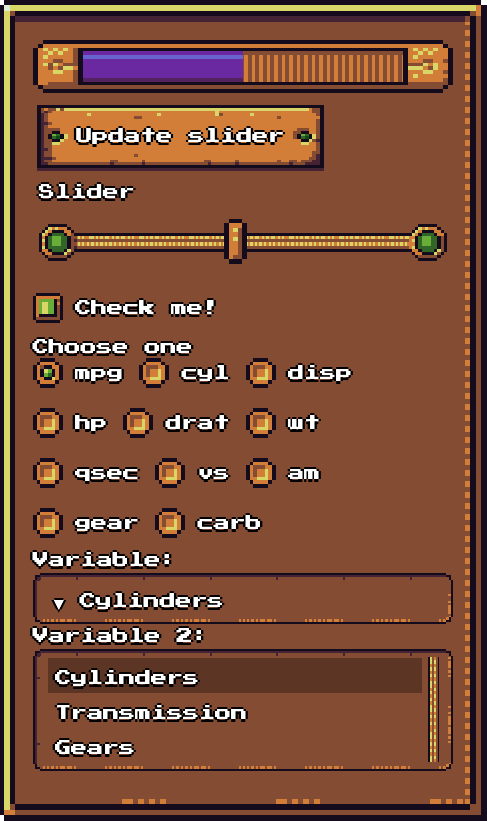
FIGURE 2.1: {shinyRPG} was built with {htmltools}.
If you want to try out this example, below is the showcase code:
remotes::install_github("RinteRface/shinyRPG")
library(shinyRPG)
shinyRPGDemo()2.2 Notations
If you type htmltools::tags$ in the R console, you should be suggested the most common available HTML tags, thereby making it fairly easy to switch between HTML and R, as shown Figure 2.2.
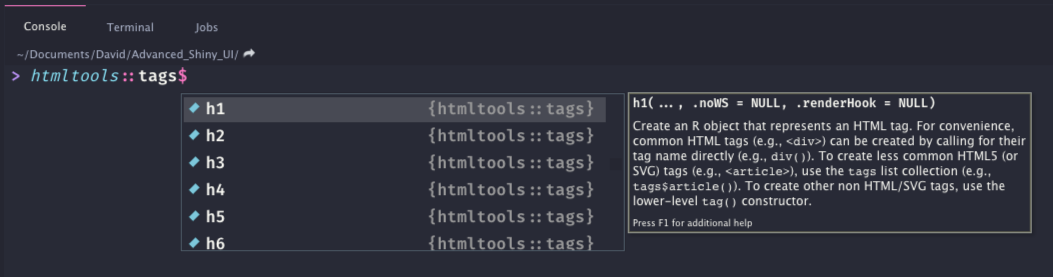
FIGURE 2.2: htmltools tags builder.
For convenience, the most commonly used tags like p, h1, h2, h3, h4, h5, h6, a, br, div, span, pre, code, img, strong, em, hr, …
are accessible by a simple function call like:
# good
h1("This is a title")

# correct but not necessary
tags$h1("This is a title")
Therefore, whether to use tags$<TAG_NAME or <TAG_NAME> depends if the tag is exported by default. Since nav is not exported, we write:
# correct
tags$nav("This is the navigation")

# fail
try(nav("This is the navigation"))
When building custom templates, you will be writing a lot of tags. It might seem
too much work to always write tags$<TAG_NAME>. There exists a function called withTags(), which allows you to get rid of all tags$. Hence, the whole code is much easier to write and read:
# Better
withTags(
  nav(div(), ul(li(), li()))
)

# instead of
tags$nav(div(), tags$ul(tags$li(), tags$li()))
If you had to gather multiple tags together, choose tagList() over list(), although the HTML output is the same:
#> List of 2
#>  $ :List of 3
#>   ..$ name    : chr "p"
#>   ..$ attribs : Named list()
#>   ..$ children:List of 1
#>   .. ..$ : chr "Some text"
#>   ..- attr(*, "class")= chr "shiny.tag"
#>  $ :List of 3
#>   ..$ name    : chr "div"
#>   ..$ attribs : Named list()
#>   ..$ children:List of 1
#>   .. ..$ : chr "Content"
#>   ..- attr(*, "class")= chr "shiny.tag"
#>  - attr(*, "class")= chr [1:2] "shiny.tag.list" "list"
tag_list_1#> <p>Some text</p>
#> <div>Content</div>#> List of 2
#> $ :List of 3
#> ..$ name : chr "p"
#> ..$ attribs : Named list()
#> ..$ children:List of 1
#> .. ..$ : chr "Some text"
#> ..- attr(*, "class")= chr "shiny.tag"
#> $ :List of 3
#> ..$ name : chr "div"
#> ..$ attribs : Named list()
#> ..$ children:List of 1
#> .. ..$ : chr "Content"
#> ..- attr(*, "class")= chr "shiny.tag"
tag_list_2#> [[1]]
#> <p>Some text</p>
#>
#> [[2]]
#> <div>Content</div>The first has the shiny.tag.list class in addition to list. You may see it as a detail, but this has noticeable consequences. For instance, tag_list_1 prints as HTML content, whereas tag_list_2 prints as a list. If we try to apply as.character() on both elements, we obtain very different outputs:
# tag_list_1
as.character(tag_list_1)
#> [1] "<p>Some text</p>\n<div>Content</div>"
# tag_list_2
as.character(tag_list_2)
#> [1] "list(name = \"p\", attribs = list(), children = list(\"Some text\"))"
#> [2] "list(name = \"div\", attribs = list(), children = list(\"Content\"))"Besides, packages like golem (Fay et al. 2021) allow us to test if an R object is a tag list. In this case, using a simple list would cause the test to fail.
2.4 Alternative way to write tags
htmltools comes with the HTML() function that you can feed with raw HTML. It prevents HTML escaping on the provided content, which is convenient, for instance, when using formatting tags inside a string:
div("Hello <u>World</u>")#> <div>Hello <u>World</u></div>#> <div>Hello <u>World</u></div>Below, both codes give exactly the same output:
Internally, their classes are different, which has consequences:
#> [1] "html" "character"#> [1] "shiny.tag"Doing so, you will not be able to use tag-related functions, as in the next parts.
We strongly recommend using R as much as possible and avoid mixing HTML with R.
Interestingly, if you want to convert raw HTML to R code, there is a Shiny App developed by Alan
Dipert from RStudio, namely html2R, shown Figure 2.3. Non-standard attributes (like data-toggle) are not correctly processed, but there are solutions. This will save you precious time! A more recent approach is developed in Chapter 21 and has been used internally to develop some of the RinteRface templates.
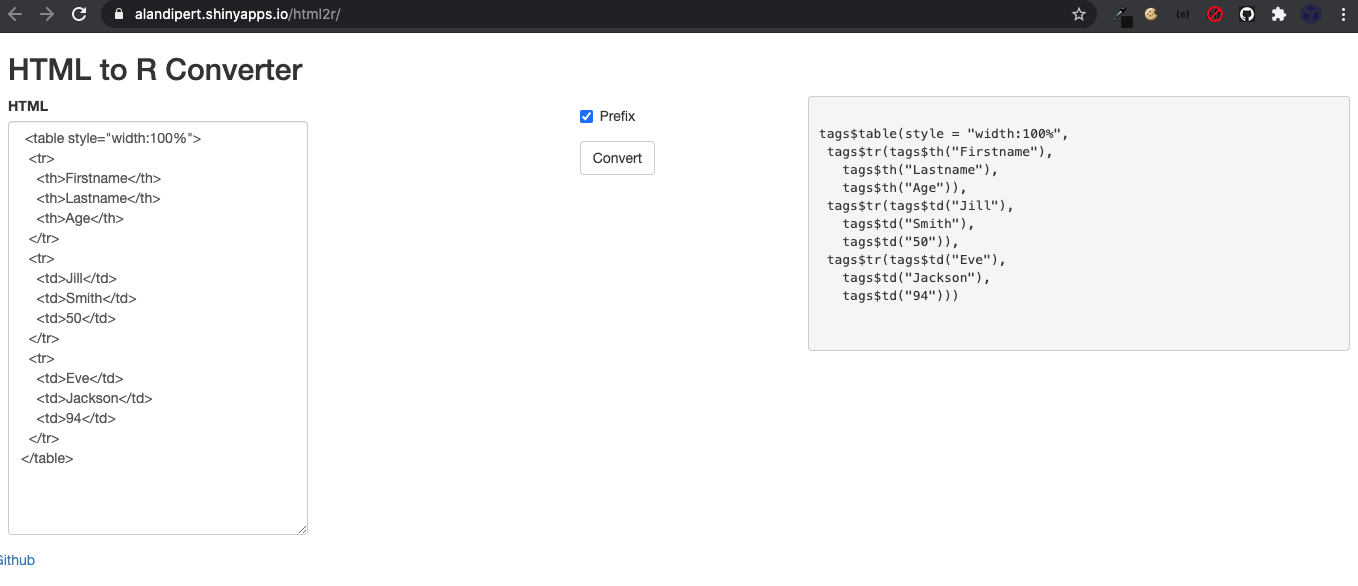
FIGURE 2.3: Illustration of the html2R app.
By converting HTML to R functions, it’s easy to parameterize the generated tag and reuse it later in the code. It also allows you to maintain a single code base (only R), which is much simpler in the long run if the code has to be reviewed by people non-familiar with HTML.
2.5 Playing with tags
Before becoming an htmltools wizard, let’s learn the Shiny tags fundamentals.
2.5.2 Practical examples: shinyRPG
Below we give concrete example on how to customize tags in real life. There exists a nice RPG HTML template, that is, rpgui. It provides the necessary elements to get started developing nice RPG-looking user interfaces, as depicted by Figure 2.4.
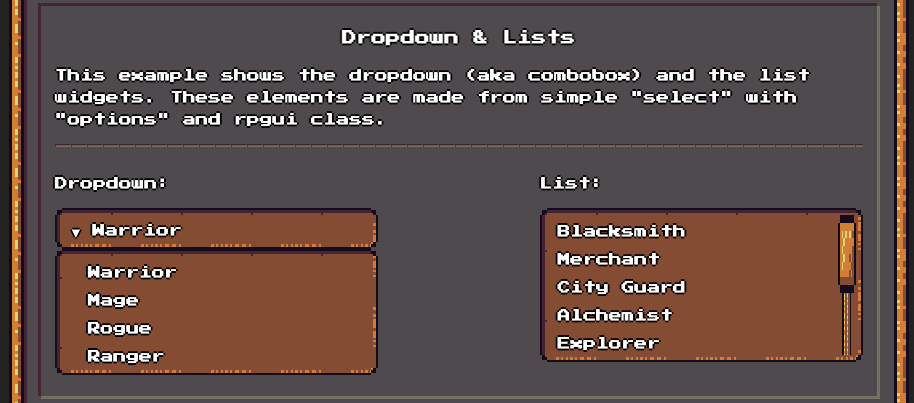
FIGURE 2.4: rpgui select input with two displays: dropdown or list.
In the following, we consider the select input, which does not have exactly the same structure as the original Shiny tag. However, it is convenient to reuse the Shiny functions to limit our amount of work. We therefore start to write our custom input:
rpgSelect <- function(inputId, label, choices, selected = NULL,
                      multiple = FALSE, size = NULL) {
  shiny::selectInput(
    inputId,
    label,
    choices,
    selected,
    multiple,
    selectize = FALSE,
    width = NULL,
    size
  )
}
According to the rpgui documentation, a select tag is composed of the following HTML elements:
<select class="rpgui-dropdown">
    <option value="option1">option1</option>
    <option value="option2">option2</option>
    ...
</select>
Adding a label tag on top of the slider, this is what we would like to get:
<div>
  <label id="variable-label" for="variable">Variable:</label>
  <select
    id="variable"
    class="rpgui-dropdown">
    <option value="cyl" selected>Cylinders</option>
    <option value="am">Transmission</option>
    <option value="gear">Gears</option>
  </select>
</div>
We compare with our own rpgSelect() function:
rpgSelect(
  "variable",
  "Variable:",
  c("Cylinders" = "cyl",
    "Transmission" = "am",
    "Gears" = "gear")
)
#> <div class="form-group shiny-input-container">
#> <label class="control-label" id="variable-label" for="variable">Variable:</label>
#> <div>
#> <select id="variable" class="form-control"><option value="cyl" selected>Cylinders</option>
#> <option value="am">Transmission</option>
#> <option value="gear">Gears</option></select>
#> </div>
#> </div>As shown in the above output, this is not exactly matching:
- The outer div should not have any class.
- The label should not have any class.
- The input tag is wrapped inside a div container. It should not.
- The input tag should have the
rpgui-dropdownorrpgui-listclass, depending on the size value.
To fix the first problem we target the outer tag (selectTag), that is, the tag returned by our rpgSelect() function. The second row cleans the label class. The third row removes the extra outer div and only keeps its children, corresponding to the input tag. The last instruction ensures we set the appropriate class, depending on the size value:
# Modify tag
selectTag$attribs$class <- NULL
# Clean extra label class
selectTag$children[[1]]$attribs$class <- NULL
# Remove extra outer div
selectTag$children[[2]] <- selectTag$children[[2]]$children[[1]]

# Add good class for rppgui binding
selectTag$children[[2]]$attribs$class <- if (is.null(size)) {
  "rpgui-dropdown"
} else {
  "rpgui-list"
}
The complete code is given here, which yields:
rpgSelect(
  "variable",
  "Variable:",
  c("Cylinders" = "cyl",
    "Transmission" = "am",
    "Gears" = "gear")
)
#> <div>
#> <label id="variable-label" for="variable">Variable:</label>
#> <select id="variable" class="rpgui-dropdown"><option value="cyl" selected>Cylinders</option>
#> <option value="am">Transmission</option>
#> <option value="gear">Gears</option></select>
#> </div>2.5.4 Other functions
The golem package written by thinkr contains neat functions to edit your tags.
Particularly, the tagRemoveAttributes():
tagRemoveAttributes <- function(tag, ...) {
  attrs <- as.character(list(...))
  for (i in seq_along(attrs)) {
    tag$attribs[[ attrs[i] ]] <- NULL
  }
  tag
}
myTag <- div(class = "test", id = "coucou", "Hello")
myTag <- tagRemoveAttributes(myTag, "class", "id")

myTag
#> <div>Hello</div>2.5.5 Conditionally set attributes
Sometimes, you only want to set attributes under specific conditions.
Calling my_button() would give:
#> <button style="color: ">
#>   <p>Hello</p>
#> </button>
This example will not fail but having style="color: " is not clean. We may use conditions:
my_button <- function(color = NULL) {
  tags$button(
    style = if (!is.null(color)) paste("color:", color),
    p("Hello")
  )
}
Below, we call my_button("blue") and my_button():
my_button("blue")#> <button style="color: blue">
#> <p>Hello</p>
#> </button>
my_button()#> <button>
#> <p>Hello</p>
#> </button>In this example, style won’t be available if color is not specified.
2.5.6 Using %>%
While doing a lot of manipulation for a tag, if you don’t need to create intermediate
objects, it is a good idea to use %>% from magrittr:
myTag <- div(class = "cl", h1("Hello")) %>%
  tagAppendAttributes(id = "myid") %>%
  tagAppendChild(p("some extra text here!"))

myTag
This is overall easier to follow and read.
2.5.7 Programmatically create children elements
Assume you want to create a tag with five children inside:
The structure is correct, but imagine if you had to create 1000 span() or a fancier tag. The previous approach is not consistent with the DRY programming concept. lapply() function will be useful here (or the purrr map() family):
# base R
div(lapply(1:5, function(i) span(i)))
# purrr + %>%
map(1:5, function(i) span(i)) %>% div()
#> <div>
#> <span>1</span>
#> <span>2</span>
#> <span>3</span>
#> <span>4</span>
#> <span>5</span>
#> </div>2.6 Modern {htmltools}
This section requires basic CSS knowledge, particularly CSS selectors. Please read Chapter 6 before going further.
As of htmltools 0.5.2, the new tagQuery() function makes manipulating Shiny tags a real pleasure, in addition to being more efficient. If you know and like jQuery (Chapter 10.5), the API is really similar. If you don’t know jQuery yet, no problem, we’ll see it later in the book!
As a preliminary example, we want to modify the third span element from the above example in section 2.5.7:
spans <- div(div(p(), lapply(1:5, function(i) span(i))))
spans$children[[1]]$children[[2]][[3]]$attribs$class <- "test"

spans
#> <div>
#> <div>
#> <p></p>
#> <span>1</span>
#> <span>2</span>
#> <span class="test">3</span>
#> <span>4</span>
#> <span>5</span>
#> </div>
#> </div>Below is the new htmltools approach, which leverages tagQuery():
spans <- div(div(p(), lapply(1:5, function(i) span(i))))
spans <- tagQuery(spans)$
  find("span")$
  filter(function(x, i) i == 3)$
  addAttrs("class" = "amazing-tag")$
  allTags()

spans
#> <div>
#> <div>
#> <p></p>
#> <span>1</span>
#> <span>2</span>
#> <span class="amazing-tag">3</span>
#> <span>4</span>
#> <span>5</span>
#> </div>
#> </div>As you may notice, the first approach may lead to poorly written code as soon as the
tag structure gets more complex. You may easily end up with things like tag$children[[1]]$children[[2]]$children[[1]]$attribs$class, which is nearly impossible to maintain.
The second approach is much more human readable, even though not necessarily shorter in this example.
The biggest advantage is that is does not always depend on the overall tag structure. As an exercise, you may wrap the span elements inside another div parent:
spans <- div(div(p(), div(lapply(1:5, function(i) span(i)))))
spans <- tagQuery(spans)$
  find("span")$
  filter(function(x, i) i == 3)$
  addAttrs("class" = "amazing-tag")$
  allTags()

spans
#> <div>
#> <div>
#> <p></p>
#> <div>
#> <span>1</span>
#> <span>2</span>
#> <span class="amazing-tag">3</span>
#> <span>4</span>
#> <span>5</span>
#> </div>
#> </div>
#> </div>The above code still works, while the previous one would require being updated.
Another reason to prefer the new tagQuery() API is the substantial performance gains. Interestingly, under the hood, most if not all older htmltools functions like tagAppendChildren() or tagAppendAttributes() call the tagQuery() API when .cssSelector is provided. In practice,
while we can achieve multiple modifications at once with a single tagQuery() call, it requires a combination of multiple tagAppendChildren()/tagAppendAttributes() to reach the same result, thereby leading to less performance.
Are you ready to become a tag witcher [^tag-witcher]?
1: I hope you’ll realize that it is easier than killing weird monsters, drinking dangerous potions made of deadly mutagens and not taking any bath for weeks…but one never knows!].
2.6.1 Basics
tagQuery() accepts a tag or list of tags as input and returns a data structure containing:
-
$allTags(): all tags. -
$selectedTags(): selected tags, default to$allTags().
As an example:
#> [1] "shiny.tag.query"
tag_query#> `$allTags()`:
#> <div>
#> <p></p>
#> </div>
#>
#> `$selectedTags()`: `$allTags()`As shown above, the returned result is not a Shiny tag. Instead, it is a R6 class having methods to handle those tags.
2.6.2 Query tags
Below is a table summarizing all available query methods. Note that at the time of writing, tagQuery() only supports simple CSS selectors. For instance, data-... selectors are not covered, as well as ,, + and ~. However, we’ll see below there are many options to work around.
| Method | Description |
|---|---|
| children | Get all the direct descendants of each selected tag |
| find | Get all descendants of each selected tag |
| parent | Get the direct ancestors of each selected tag |
| parents | Get all parents of each selected tag |
| siblings | Get all siblings of each selected tag |
| filter | Subset selected tags with CSS selectors or R function |
| resetSelected | Reset set of selected tags to the root tag |
According to Figure 2.5, while $children() selects only direct descendants, $find() is slightly more powerful and drills down to any level deeper. $filter() is convenient to subset selected tags, for instance, depending on a specific attribute. A dedicated section (2.6.4) covers $resetSelected(), which essentially resets the current selection to the root tag. Whereas $parent() allows going up step by step, returning each time the direct ancestor, $parents() returns all ancestors. If you need to be even more specific, $closest(cssSelector) goes up until it finds the matching cssSelector. Note that, if cssSelector = NULL, $closest() is equivalent to call $selectedTags().
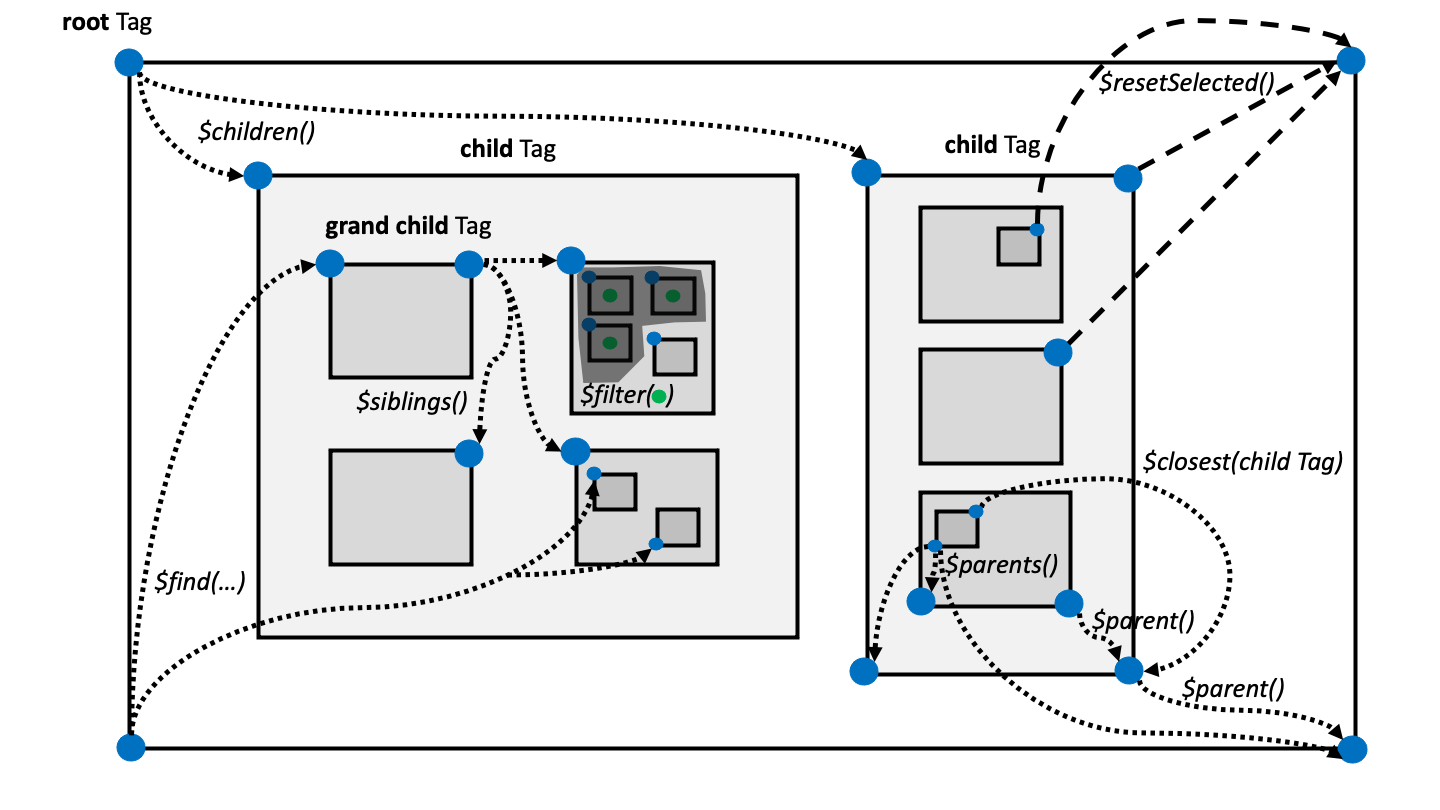
FIGURE 2.5: tagQuery API: overview of query methods.
Let’s consider an example consisting of a tabset panel with three tabs. Those menu items are one of the most challenging elements to handle when building a custom Shiny template and the new tagQuery() literally make it a breeze to handle. A detailed case study is available section 17.2.4.1.
temp_tabs <- lapply(1:3, function(i) {
  tabPanel(i, paste("Tab", i))
})
tabs <- bs4Dash::tabsetPanel(.list = temp_tabs)

tabs
#> <div class="tabbable">
#> <ul class="nav nav-tabs" data-tabsetid="6315">
#> <li class="nav-item">
#> <a href="#" data-toggle="tab" data-value="1" class="nav-link active" data-target="#tab-6315-1">1</a>
#> </li>
#> <li class="nav-item">
#> <a href="#" data-toggle="tab" data-value="2" class="nav-link" data-target="#tab-6315-2">2</a>
#> </li>
#> <li class="nav-item">
#> <a href="#" data-toggle="tab" data-value="3" class="nav-link" data-target="#tab-6315-3">3</a>
#> </li>
#> </ul>
#> <div class="tab-content" data-tabsetid="6315">
#> <div class="tab-pane active" data-value="1" id="tab-6315-1">Tab 1</div>
#> <div class="tab-pane" data-value="2" id="tab-6315-2">Tab 2</div>
#> <div class="tab-pane" data-value="3" id="tab-6315-3">Tab 3</div>
#> </div>
#> </div>How would you select the third tab content element?
tagQuery(tabs)$
  find("div.tab-pane")$ # div element with tab-pane class
  filter(function(x, i) tagGetAttribute(x, "data-value") == 3)
#> [[1]]
#> <div class="tab-pane" data-value="3" id="tab-6315-3">Tab 3</div>Note that we provided an anonymous R function to $filter(), where x is the tag and i the index, allowing us to drill down to the third tab, which has data-value = 3.
As an exercise, I give you two minutes to find the classic htmltools equivalent. If you don’t manage, it means the new tagQuery() system is rather convenient.
2.6.3 Modify tags
As shown in the preliminary example, the main interest of querying tags is to ultimately modify them. tagQuery() exposes methods to modify attributes, children of the query selection.
2.6.3.1 Playing with attributes
As shown Figure 2.6, there are currently two main methods to alter tag attributes, namely $addAttrs() (equivalent of tagAppendAttributes) and $removeAttrs(), even though more specific methods exists, for instance $addClass(), $removeClass() and $toggleClass().
| Method | Description |
|---|---|
| addAttrs | Add any number of attributes to each selected tag |
| removeAttrs | Remove any number of attributes to each selected tag |
| hasAttrs | Check if the selected tag has the specified attribute(s) |
| addClass | Add any number of new classes to each selected tag |
| removeClass | Remove any number of classes to each selected tag |
| hasClass | Check if the selected tag has the specified classe(s) |
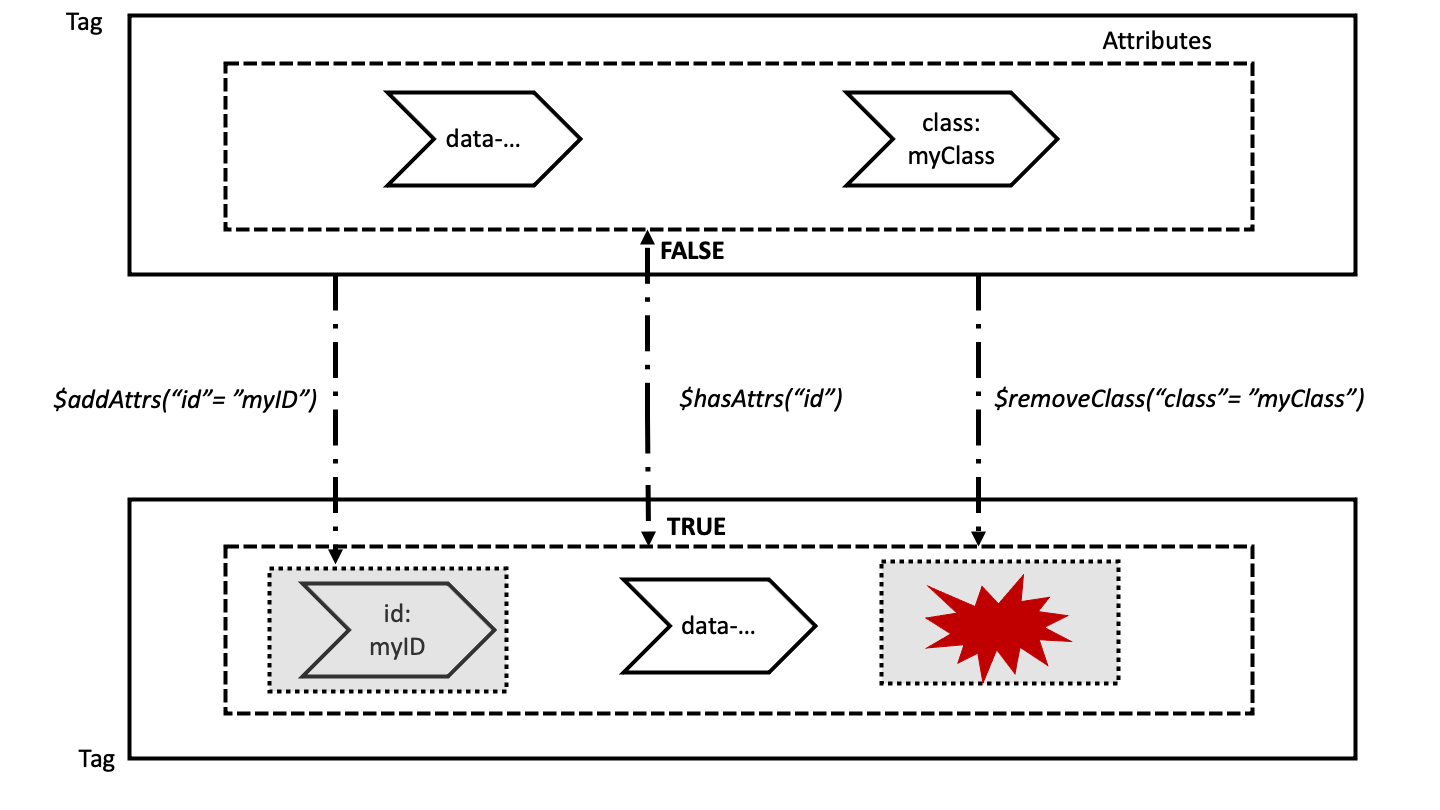
FIGURE 2.6: tagQuery API: modify tag attributes.
Bootstrap 4 allows us to apply a fade transition between tabs, provided that those tabs have the fade class. Below is how to seamlessly do it with tagQuery():
tagQuery(tabs)$
  find(".tab-pane")$
  addClass("fade")
#> [[1]]
#> <div class="tab-pane active fade" data-value="1" id="tab-6315-1">Tab 1</div>
#>
#> [[2]]
#> <div class="tab-pane fade" data-value="2" id="tab-6315-2">Tab 2</div>
#>
#> [[3]]
#> <div class="tab-pane fade" data-value="3" id="tab-6315-3">Tab 3</div>2.6.3.2 Altering tag/children/siblings
Below are listed some methods to alter the current tag or its children, as depicted Figure 2.7.
| Method | Description |
|---|---|
| append | Insert content after the children of each selected tag |
| prepend | Insert content before the children of each selected tag |
| empty | Remove all children from the selected tag |
| remove | Remove all selected tags |
| before | Insert content before each selected tag |
| after | Insert content after each selected tag |
| replaceWith | Replace the currently selected tag by the provided tag |
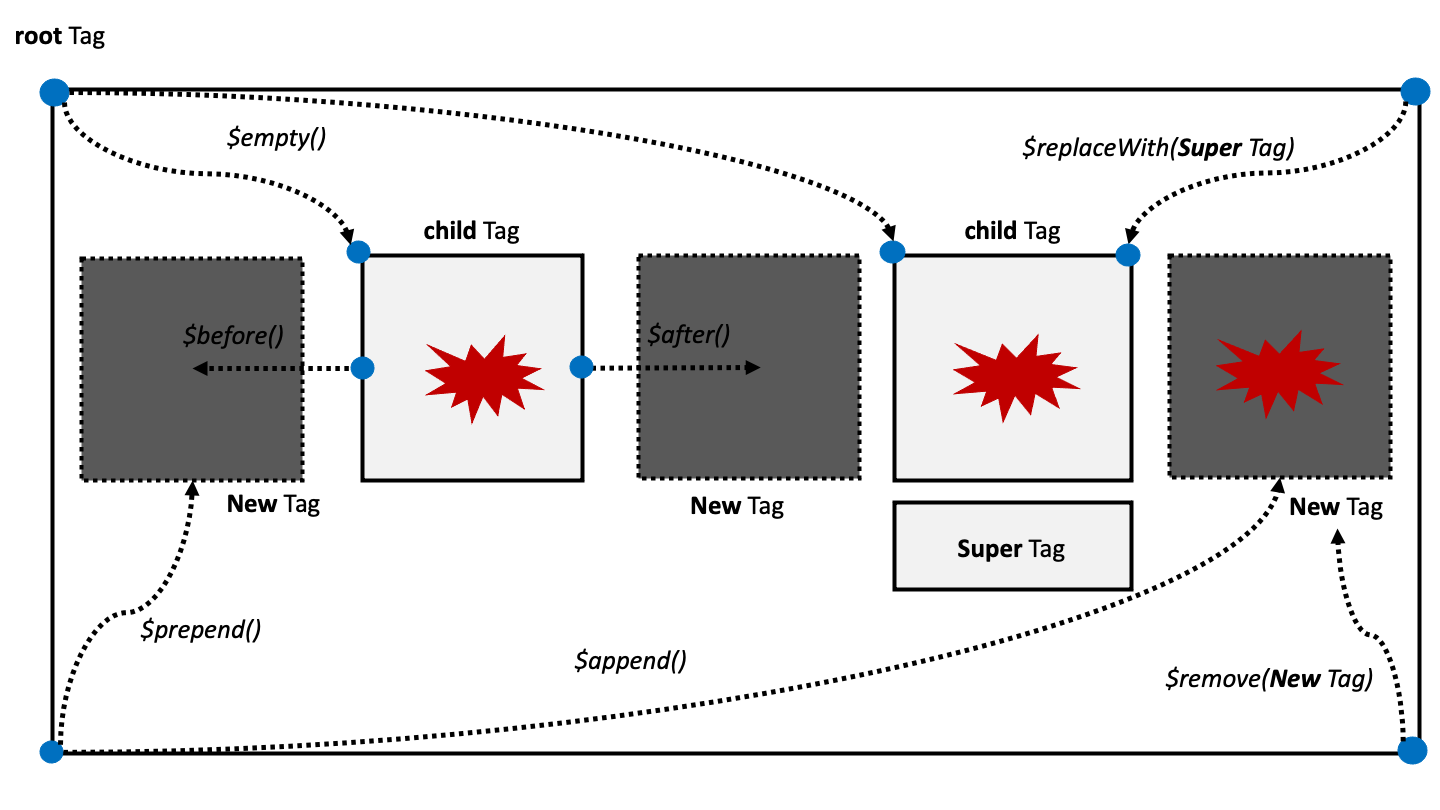
FIGURE 2.7: tagQuery API: alter tags children.
Going back to our previous tabs example, we would like to include an icon before each tab title. We leverage the $prepend() method, after selecting the a elements part of the tab navigation:
# Add extra item to tabs at the end
new_tabs <- tagQuery(tabs)$
  find("a")$
  prepend(icon("flag"))

new_tabs$selectedTags()
#> [[1]]
#> <a href="#" data-toggle="tab" data-value="1" class="nav-link active" data-target="#tab-6315-1">
#> <i class="fa fa-flag" role="presentation" aria-label="flag icon"></i>
#> 1
#> </a>
#>
#> [[2]]
#> <a href="#" data-toggle="tab" data-value="2" class="nav-link" data-target="#tab-6315-2">
#> <i class="fa fa-flag" role="presentation" aria-label="flag icon"></i>
#> 2
#> </a>
#>
#> [[3]]
#> <a href="#" data-toggle="tab" data-value="3" class="nav-link" data-target="#tab-6315-3">
#> <i class="fa fa-flag" role="presentation" aria-label="flag icon"></i>
#> 3
#> </a>
ui <- fluidPage(new_tabs$allTags())
server <- function(input, output, session) {}
shinyApp(ui, server)
The result is shown in Figure 2.8.
FIGURE 2.8: tagQuery API in action: a customized Shiny tabsetPanel.
2.6.4 Chain tag queries
One of the strengths of the tagQuery() API is the ability to chain methods, where the classic htmltools syntax might be repetitive and heavy. $resetSelected() allows us to reset the tag selection to the root tag after a given operation, thereby making it possible to chain multiple queries with different purposes. The overall flow is more human readable than a step-by-step approach, similar to the tidyverse or ggplot grammar. Let’s combine all previous examples:
# add fade class to all panels
tagQuery(tabs)$
  find(".tab-pane")$
  addClass("fade")$
  removeClass("active")$
  filter(function(x, i) tagGetAttribute(x, "data-value") == 3)$
  addClass("active")$
  resetSelected()$
  # new operation: add icon before each nav link title
  find("a")$
  prepend(icon("flag"))$
  # Here the next operation use the same target
  # We don't need to reset the scope
  removeClass("active")$
  # Select third nav link
  filter(function(x, i) tagGetAttribute(x, "data-value") == 3)$
  # Make it active
  addClass("active")$
  allTags()
#> <div class="tabbable">
#> <ul class="nav nav-tabs" data-tabsetid="6315">
#> <li class="nav-item">
#> <a href="#" data-toggle="tab" data-value="1" class="nav-link" data-target="#tab-6315-1">
#> <i class="fa fa-flag" role="presentation" aria-label="flag icon"></i>
#> 1
#> </a>
#> </li>
#> <li class="nav-item">
#> <a href="#" data-toggle="tab" data-value="2" class="nav-link" data-target="#tab-6315-2">
#> <i class="fa fa-flag" role="presentation" aria-label="flag icon"></i>
#> 2
#> </a>
#> </li>
#> <li class="nav-item">
#> <a href="#" data-toggle="tab" data-value="3" class="nav-link active" data-target="#tab-6315-3">
#> <i class="fa fa-flag" role="presentation" aria-label="flag icon"></i>
#> 3
#> </a>
#> </li>
#> </ul>
#> <div class="tab-content" data-tabsetid="6315">
#> <div class="tab-pane fade" data-value="1" id="tab-6315-1">Tab 1</div>
#> <div class="tab-pane fade" data-value="2" id="tab-6315-2">Tab 2</div>
#> <div class="tab-pane fade active" data-value="3" id="tab-6315-3">Tab 3</div>
#> </div>
#> </div>2.6.5 Specific cases
There are situations where the previous methods won’t work. What if you want to modify the
tab content from Tab i to This is tab i. A common mistake would be to proceed as follows:
tagQuery(tabs)$
  find(".tab-pane")$
  empty()$
  append(lapply(1:3, function(i) paste("This is tab", i)))
#> [[1]]
#> <div class="tab-pane active" data-value="1" id="tab-6315-1">
#> This is tab 1
#> This is tab 2
#> This is tab 3
#> </div>
#>
#> [[2]]
#> <div class="tab-pane" data-value="2" id="tab-6315-2">
#> This is tab 1
#> This is tab 2
#> This is tab 3
#> </div>
#>
#> [[3]]
#> <div class="tab-pane" data-value="3" id="tab-6315-3">
#> This is tab 1
#> This is tab 2
#> This is tab 3
#> </div>You may think it will add each text to the corresponding panel item, but methods like $append() and $prepend() are only able to add the same element(s) to one or multiple target(s). It will actually add three new children to each selected panel. For this case where the content is index specific, we have to utilize $each(). It takes an anonymous function as input, with two parameters. x is the tag and i is the current index. Inside that function, you may edit the tag depending on the index and return the modified structure:
tagQuery(tabs)$
  find(".tab-pane")$
  empty()$
  each(function(x, i) {
    # replace text
    x <- tagAppendChildren(x, paste("This is tab", i))
    # return edited tag
    x
  })
#> [[1]]
#> <div class="tab-pane active" data-value="1" id="tab-6315-1">This is tab 1</div>
#>
#> [[2]]
#> <div class="tab-pane" data-value="2" id="tab-6315-2">This is tab 2</div>
#>
#> [[3]]
#> <div class="tab-pane" data-value="3" id="tab-6315-3">This is tab 3</div>2.6.6 Practice
Let’s rewrite the shinyRPG select (see 2.5.2) input using the new tagQuery() API. As a reminder, the function is given here. The new approach is described below and leverages almost all the tagQuery() API tools. We first remove the outer div class and the label class with $removeAttrs(). These two steps don’t need any reset since the label is a child of the outer div. The next step is targeting the select element and requires using $siblings() to catch the div parent followed by a $children(), which will capture the select (interestingly, we could also have reset the selection with $resetSelected() and apply $find()). We also add a custom class with $addClass(). We finally go back to the parent outer div with $resetSelected() and apply $each() to replace the inner div with its children.
tagQuery(selectTag)$
  removeAttrs("class")$ # remove outer div class
  find(".control-label")$
  removeAttrs("class")$ # remove class from child label
  siblings()$ # go down to the div
  children()$ # go down to the select tag
  addClass(selectClass)$ # add class to child select
  resetSelected()$# go back to div parent
  each(function(x, i) {
    x$children[[2]] <- x$children[[2]]$children
  })$ # replace div parent
  allTags()
The complete code may be found in A.1.1.
2.6.7 Alter tag rendering with render hooks
2.6.7.1 Simple hooks
In this section, we’ll see what is probably one of the most advanced htmltools feature, recently introduced in version 0.5.2. How would you conditionally render a tag, for instance depending on different conditions like external options, a specific theme version, …?
Assume you want to design development specific tags, that only appear in Shiny dev mode:
#> [1] TRUEThen we create our custom tag with the .renderHook parameter available for the htmltools tag element, providing a special function, namely a render hook, that will be called upon for tag rendering:
cssStyle <- "color:red; border-style:dashed; border-color:blue;"
customTag <- span("", .renderHook = function(x) {
  if (getOption("shiny.devmode")) {
    tagAppendAttributes(x, style = cssStyle)
  }
})

customTag
#> <span style="color:red; border-style:dashed; border-color:blue;"></span>Note that if the tag already has any existing hook, tagAddRenderHook() adds another hook to the current list. An option controls whether to erase existing hooks (replace).
customTag <- tagAddRenderHook(customTag, function(x) {
  if (getOption("shiny.devmode")) {
    tagAppendChildren(x, "UNDER REWORK")
  }
})
The hooks list is accessible with:
customTag$.renderHooks#> [[1]]
#> function(x) {
#> if (getOption("shiny.devmode")) {
#> tagAppendAttributes(x, style = cssStyle)
#> }
#> }
#>
#> [[2]]
#> function(x) {
#> if (getOption("shiny.devmode")) {
#> tagAppendChildren(x, "UNDER REWORK")
#> }
#> }
# Remove first hook
# customTag$.renderHooks[[1]] <- NULL
which is convenient to remove or edit hooks. Figure 2.9 summarizes the main mechanisms.
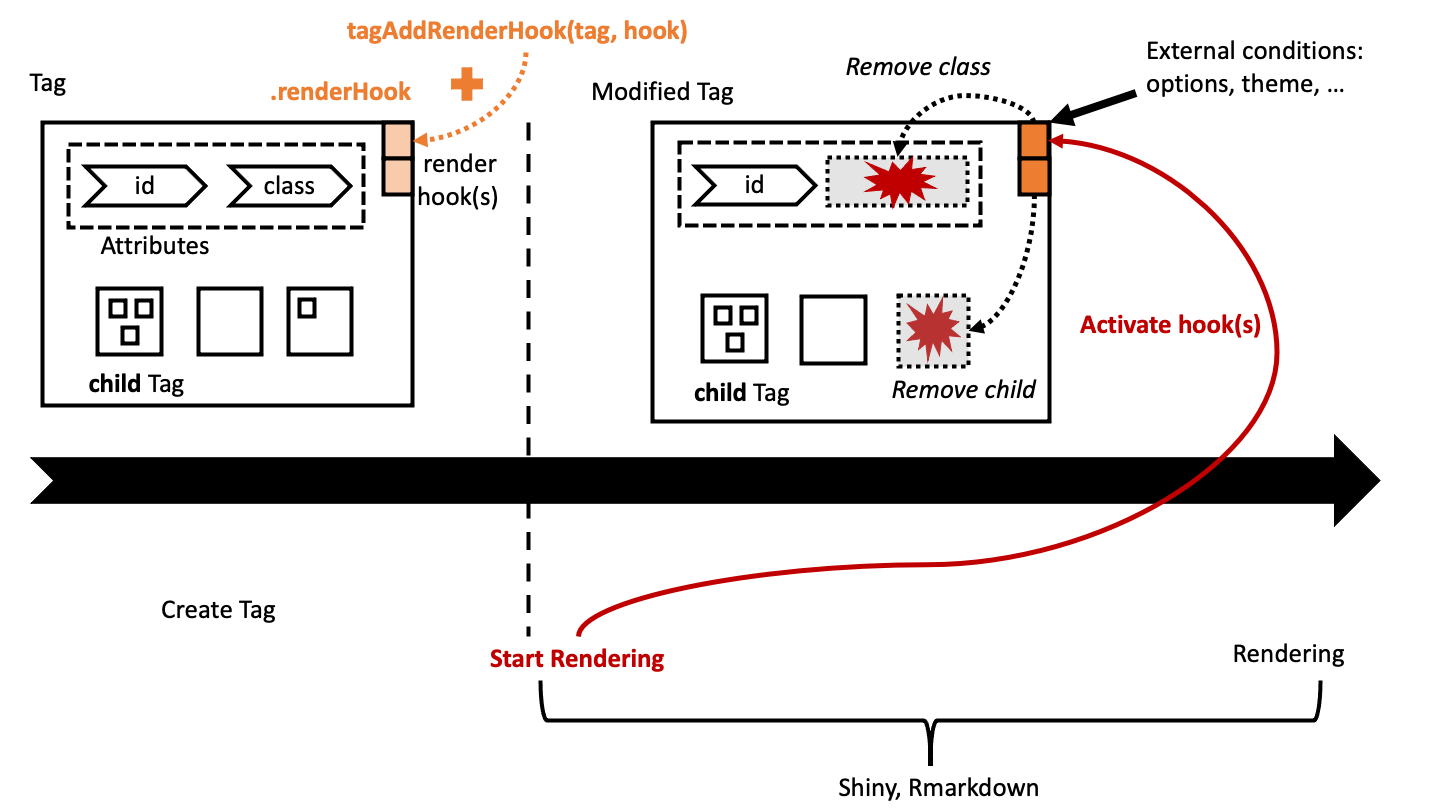
FIGURE 2.9: Alter tags before rendering: htmltools hooks.
Let’s try it in a Shiny app with the dev mode enabled:
ui <- fluidPage(
  sidebarLayout(
    sidebarPanel(customTag),
    mainPanel(customTag)
  )
)
server <- function(input, output, session) {}
shinyApp(ui, server)
We disable the dev mode:
The result is shown Figure 2.10.

FIGURE 2.10: tagAddRenderHook in action. Left: Shiny dev mode enabled; right: Shiny dev mode disabled.
In Chapter 9.3.3 we’ll discuss another use case, which is about theme-dependent rendering, that is, for instance, rendering a tag differently whether Shiny is in Bootstrap 3 or Bootstrap 4 mode.
2.6.7.2 Nested hooks
In practice, you will rarely have only one render hook to handle. Most Shiny elements are composed
of main wrappers and nested tags. For instance, nav elements like tabsetPanel() and tabPanel() are, again, the perfect example.
How do we handle render hooks with nested elements? Let’s see below with a simple example.
We first consider the main wrapper, namely my_wrapper_tag(). The function creates a single div wrapper containing other items generated with another function. In the render hook, we simulate the impact of
a theme_version option. We capture all passed items in a list and apply tagQuery() to edit a given
element targeted with a specific class, using $each() to loop over all items and add an id attribute to them. We store the query result in a new item variable and replace the old items by the newly generated ones in the main wrapper with $empty() and $append(). Note the commented rows, we will discuss it later.
my_wrapper_tag <- function(...) {
  wrapper <- tags$div(class = "parent", ...)
  items <- list(...)

  tagAddRenderHook(wrapper, function(x) {
    version <- getOption("theme_version")
    if (!is.null(version)) {
      if (version == "4") {
        # resolve sub items
        # items <- lapply(items, as.tags)
        # INSERT BROWSER TO DEBUG
        new_items <- tagQuery(items)$
          find(".new-child")$
          each(function(x, i) {
            tagAppendAttributes(x, id = i)
          })$
          allTags()

        x <- tagQuery(x)$
          # replace accordion items processed above
          empty()$
          append(new_items)$
          allTags()
      }
    }
    x
  })
}
The next step is to design the nested item function. The tag consists of a
simple div element with a class. In the render hook, we get the theme version
and, depending on the result, we add a child to the item with $append().
Note the new-child class. This is the one targeted one level up in my_wrapper_tag().
my_nested_tag <- function() {
  wrapper <- tags$div(class = "nested")

  tagAddRenderHook(wrapper, function(x) {
    version <- getOption("theme_version")
    if (!is.null(version)) {
      x <- if (version == "4") {
        new_child <- tags$div(class = "new-child")

        tagQuery(x)$
          append(new_child)$
          allTags()
      }
    }
    x
  })
}
We test it below:
# Define external option to mimic arbitrary change
options("theme_version" = "4")
my_wrapper_tag(my_nested_tag(), my_nested_tag())
#> <div class="parent">
#> <div class="nested">
#> <div class="new-child"></div>
#> </div>
#> <div class="nested">
#> <div class="new-child"></div>
#> </div>
#> </div>The code does not seem to work as expected since the child items do not get any new id attribute,
contrary to what is specified in the my_wrapper_tag() render hook. What is the problem here?
It is basically a resolve issue. In the top-level render hook, the newly added item is not yet available. To check this, we can put a browser() just before the tagQuery() flow inside my_wrapper_tag():
my_wrapper_tag <- function(...) {
  # start
  # ...

  # TO DEBUG
  browser()

  new_items <- tagQuery(items)$
    find(".new-child")$
    each(function(x, i) {
      tagAppendAttributes(x, id = i)
    })$
    allTags()

  # ...
  # end
}
Then we run tagQuery(items)$find(".new-child") and capture the output:
#> `$allTags()`:
#> <div class="nested">
#>   <div class="new-child"></div>
#> </div>
#> <div class="nested">
#>   <div class="new-child"></div>
#> </div>
#>
#> `$selectedTags()`: (Empty selection)
From what we see, tagQuery() does not manage to find the newly inserted element with new-child class in the lower-level render hook. If we inspect str(items[[1]]):
#> List of 4
#> $ name        : chr "div"
#> $ attribs     :List of 1
#>  ..$ class: chr "nested"
#> $ children    : list()
#> $ .renderHooks:List of 1
#>  ..$ :function (x)
#>  .. ..- attr(*, "srcref")= 'srcref'
#>  int [1:8] 4 31 20 5 31 5 4 20
#>  .. .. ..- attr(*, "srcfile")=Classes 'srcfilecopy',
#>  'srcfile' <environment: 0x7fcbf889aba8>
#> - attr(*, "class")= chr "shiny.tag"
We get the confirmation that the child item is not available for htmltools, even if it appears in the code output:
<!-- items[[1]] -->
<div class="nested">
  <div class="new-child"></div>
</div>
A workaround is to manually resolve the sub items with as.tags(), which converts
any arbitrary element to be part of the tag structure. Therefore, if you uncomment items <- lapply(items, as.tags) in my_wrapper_tag(), we obtain:
#> List of 4
#> $ name        : chr "div"
#> $ attribs     :List of 1
#>  ..$ class: chr "nested"
#> $ children    :List of 1
#>  ..$ :List of 3
#>  .. ..$ name    : chr "div"
#>  .. ..$ attribs :List of 1
#>  .. .. ..$ class: chr "new-child"
#>  .. ..$ children: list()
#>  .. ..- attr(*, "class")= chr "shiny.tag"
#> $ .renderHooks: list()
#> - attr(*, "class")= chr "shiny.tag"
confirming the structure is now correctly processed. Running my_wrapper_tag(my_nested_tag(), my_nested_tag()) yields:
<!-- RUN: my_wrapper_tag(my_nested_tag(), my_nested_tag()) -->

<div class="parent">
  <div class="nested">
    <div class="new-child" id="1"></div>
  </div>
  <div class="nested">
    <div class="new-child" id="2"></div>
  </div>
</div>
which is exactly what we want! A real-life case study is available later in the book in section 9.3.3.3.