8 Beautify with {fresh}
As shown in the previous chapter, Sass is a powerful tool to customize apps in minutes, in addition to drastically improving code quality, thereby empowering long term maintenance. Some CSS knowledge are required and it may not be that easy to find the corresponding variables to a specific purpose. For instance, would you be able to guess what Bootstrap 4 variables are required to customize the bs4Dash template?
In this chapter, as well as in Chapter 9, we show higher-level tools to customize Bootstrap-based templates. Let’s start with the first one: fresh.
{fresh} is an R package developed by the dreamRs team, also authors of shinyWidget and esquisse. All dreamRs projects are clearly a great source of inspiration to design outstanding Shiny apps, to such an extent that we highly recommend the reader explore more about their work.
To install fresh, we run:
# CRAN
install.packages("fresh")
# development version
remotes::install_github("dreamRs/fresh")
An interactive live theming tool may be run from Github with an example shown in Figure 8.1:
shiny::runGitHub("dreamRs/fresh", subdir = "inst/examples/create")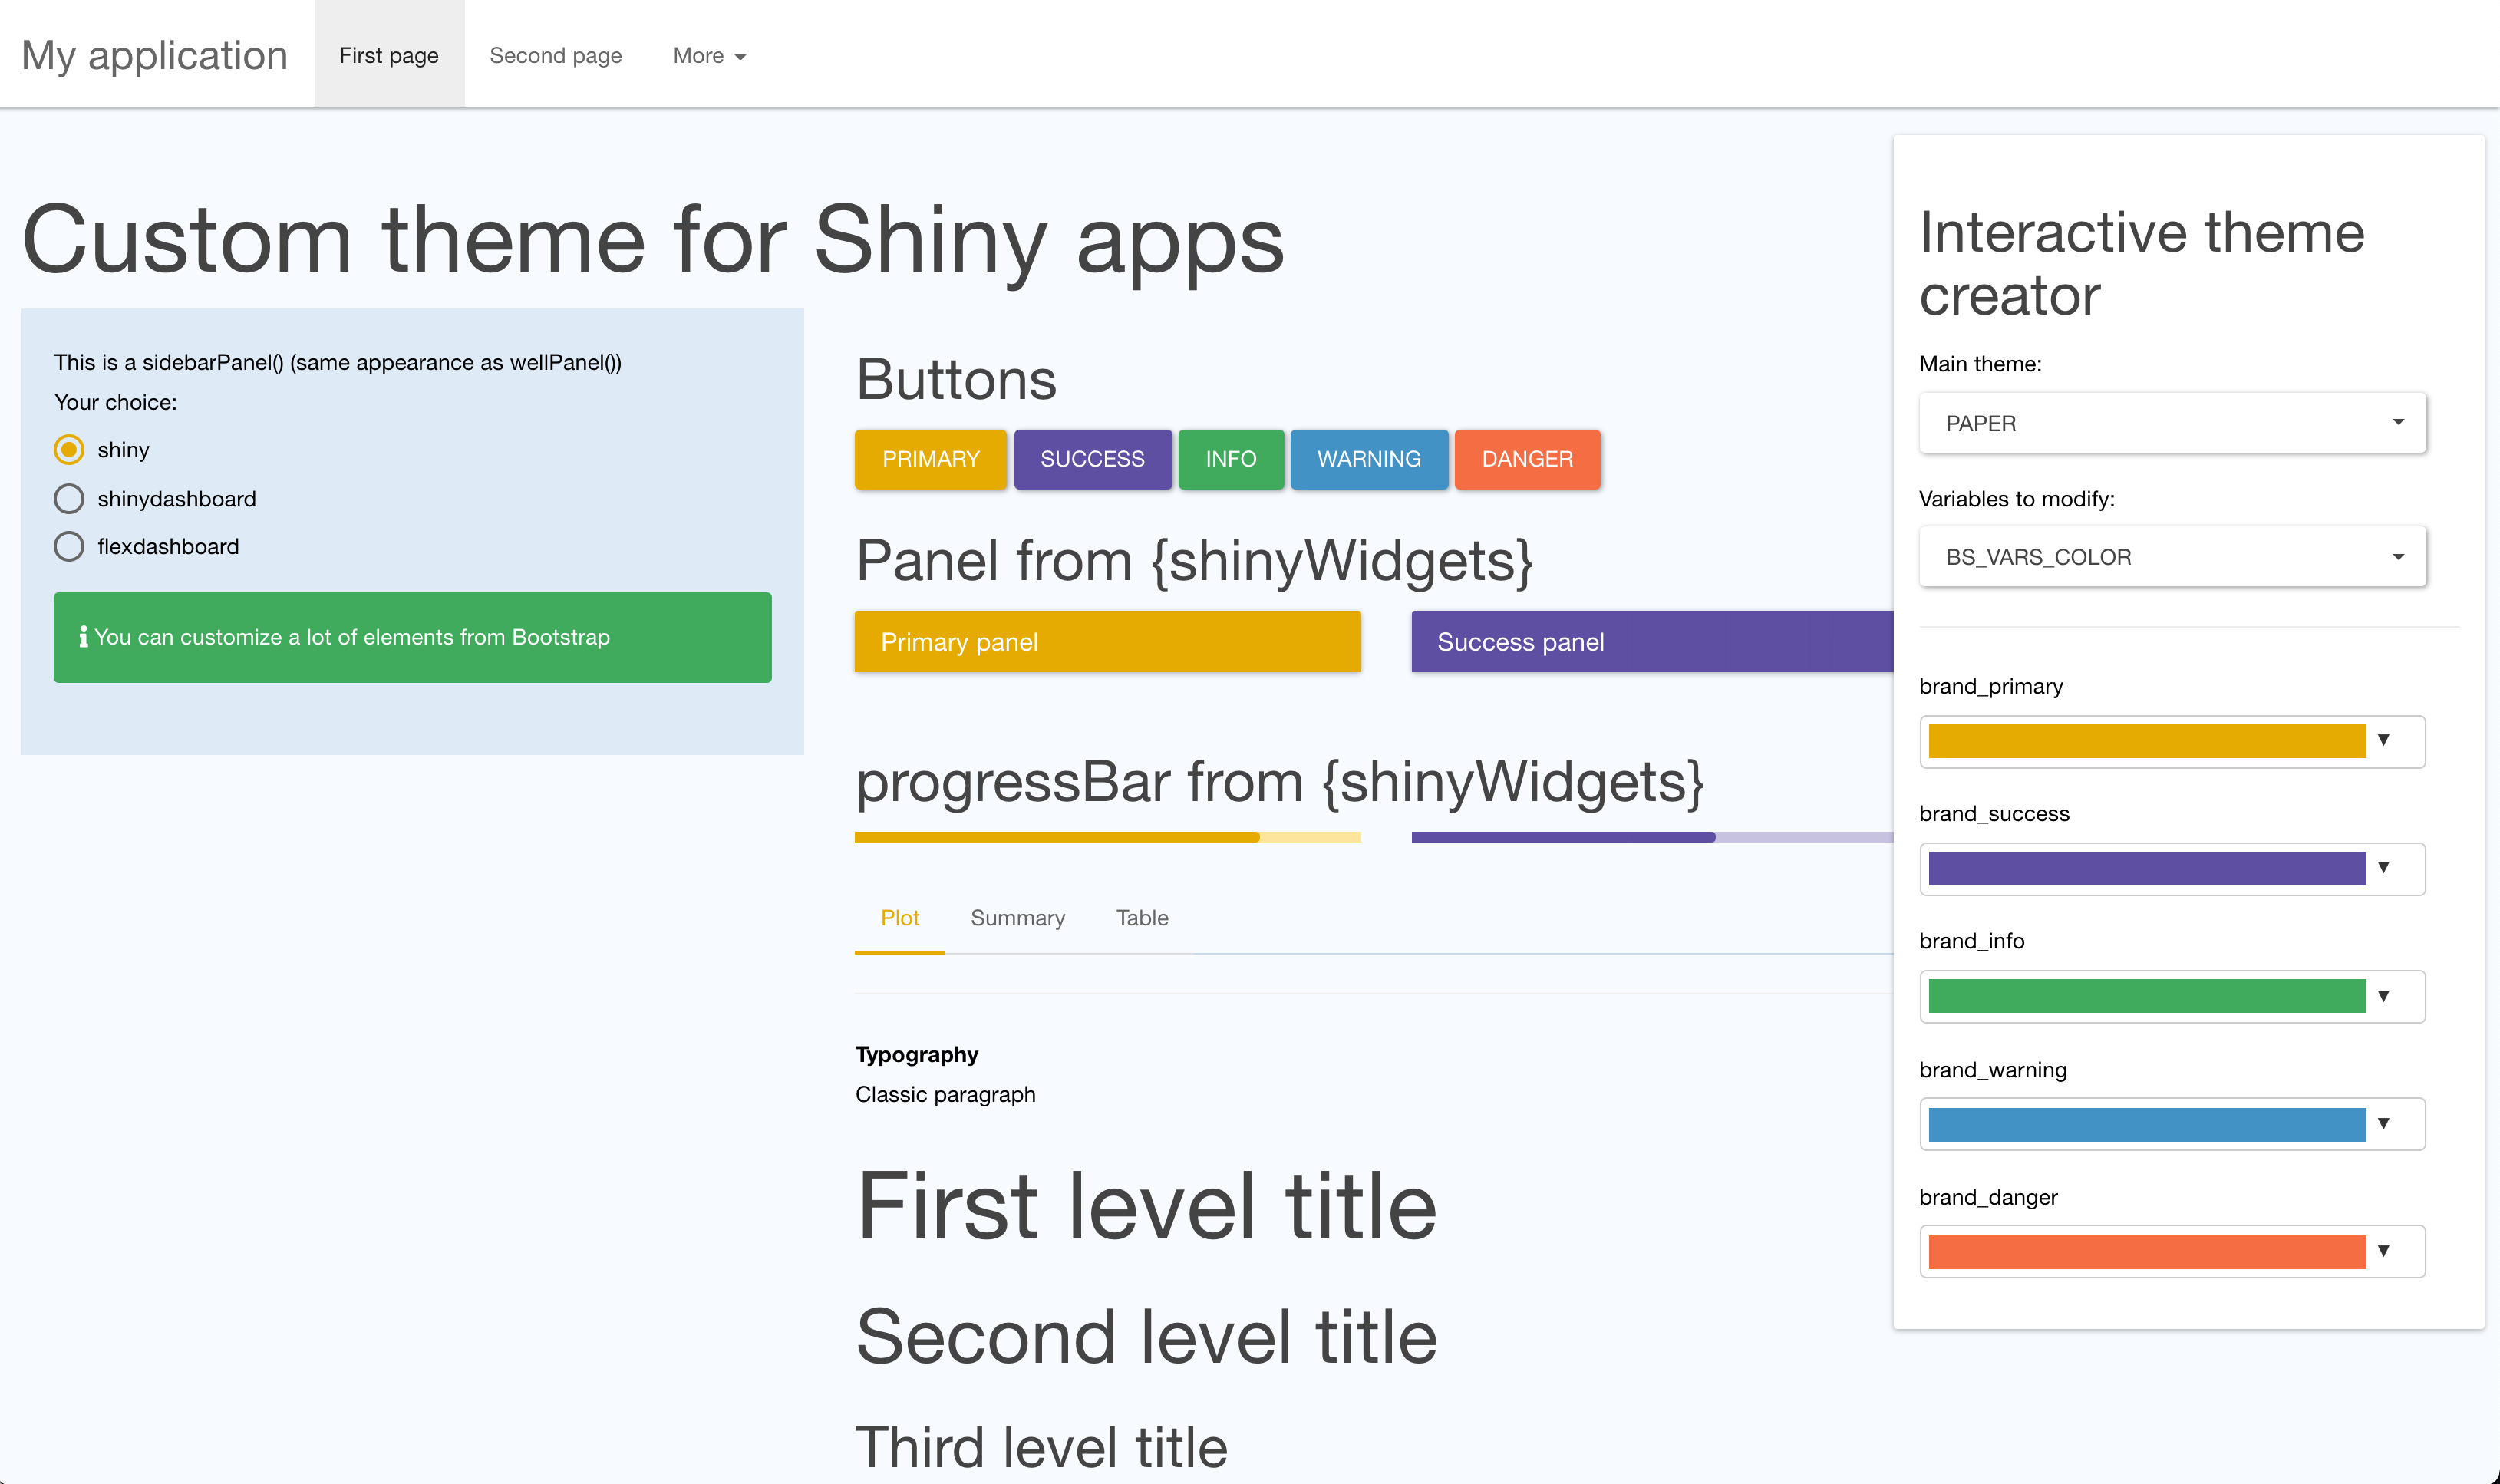
FIGURE 8.1: Live theming app with {fresh}.
8.1 {fresh}, the big picture
fresh is built on top of sass and what you see later in Figures 8.6 and 8.7 may be done in few minutes. To design a new theme, the main function is create_theme():
create_theme(
  ...,
  theme = c("default", "cerulean", ...),
  output_file = NULL,
  include_assets = FALSE
)
theme allows you to import a Bootswatch CSS theme; you may already know this if you ever used {shinythemes}. output_file controls the output. If provided, create_theme() creates a CSS file at the specified location. Otherwise, it returns a string value containing the compiles CSS. It is useful in a package context where you don’t necessarily want to generate a new theme each time. … is where we pass a list of CSS variables through bs4Dash_* (specific to bs4Dash), adminlte_* (for shinydashboard) or bs_vars_* (for classic shiny apps) functions, which we describe below.
In general, you’ll have to call use_theme() inside the app UI to load the newly generated theme.
Note that bs4Dash and shinydashboardPlus expose a freshTheme parameter, which handles the provided theme on the fly.
8.1.1 Customize {bs4Dash}
In what follows, we explain how to set a blue ocean theme in only few minutes.
8.1.1.1 Statuses and colors
In Chapter 7.6.1, we showed how to change bs4Dash color, with a few lines of Sass code. Guess what: fresh makes it even easier! The bs4dash_status() and bs4Dash_color() functions allow to overwrite all the default statuses and colors:
bs4dash_status(
  primary = NULL,
  secondary = NULL,
  success = NULL,
  info = NULL,
  warning = NULL,
  danger = NULL,
  light = NULL,
  dark = NULL
)

bs4dash_color(
  blue = NULL,
  lightblue = NULL,
  navy = NULL,
  cyan = NULL,
  teal = NULL,
  olive = NULL,
  green = NULL,
  # ...
)
By default, primary is blue but could become green with just one line of code. Do you recall section 7.6.1, where we customized bs4Dash colors with Sass? Let’s try again with fresh. We first create the new theme, passing it the new colors and injecting it inside the previously mentioned freshTheme parameter:
library(fresh)
custom_colors_theme <- create_theme(
  bs4dash_color(
    lightblue = "#136377",
    olive = "#d8bc66",
    lime = "#fcec0c",
    orange = "#978d01",
    maroon = "#58482c",
    gray_x_light = "#d1c5c0"
  )
)
The corresponding example may be run with:
### RUN ###
# OSUICode::run_example(
#  "fresh/bs4Dash-custom",
#   package = "OSUICode"
# )
To preview the code, use OSUICode::get_example("fresh/bs4Dash-custom").
Note that complex variable names like gray-x-light become gray_x_light!
Compared to the approach described in section 7.6.1, there a few advantages:
- We don’t have to specify the
AdminLTE.scsslocation, as fresh hosts it here. - We don’t have to look for all colors names as they are described along the
bs4dash_colorfunction definition. We even have a description of the default values (as well as statuses in bold), depicted in Figure 8.2 below.
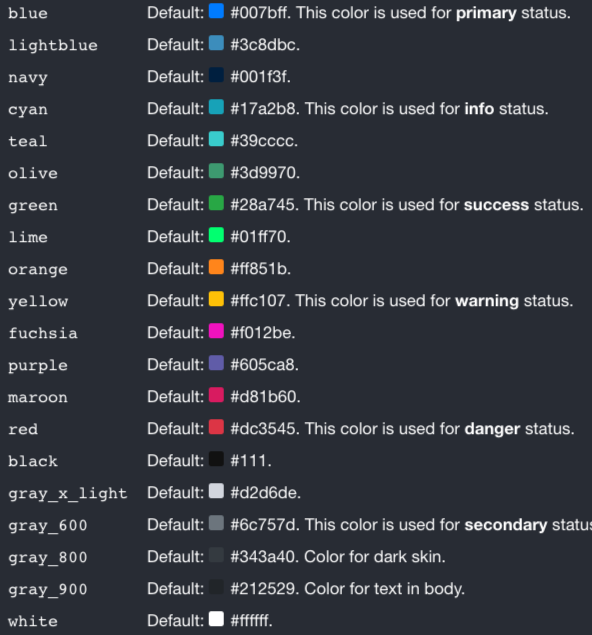
FIGURE 8.2: Default {bs4Dash} theme colors.
Corporate users will appreciate being able to set up a custom internal theme in minutes.
8.1.1.2 General Layout
bs4Dash_layout exposes variables to control the sidebar width when expanded or collapsed, the sidebar padding, the controlbar width, the main background color and the main content padding. For the blue ocean theme, we change the body background color passing a new value to the main_bg variable, as below (Figure 8.3):
layout_vars <- bs4dash_layout(main_bg = "#006994")
ocean_theme <- create_theme(layout_vars)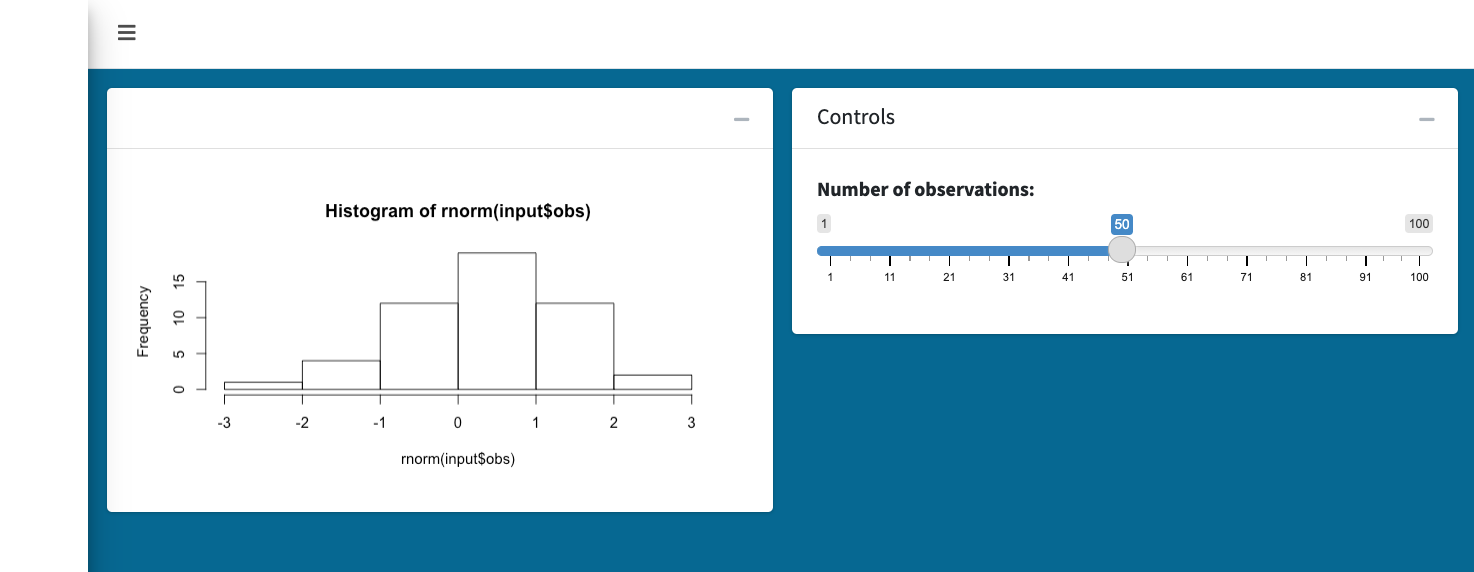
FIGURE 8.3: Customized body background color.
We acknowledge the result is not yet consistent, but it gives a small glimpse about the package capabilities.
8.1.1.4 Text color
The card text elements would not properly be styled without setting the white color to
the global ocean blue theme color, as they would render dark, which is a bad contrast option. Hence, we change the white and gray_900 colors with bs4dash_color().
inverted_colors <- bs4dash_color(
  gray_900 = "#fff",
  white = "#005475"
)
ocean_theme <- create_theme(
  layout_vars,
  navbar_vars,
  inverted_colors
)
8.1.1.5 Color contrast
bs4dash_yiq() fine-tunes the contrast between a given color and its background. It relies on the Bootstrap 4 color-yiq function, whose code may be found below. Interested readers will have a look at the following article, that explains better where this calculation is derived from.
@function color-yiq($color, $dark: $yiq-text-dark,
                    $light: $yiq-text-light) {
  $r: red($color);
  $g: green($color);
  $b: blue($color);

  $yiq: (($r * 299) + ($g * 587) + ($b * 114)) / 1000;

  @if ($yiq >= $yiq-contrasted-threshold) {
    @return $dark;
  } @else {
    @return $light;
  }
}
The function has three major steps:
- Given a color, we extract its three components in the rgb space.
- The
yiqvalue is computed from these contributions, according to the above formula. - The threshold determines the final color value. If
yiqis higher than the threshold, the color is black. Conversely, ifyiqis lower than the threshold, the resulting color is white.
As an example, let’s apply this to the default AdminLTE3 primary color #0073b7, with a threshold value of 150. We included an extra parameters to the color-yiq function, that represents the threshold value (defaulting to 150).
We utilize knowledge from Chapter 7, particularly, the sass_layer() function to separate functions/mixins from rules and defaults:
color_yiq <- "
  @function color-yiq($color, $threshold: 150,
  $dark: $yiq-text-dark, $light: $yiq-text-light) {
    $r: red($color);
    $g: green($color);
    $b: blue($color);

    $yiq: (($r * 299) + ($g * 587) + ($b * 114)) / 1000;

    @if ($yiq >= $threshold) {
      @return $dark;
    } @else {
      @return $light;
    }
  }
"

background <- "
  $bg: #0073b7 !default;
  $yiq-text-dark: #111 !default;
  $yiq-text-light: #fff !default;
"
test_contrast <- ".test { background: color-yiq($bg); }"
sass(
  sass_layer(
    defaults = background,
    declarations = color_yiq,
    rules = test_contrast
  )
)
#> <style>.test {
#> background: #fff;
#> }
#> </style>Wait a moment: bs4dash_yiq() does not expose any color parameter! Indeed, the color is already implicitly applied by the AdminLTE Sass code.
As a last example, we design an app with a slider input controlling the contrast threshold and a radio input color picker to set the box current status color. We dynamically call bs4dash_yiq() and create_theme, with an initial threshold of 150 (Bootstrap default) and a dark and light values set to primary and white, respectively. The initial status is primary (blue), and as shown above, we expect the yiq value to be lower than the threshold since the blue color has a relatively light weight for the calculation, thereby fixing the background text color to white. As an exercise, you may try to reduce the threshold until the text becomes black. What is the threshold value. Then, replace the card status from primary to warning. What happens? Why? As yellow is made of green and red, which have the highest contributions in the yiq calculation, this result is not surprising!
### RUN ###
# OSUICode::run_example(
#  "fresh/color-contrast",
#   package = "OSUICode"
# )
The output is shown Figure 8.4.
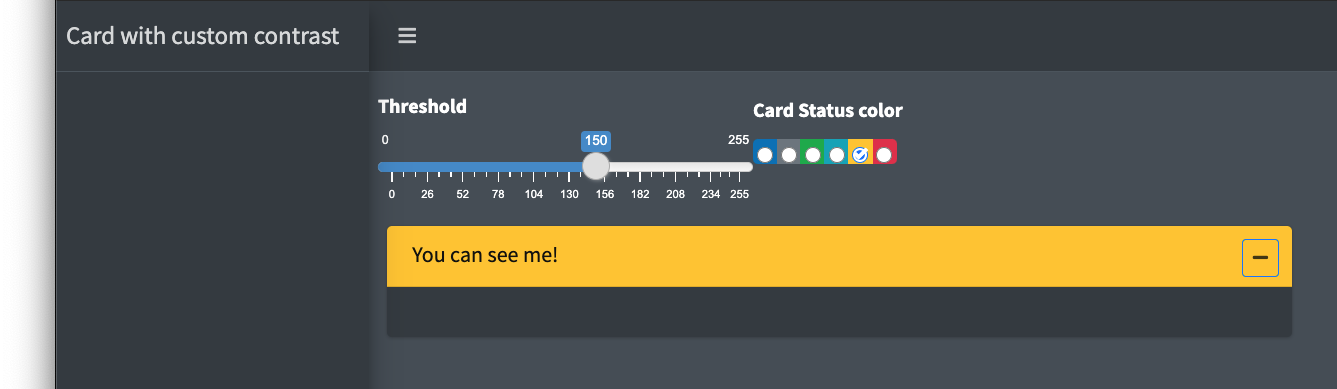
FIGURE 8.4: Color contrast function in action.
8.1.1.6 Sidebar
Like dashboardHeader(), dashboardSidebar() exposes two flavors, namely light and dark. Since we set the sidebar to be light, we leverage the bs4Dash_sidebar_light() helper. We set the main background (bg variable) to ocean blue and set the menu color (color variable) to white, so as to have a better contrast. Additionally, we invert the text_dark and text_light colors for an even better contrast with bs4dash_yiq(). In short, the higher the contrasted_threshold parameter the less sensitive is the change.
sidebar_vars <- list(
  bs4dash_yiq(
    contrasted_threshold = 10,
    text_dark = "#FFF",
    text_light = "#272c30"
  ),
  bs4dash_sidebar_light(
    bg = "#005475",
    color = "#FFF",
    hover_color = "#FFF",
    submenu_color = "#FFF",
    submenu_hover_color = "#FFF"
  )
)
ocean_theme <- create_theme(
  layout_vars,
  navbar_vars,
  inverted_colors,
  sidebar_vars
)
As the fresh theme does not apply to static plots, since they are not HTML element and not part of the DOM, we leverage the {thematic} package, that in short, provides a sort of CSS interface for base R plots, ggplot and lattice. Specifically, in the Shiny context, we choose thematic_shiny(). By default, it sets the appropriate background, foreground and accent colors. The final product is shown Figure 8.5 and may be run as per below code:
### RUN ###
# OSUICode::run_example(
#  "fresh/bs4Dash-ocean-theme",
#   package = "OSUICode"
# )
You may notice the inappropriate sliderInput() style. This is because it is not a Bootstrap 4 element. In this case, you’ll have to create custom CSS rules targeting the slider labels and scale.
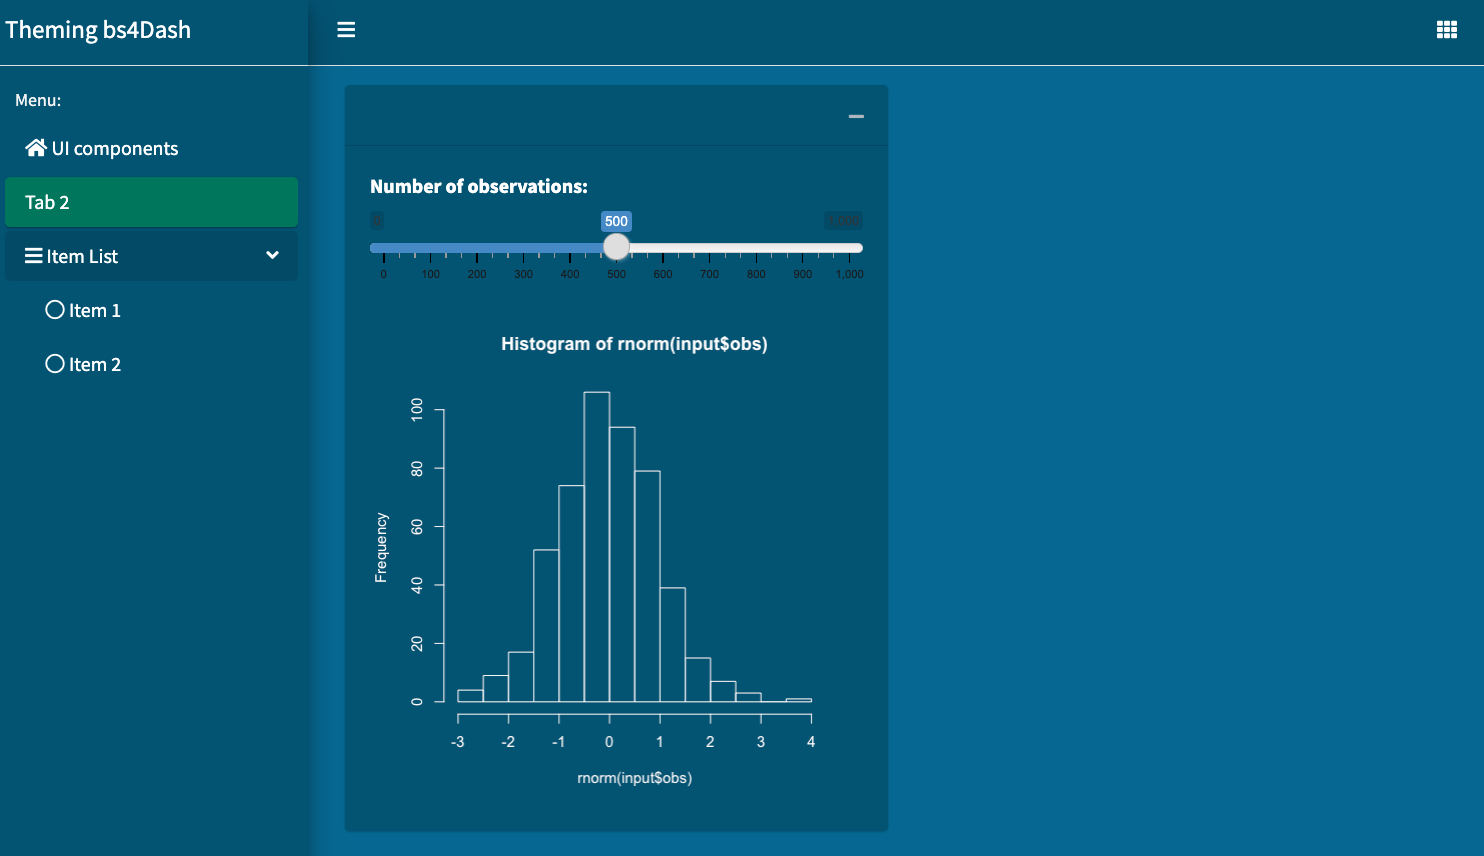
FIGURE 8.5: Ocean theme for {bs4Dash}.
Below is another example of a custom dark theme, whose code may be found right after Figure 8.6.
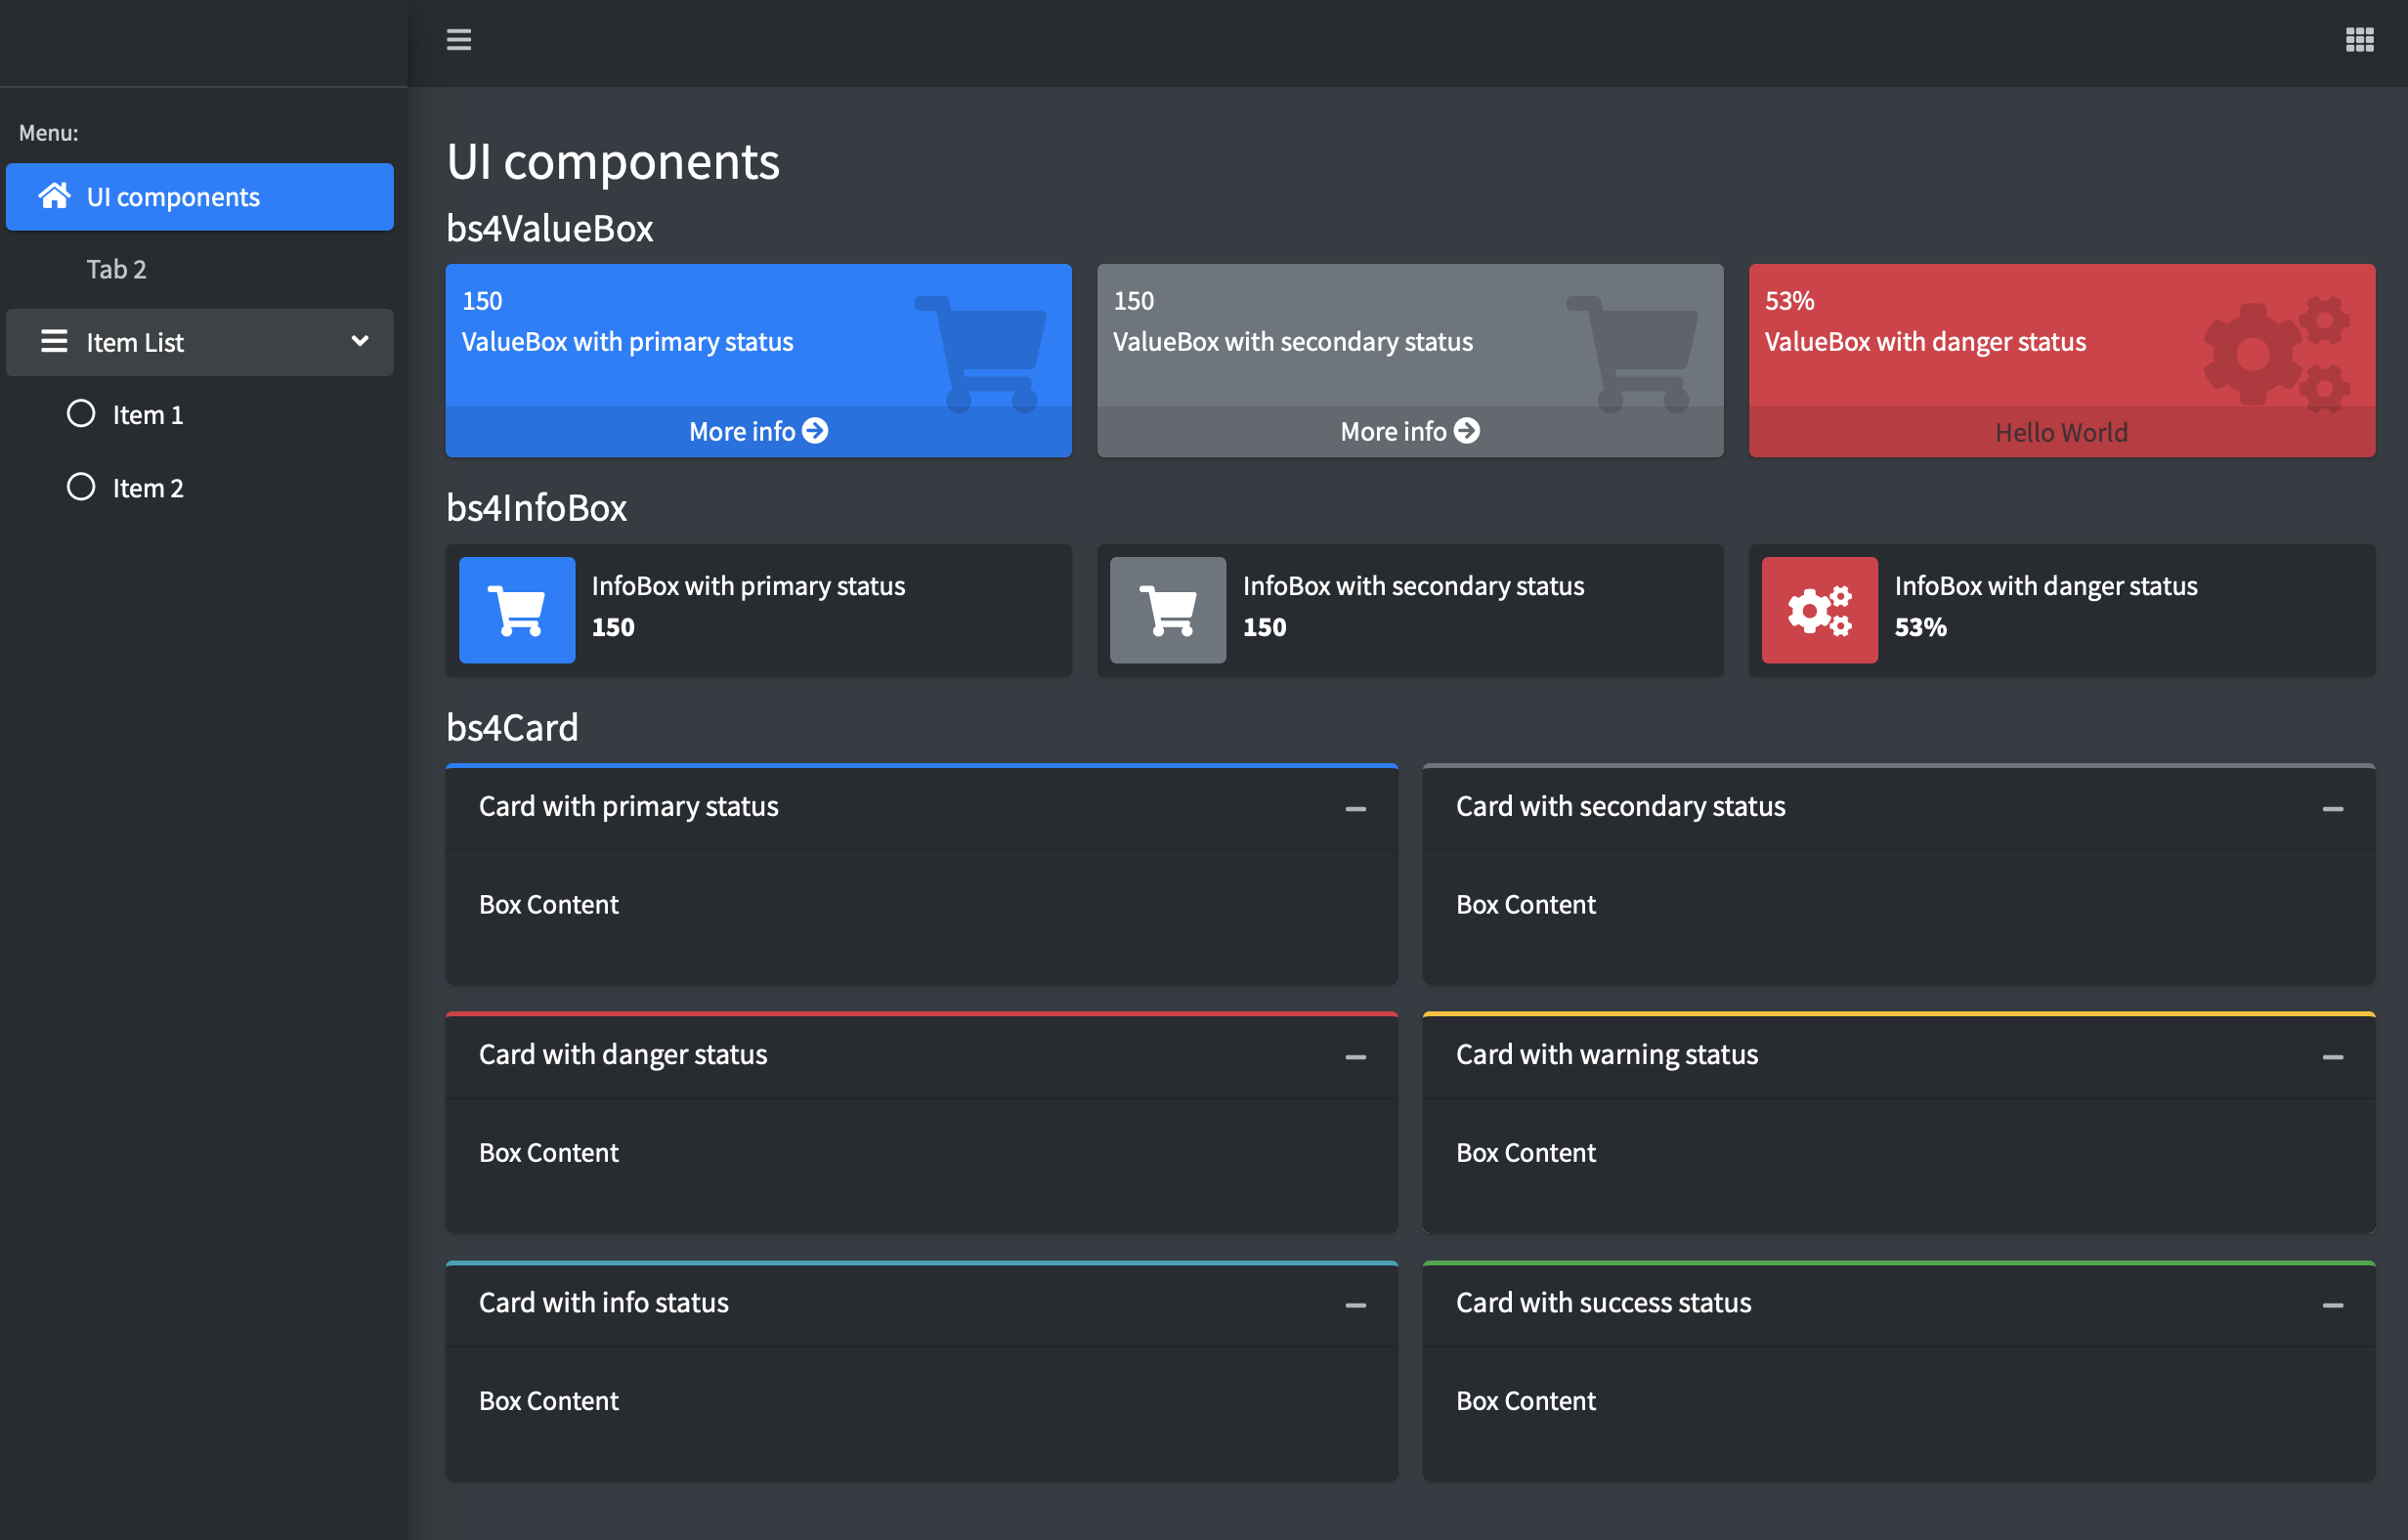
FIGURE 8.6: Few lines of code to create a {bs4Dash} dark theme.
dark_theme <- create_theme(
  bs4dash_vars(
    navbar_light_color = "#bec5cb",
    navbar_light_active_color = "#FFF",
    navbar_light_hover_color = "#FFF"
  ),
  bs4dash_yiq(
    contrasted_threshold = 10,
    text_dark = "#FFF",
    text_light = "#272c30"
  ),
  bs4dash_layout(main_bg = "#353c42"),
  bs4dash_sidebar_dark(
    bg = "#272c30",
    color = "#bec5cb",
    hover_color = "#FFF",
    submenu_bg = "#272c30",
    submenu_color = "#FFF",
    submenu_hover_color = "#FFF"
  ),
  bs4dash_status(dark = "#272c30"),
  bs4dash_color(gray_900 = "#FFF", white = "#272c30")
)
### RUN ###
# OSUICode::run_example(
#  "fresh/bs4Dash-dark-theme",
#   package = "OSUICode"
# )
8.1.2 Customize {shinydashboard}
Similarly, fresh supports shinydashboard-powered apps. In few lines of code, you may definitely provide a cyberpunk look and feel to your favorite Shiny dashboard (Figure 8.7). shinydashboardPlus (v2) has a plug and play support for fresh, where the theme has to be passed to the dashboardPage freshTheme parameter (it would also seamlessly work with shinydashboard). We start by creating the theme with adminlte_colors(), adminlte_sidebar() and adminlte_global():
cyberpunk_theme <- create_theme(
  adminlte_color(
    green = "#3fff2d",
    blue = "#2635ff",
    red = " #ff2b2b",
    yellow = "#feff6e",
    fuchsia = "#ff5bf8",
    navy = "#374c92",
    purple = "#615cbf",
    maroon = "#b659c9",
    light_blue = "#5691cc"
  ),
  adminlte_sidebar(
    dark_bg = "#D8DEE9",
    dark_hover_bg = "#81A1C1",
    dark_color = "#2E3440"
  ),
  adminlte_global(
    content_bg = "#aaaaaa"
  )
)
The demonstration may be run with the following code, the result being shown in Figure 8.7:
### RUN ###
# OSUICode::run_example(
#  "fresh/shinydashboardPlus-cyberpunk",
#   package = "OSUICode"
# ) 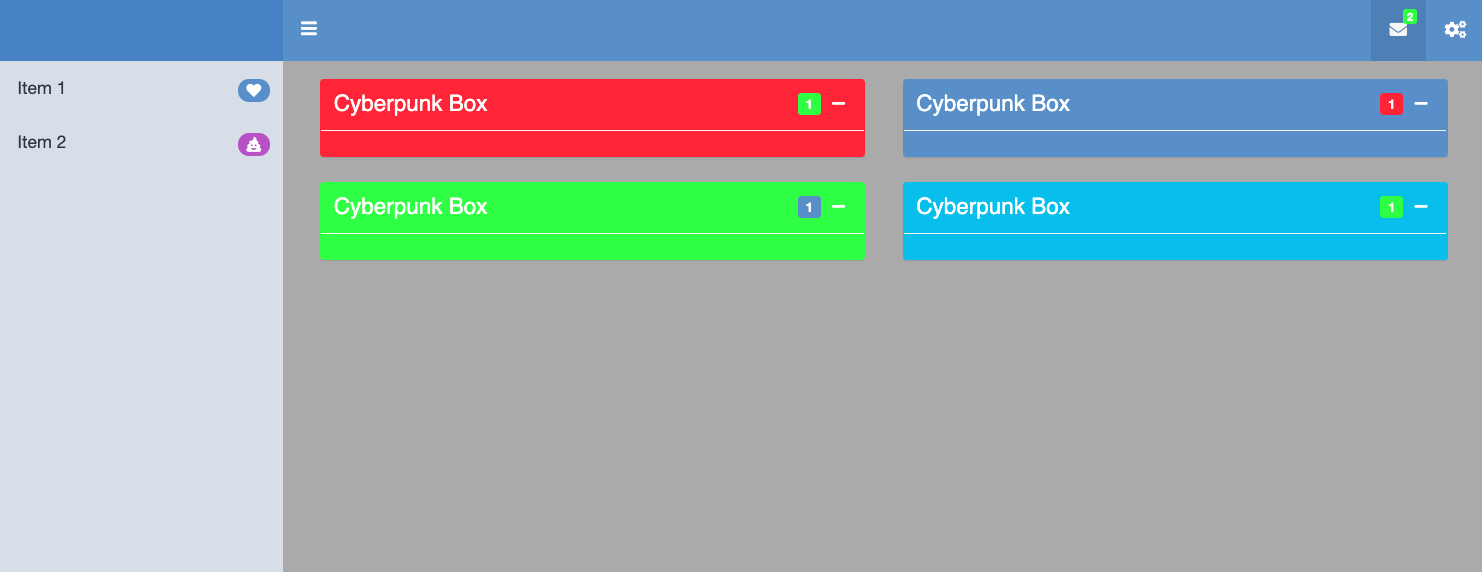
FIGURE 8.7: Cyberpunk shinydashboard.